Butternut Squash and Lentil Salad

Warm foods during the cold winter days just makes so much sense.  And I don’t just mean temperature but the actual foods and their properties.

When you eat warm foods, they take longer to digest because they are higher in healthy fats, proteins, and carbohydrates which in turn results in increased body temperature (thermogenesis).  Root veggies, fruits such as coconut and apples, and herbs and spices are a few examples of these types of foods.

This Butternut Squash and Lentil Salad is a great combination of many of those warm foods and the fact that it’s filled with flavor, texture, sweet, and spicy makes this that much more of a delicious dish.

This is perfect to make as an entree or a side dish, or serve it up in mini bowls/plates as an appetizer.  A small amount will take you a long way as the salad is very filling.

I honestly think this is one of the most nutrient dense recipes I have.  Here are a few healthy benefits from this one:

  • Rich in Fiber and Protein
  • Packed with antioxidants
  • Boosts Immune System
  • Good source of Vit. C, E, and B6
  • Good source of Calcium, Iron, and Folate
  • Good source of omega 3 and carotenoids which have anti-inflammatory effects beneficial to all types of arthritis (Butternut Squash)
  • Boost in energy level (Lentils)

The list can literally go on about how healthy this salad is, which only adds to the deliciousness of it.

From my kitchen to yours, I really hope you enjoy this Butternut Squash and Lentil Salad.

Butternut Squash and Thyme Risotto Yum

One of my favorite Italian dishes is risotto.  It’s so creamy, decadent, and delicious.  I started experimenting with the basics of making risotto about 9 months ago.
When I first started making it, I was a little intimidated.  To be honest, I had to work up my nerve to attempt it for quite a while as I had heard stories about how hard it is to make risotto.  One day, I decided to just go for it.  If nothing else, I have frozen pizza to serve the family.  (Yep, I always have frozen pizza on hand …. though, currently I stock this amazing cauliflower crust pizza with veggies on top.  Ummm, anyways, story for another time.)
wp-1585664509695.jpg
I must have looked through a dozen recipes to see which didn’t intimidate me and seemed the easiest.  In hindsight, they are all easy.  You see, I think people get overwhelmed with the idea that you have to babysit this dish.  You literally do.  It’s not a quick and easy weeknight dinner but it is an amazing labor of love.  From start to finish, I would say cooking this specific dish (we’re including the time to roast the squash), I spent about an hour in front of the stove.  About 80% of that is stirring the risotto so it doesn’t stick, 10% was prep work and 10% was zoning out the kids while they screamed their latest rock concert with Frozen lyrics.
wp-1585664508500.jpg
The secret to a perfect risotto, you have to stir the broth in one ladle at a time.  Yep, a bit tedious, but this is definitely one of those times where patience brings very delectable rewards.
wp-1585422275201.jpg
During my extensive research to find an “easy” recipe for risotto, I also looked into why I couldn’t just add the broth all at once.  One reason that I found for adding the broth slowly is that by doing so, the rice releases the starch slowly and therefore, giving the dish its creamy texture.  Adding the broth all at once, covering it and leaving it to cook can ruin your risotto in two different ways.  One, the water will sit at the bottom from lack of stirring the risotto and can burn the dish from the bottom.  Second, instead of giving the risotto its creamy texture, dumping the broth all at once can make break the rice and make it mushy rather than keeping the rice kernels whole but cooked and creamy.


I know this seems like a lot but really, it’s just reinforcing the fact that you need to add your broth slowly and you will have an amazing risotto.
wp-1585664508642.jpg
The only other tip I want to add is to constantly check for salt.  I used veggie bouillon combined with water for my broth in this recipe.  You can use a low sodium broth also.  The bouillons tend to have a higher sodium content so don’t add salt until you’ve tasted it.  The parmesan cheese also brings a lot of salt content with it.  The last thing you want to end up with a salty risotto you can barely eat (trust me, I’ve done this too.  Speaking from unfortunate experience).  Keep tasting as you go.
Fun fact, arborio rice looks very similar to idli rice.  In fact, I picked it up and almost used it before I realized there was a slight difference.  The idli rice is a little plumper than arborio.  Of course, I did more research and found that idli rice can be used as a substitute for arborio because of its a medium grain.  When you compare the two side by side, they look very similar.

From my kitchen to yours, Enjoy!

Ingredients:
1½ c butternut squash, cubed
1 ½ c arborio rice
1 med onion, diced finely
5 cloves garlic, minced
3 Tbsp thyme, roughly chopped
6 c veggie broth
1 c Parmesan cheese
¾ tsp salt
1 tsp ground black pepper
2 Tbsp Oil (Avo or EVOO)

Directions:
Preheat oven to 400ºF.  Toss squash with 1 Tbsp oil, salt and pepper.  Spread out on a baking sheet and bake for 20-25 minutes.
In a large pot, heat veggie broth until it comes to a boil, then lower the heat to low and cover.
Meanwhile, In a deep and wide pan, heat oil and add onions.  Cook for 7-8 minutes until they are cooked through and translucent.
Add in the garlic and cook for 1 minute on med-low flame.  Add in the risotto and 2 Tbsp thyme and cook for 8-10 minutes until the rice is toasted and has a light golden red color to it.
Add in 1 ladle of broth and wait for it to burn off while you keep stirring the risotto.  As it burns off.  Keep adding the broth 1 ladle at a time until you use up all of the broth.  As the risotto cooks with the broth, you’ll notice it getting plumper and creamier.  When all of the broth is used up, and cooked into the risotto, the texture should be thick and creamy.  Turn off the heat and mix in ¾ c Parmesan and mix well.
Add in the butternut squash and remaining thyme and mix.
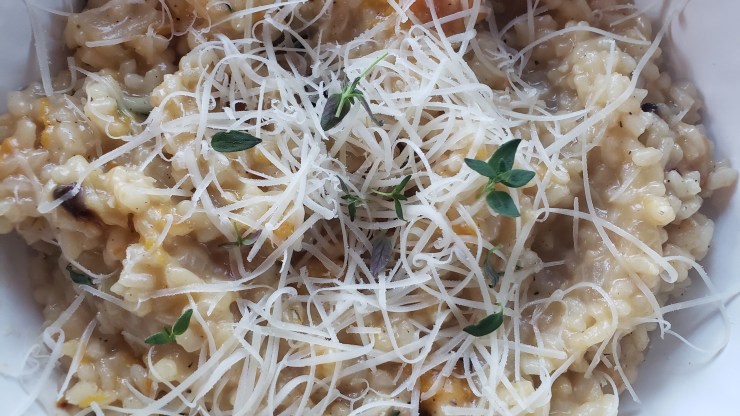
Serve hot into bowl and garnish with some of the remaining Parmesan cheese.

Enjoy!

Polenta & Veggie Pot Pie

I love rainy days!  All I want to do is curl up with a blanket in front of the fireplace, read a book with a cup of chai in my hand.  That probably won’t happen till my kids are off to school.

In the meantime, I decided to put together a hearty stew that warms you from your fingers to your toes.  I took the stew a little further and decided to put a spin on it.  I made cute pot pies but instead of the traditional pastry shell, I used polenta and cheese for the crust.  It tasted so delicious, the creamy polenta and the melted cheese just got all of us, especially my daughter hooked!

20180226_183825.jpg

I have these cute little Le Creuset cocottes that I got as a gift from our close friends a few years ago and thought my 2.5 year old will get a kick out of eating from it.  And boy was I right!  She insisted on eating her leftovers the next day from these adorable pots!  I was just happy she loved the stew as much as the cocottes!

20180226_184128.jpg

I hope these warm you up on a cold rainy (or snowy) day like it did us!

Ingredients:
½ onion, chopped finely
1c cubed butternut squash
1 jalapeño, seeded and chopped
2 cloves garlic, minced
1 14.5oz can black beans, drained and rinsed
¼c AP flour
2Tbsp tomato paste
2Tbsp cayenne pepper
1tsp smoked paprika
1tsp cumin powder
¼tsp oregano
½tsp salt (or to taste)
¼tsp ground black pepper
2c veggie broth
1Tbsp Sriracha sauce
¼c milk
2Tbsp EVOO

For the Polenta:
2c Veggie Broth
2c milk
1c Polenta
¼tsp salt
¼tsp pepper
3Tbsp Butter
3oz sharp cheddar cheese, shredded

Directions:
Preheat oven to 400ºF.

In a nonstick pan, over medium heat, add EVOO.  Once the oil is heated, add onions and sauté for a couple of minutes.  Add garlic and cook for another 30 seconds.  Now add the butternut squash and for about 10 minutes or until it becomes tender.  Make sure you don’t over cook it as the squash can get a mushy texture.  Add in all the dry spices and mix well.  Cook with the spices for a 1-2 minutes so they bloom and flavor the squash.  Now, sprinkle in the flour.  Stir for about 3 minutes so the flour cooks.  If the flour doesn’t cook through, you’ll be able to taste a raw, gritty flavor which is so unappetizing.  Add the veggie broth, tomato paste, and Sriracha, raise to a simmer and cook until it has thickened.  Once it has thickened, add in the milk and black beans.  Cook for another 5 minutes.  Taste and adjust for salt.

Spoon the mixture into 4 individual baking dishes or one pie pan and place on a baking sheet with a 2 inch lip.

For the polenta, add the veggie broth and milk in a saucepan and bring to a boil.  Lower the heat and whisk in the polenta slowly.  If you add it all at once, the polenta will be lumpy and not cook through.  Keep stirring until the polenta thickens, approximately 10-12 minutes.  Add in the butter and season with salt and pepper.  Spoon the polenta over the pot pie filling and top with cheese.

Bake in the oven for about 18-20 minutes or until the polenta is golden brown and the cheese is melted.
Remove from oven, garnish with fresh parsley and let it warm you to your toes as you dig in to this deliciousness!

20180226_184130.jpg

Roasted Butternut Squash Soup

There have been a series of storms lately with only rain in the forecast.  Days like these always make me yearn for the some warm soup in front of the fireplace.  The fireplace didn’t happen, but here’s how I put my twist of Thai and Indian fusion on Butternut Squash Soup.

wp-1490376371081.jpg

Heat the oven to 375º.  Add butternut squash to a sheet pan and drizzle with EVOO.  Add salt and pepper and toss so that all the cubes are evenly coated.  Bake for 45 minutes.

wp-1490376362204.jpg

The aroma as these are baking in the oven fills my whole house and has me salivating.  The 45 minutes seem so long but these nuggets are so sweet and delicious when they’re done.   Let’s be honest… I definitely dipped into these and a little more than “a couple” were gone!  Luckily, I had enough left to make soup!

wp-1490376348179.jpgIn a pot deep enough to make the soup, sauté onions until they are soft and starting to turn a little translucent.  While the onions are cooking, grate in fresh ginger.

The fresh ginger adds a great zing and I love watching it sizzle as I grate it straight into the pot.

wp-1490376340983.jpg

Next, I added all the spices – this is where the Indian comes in.  Cayenne, Cumin, Coriander, and Turmeric.  Mix it for a couple of minutes so you don’t have an uncooked taste of the spices in your soup.  If you don’t like spicy too much, feel free to cut out the cayenne pepper.

wp-1490376336070.jpg

Finally, add in the roasted butternut squash and mix everything together.  Add the veggie broth, and a little salt and pepper.  You’ll probably want to taste at this point.  Remember, the squash already had salt on it before you roasted it so you’re really adding enough to bring out the flavors of the spices at this point.  Once it boils, add lemon juice, basil and the coconut milk to it (my Thai inspiration).  With an immersion blender, blend everything so you have a nice, smooth texture.

wp-1490376319089.jpg

Let it simmer for an additional 10-15 minutes.  Enjoy with your favorite nostalgic memories.

Ingredients:
1 butternut squash, seeded and cubed
1 med red onion, chopped finely
3 Tbsp grated ginger
1/2 tsp cayenne pepper
2 tsp ground coriander
1 tsp cumin seeds
1/2 tsp turmeric powder
1/4 tsp cinnamon powder
4 c Veggie broth
1/4 c fresh basil, chopped
1 can coconut milk
salt to taste
black pepper to taste

Recipe:
Heat the oven to 375º.  Add butternut squash to a sheet pan and drizzle with EVOO.  Add salt and pepper and toss so that all the cubes are evenly coated.  Bake for 45 minutes.
Heat EVOO in a soup pot on medium heat and add onions.  Add in freshly grated ginger and sauté 5-10 minutes until onions are soft and translucent.  Add in cayenne pepper, coriander powder, cumin seeds, turmeric powder, and cinnamon powder and mix well.  Add the roasted squash, veggie broth and salt and pepper.  Once it boils, add lemon juice, basil and the coconut milk.  With an immersion blender, blend everything so you have a nice, smooth texture.  Let it simmer for an additional 10-15 minutes.  Serve hot.

Basil Butternut Squash Lasagna

20151002_195403

Fall is here and that means squash is everywhere.  So many different kinds but butternut squash is one of my favorites.  I experimented with Giada de Laurentiis’ recipe for Butternut Squash Lasagna and since then, I’ve made a few changes of my own.  This recipe is great to serve for a dinner party, or even to have for lunch leftovers.  If you want the original recipe, I’ll post a link at the end of this blog post.  But for the moment, here’s my version.

Ingredients:
1Tbsp olive oil
1 whole butternut squash, peeled, seeded, and cut into 1-inch cubes
Salt and freshly ground black pepper
1/2c water
1/4c butter
1/4c all-purpose flour
3 1/2c low-fat milk
Pinch nutmeg
3/4c (tightly packed) fresh basil leaves
1c fresh basil leaves, chopped
12 no-boil lasagna noodles
2 1/2c shredded low-fat mozzarella cheese

Directions:

Add the squash in a heavy large pot full of boiling water.  Cover and simmer over medium heat until the squash is tender – it’ll take about 20-30 minutes.  Spoon out the squash and let it cool for 5 minutes.  Add to food processor and blend until smooth.  Season with salt and pepper to taste.

Melt the butter in a heavy medium-size saucepan over medium heat. Add the flour and whisk for 1 minute. Gradually whisk in the milk. Bring to a boil over medium-high heat. Reduce the heat and simmer until the sauce thickens slightly, whisking often, about 5 minutes.  Add the nutmeg and mix well.  Cool slightly. Transfer half of the sauce to a blender. Add the 3/4 of the basil and blend until smooth. Return the basil sauce to the sauce in the pan and stir to blend. Season the sauce with salt and pepper, to taste.

Preheat to 375 degrees F.  Spread a ladle of the sauce in a baking dish. Arrange 3 lasagna noodles on the bottom of the pan. Spread a little squash puree over the noodles. Sprinkle with mozzarella cheese. Drizzle some more sauce over the noodles.  In the second layer, sprinkle the cup of chopped basil.  Continue layering and top with mozarella cheese.

20151002_192341Tightly cover the baking dish with foil and refrigerate for at least 1 hour.  I found that this makes the sauce not bubble over and the flavors are so much more vibrant.  Bake the lasagna for 40 minutes.  Let the lasagna stand for 15 minutes before serving.  Garnish with some fresh basil.

*Here is the link to the original recipe by Giada de Laurentiis: Butternut Squash Lasagna