Pineapple Fried Rice

I’m all about summer and summer foods these days.  This Pineapple Fried Rice is the perfect balance between sweet, spicy, crunchy, soft, and a burst of flavors.  Best of all, it takes 20 minutes to make!  A fun weeknight recipe, or a weekend recipe with some Thai Curry on the side.  Go ahead, try this out and bring a taste of Thailand to your home.
Continue reading “Pineapple Fried Rice”

Tropical Fruit Smoothie

This is the most perfect afternoon drink on a hot summer day.  We’ve had temps in the high 90’s and low 100’s lately so we’ve been making ice cold drinks to stay cool.  One of our favorite is this Tropical Fruit Smoothie.  Though we can’t be in the tropics, the girls and I decided to bring the flavors of the tropics home.  Continue reading “Tropical Fruit Smoothie”

Fresco Carpaccio

So, traditionally, a carpaccio is an appetizer made of thinly sliced meat.  I decided to take the technique and make my own summer version of that.  The sharp tang of lemon, the fresh fruit, and the crunch of toasted pistachios on top are an amazing combination.  This Fresco Carpaccio is great as an appetizer for any dinner or party you are hosting, or just follow what I did and make a plate for yourself, and enjoy it in the sun!
wp-1590599555473.jpg
Yum
I really didn’t want to stop eating it!  Hubby and I finished it within minutes and this has become another of our favorite summer recipe.
wp-1590599560914.jpg
The best part, this is so healthy for you with not too many calories or fat, there’s no cooking involved, and it takes 10 minutes to make (I’m not counting how long you have to wait for it to marinate).
wp-1590599561161.jpg
wp-1590599556324.jpg
Notes:

I highly recommend marinating this as the flavor of the dressing will be sharper and will help breakdown the raw taste of the zucchini since you are not cooking it.

I used a mandolin for this but if you don’t have one, no worries.  Use a potato peeler and make thin ribbons of the zucchini and cucumbers.

What fruits and veggies will you use?  Share your pictures!

From my kitchen to yours, enjoy this carpaccio as much as we did!

Ingredients:  
1 zucchini
1 cucumber
1 avocado
1 lemon, zested and juiced
¼ c Avocado Oil
2 Tbsp pistachios
Salt to taste
Pepper to taste

Directions:  
1.  In a large bowl, mix together lemon zest and lemon juice.  Whisk to mix well.
2.  Add in oil and whisk 2-3 minutes until oil and lemon juice have emulsified.
3.  Add in salt and pepper and whisk one last time to mix.  Set aside.
4.  Trim the ends of the zucchini and cucumber.  Using slicer or peeler, make very thin ribbons.
5.  Add zucchini and cucumber ribbons to dressing and toss to coat each ribbon equally.
6.  Cover bowl and marinate in fridge for 30 minutes.
7.  Meanwhile, on a med flame, heat up a small skillet.  Add in the pistachios and toast 3-5 minutes until they are nice and crunchy.
8.  Give the toasted pistachios a rough chop and set aside.
9.  Pull zucchini and cucumber out of fridge.
10.  Thinly slice avocado.
11.  In a plate, line up each fruit with one slightly on top of the previous one.  If you have any dressing left, drizzle a little on top.  Garnish with toasted pistachios.

Enjoy!

Aloo Paratha Yum

Aloo parathas are a standard in any Indian household, especially for breakfast/brunch on the weekends.  Traditionally a Punjabi dish, it is popular amongst everyone for its taste, and the nostalgic reminder of home. Continue reading “Aloo Paratha Yum

Root Vegetable Salad Yum

Root vegetables are so versatile in any recipe you use.  They can be roasted, baked, sautéed, mashed or even eaten raw!  They have an earthy taste when raw that turns sweet when you cook them.  Continue reading “Root Vegetable Salad Yum

Rainbow Lentil Stew Yum

Rainy days always inspire a bowl of soup from my kitchen.  This particular stew is inspired from my love of including rainbows in my food.  Even better, it’s a one pot meal that’s easy to make with staple ingredients already in your pantry/fridge. Continue reading “Rainbow Lentil Stew Yum

Rainy days always inspire a bowl of soup from my kitchen.  This particular stew is inspired from my love of including rainbows in my food.  Even better, it’s a one pot meal that’s easy to make with staple ingredients already in your pantry/fridge. Continue reading “Rainbow Lentil Stew Yum

Spinach Dal Yum

Both the girls need their dal (lentils) at least once a week and I love it!  It makes me so happy that they turn to Indian food for comfort and norm.  I try to vary out the dals that I feed them so they get a variety of nutrients and flavors and I get to rotate my lentils. Continue reading “Spinach Dal Yum

Apple Pie Oatmeal Yum

I really had to find a way to sell eating oatmeal to my kids.  We went through a phase where they loved oatmeal then, for the past 6 months, just the name would send them running in fear as if I was punishing them.

So, what does any desperate mother do?  Change the name, feed the same food, and take the win.  Seriously, I love this game where they think they won, and I know I definitely did!
wp-1586872927704.jpg

When I first started making steel cut oats, it was a dump and turn on the machine type deal.  You can absolutely still do that with this recipe instead of roasting the oats.  I just love to do that because it gives it a little more of a nutty flavor and aroma.  We are all busy these days and need more time so if you don’t have enough to roast the oats, don’t worry – the oatmeal will still taste just as great.  (Side note, I do not roast the oats in the slow cooker as it takes forever to heat up – at least for me – and I don’t have the patience for that).

wp-1586872927678.jpg

I love this recipe because it is so easy to make and you can batch cook it so it lasts you for a few days.  Let’s face it, life is crazy for a lot of us, between working from home, homeschooling children and just trying to keep sane.  My favorite method of cooking this recipe is either in a slow cooker or an instant pot as you don’t have to spend so much time watching over it.  It is therapeutic to just stand over the stove and stir it until it cooks (as I practice to zone out the kids bickering who will get a certain spoon or sit in a specific spot).
wp-1586872927634.jpg

I’ve made it all three ways so I know it turns out delicious regardless of your method of cooking.  The ratios below are for 4-6 servings.  You can double or triple the amount without any change in flavor and store it in the fridge for 2-3 days.  Just add a little milk or water when you are reheating it to loosen it up a bit.
wp-1585422235298.jpg

From my kitchen to yours, I hope you and your family enjoy this apple pie oatmeal!

Ingredients:
2 apples, peeled, cored and diced (reserve ½ apple, chopped for topping)
2 c almond milk
1 c water
1 c steel cut oats
2 Tbsp Brown Sugar
2 tsp cinnamon powder
2 Tbsp ground flaxseed
1 Tbsp EVOO or Avo Oil
¼ tsp salt
¼ c chopped walnuts

Directions:
For Instant Pot:
Set to sauté mode and heat up oil.  Add the oats and roast for 3-5 minutes.  Add in the apples and mix for 1 minute.  Add in the remaining ingredients and cover instant pot with vent in sealing position.  Change setting to pressure cook or manual and set time for 5 minutes.  When the instant pot beeps, do a 20 minute NPR (natural pressure release).  Release the steam left in the vent and open up the instant pot.  Add remaining apples and walnuts for topping and enjoy hot!

For Slow Cooker:
Spray the inside of your slow cooker with a little cooking spray to prevent burning and sticking.
Mix all ingredients and cover overnight.  Set a delay start for 4 hours with a cooking time for 4 hours on high heat.  Remove cover and stir to combine evenly.  Serve hot with toppings and enjoy!

For Stovetop:
Heat a large saucepan over medium heat and add in the oil.  Add the oats and roast for 3-5 minutes.  Add in the apples and mix for 1 minute.Add in the remaining ingredients and stir continuously for the first 3-5 minutes until the oats start thickening.  Cook for 35 minutes, stirring frequently.  As they start to become creamy and thick, you may want to lower the heat.  Once they are cooked, remove from heat and let them rest for about 5 minutes.  Serve hot with toppings and enjoy!

Veggie Pasta Sauce Yum

When my kids were younger, I had a bit of a hard time getting them to eat certain vegetables.  Even today, my oldest will not eat any type of leafy green because it’s a “salad” and she doesn’t eat salads apparently.  My youngest pretty much copies her Sissy and does whatever she says.  Sanaya loves spinach….. if it’s cooked down into a saag, blended into her Popeye muffins or hidden in this veggie sauce.
20180803_172940.jpg
This recipe came into being when Aishani was new to eating foods at about almost 1 year old.  Sanaya used to love pasta and Aishani liked it because she was all about finger foods and rotini was big enough for her to hold in her cute little pudgy hands.  Added benefit, I can make a batch, freeze it for future use on a last minute day.
20180803_170102.jpg
I load this pasta sauce up with onions, carrots, bell peppers, spinach, and frozen mixed veggies.  I also add tons of spices including turmeric, especially in the winter which is rich in it’s anti-inflammatory properties.  It’s such a healthy pasta sauce and my wonderful kids don’t even notice further than it being a red pasta sauce.  Try it out…. trick your kids or even spouse and see if they notice the difference!
20180803_172931.jpg

20180803_174235.jpg
From my kitchen to yours, Enjoy!

Ingredients:
1 med onion, chopped finely
1 bell pepper, chopped finely
1 carrot, chopped finely
¼ c frozen mixed veggies
¼ c spinach
3 cloves garlic, minced
1 jar (about 1½ pounds) your favorite pasta sauce
¼ tsp ajwain (carom seeds)
¼ tsp haldi (turmeric)
½ tsp lal mirch (cayenne pepper)
¾ tsp cumin powder
1 tsp coriander powder
2 tsp Italian seasoning
1 Tbsp Avocado (or Olive) Oil
salt to taste
pepper to taste

Directions:
In a deep pot, heat oil on medium flame.  Add in the carom seeds.  When they splutter, add in the onions and sauté until translucent, about 3-5 minutes.  Add in garlic and sauté for another 30 seconds.  Add in the turmeric, and let it bloom for about 30 seconds.
Once the turmeric has mixed in well, add in all the veggies except the spinach, spices, salt and pepper.  Mix well and cook for about 10 minutes or until they are tender.  Finally add in the spinach and sauce and cook for 2 minutes stirring constantly.
Turn the flame off and with a hand blender, blend the veggies into the sauce.  You should get a chunky consistency though if you prefer a more smooth texture, you can blend in a blender.  If it’s too thick, add 1 Tbsp of water at a time until you achieve your desired consistency.
Taste and adjust for salt.

Serve with your favorite pasta!

Berry Bake Yum

Times are trying right now as we adjust to working from home, homeschooling and entertaining children at home and just keeping a normal routine for a minimum of the next month as we battle COVID-19.  The first couple of days at home, my children thought we were on vacation…… well, it kind of is I suppose.  In our household, that also means waking up earlier, knowing the children don’t have to pretend they’re sleeping to avoid going to school (they’re starting early!), and also, wanting to eat whatever they want whenever they want.
20190827_071837.jpg
I decided I needed to get an upper hand in this mess and started a frenzy of organizing my pantry and creating my menu.
20190904_080221.jpg
Over the years, I’ve learned that my munchkins are creatures of habit and though they would prefer to eschew breakfast in lieu of playing and running around or snacking all day, their bodies tell me different when we go through a tantrum.  This berry bake is loaded with fiber, protein, vitamins, and great flavor, it’s a win-win.
20190904_080205.jpg
I put this recipe of a bake together because it can loosely be termed as a breakfast bar and it’s a dump and bake deal.  It’s also really easy because you make a generous amount and refrigerate the rest up to a week and pull them out throughout the week without putting in much effort.  The best part is most of these items may already be in your pantry.
20190904_062945.jpg
Completely vegetarian and easily modified to be a vegan recipe if you replace the butter with vegan butter.  You can also substitute frozen berries instead of fresh or any other fruit you have on hand without compromising the integrity of the bars.  Try it out and tell me how you like it.
20190904_063422.jpg

From my kitchen to yours, I hope you enjoy!  Be safe, Be healthy!

Ingredients:
1 c almond milk
1 ripe banana, mashed
1 ½ Tbsp butter, melted
1 ½ c Old Fashioned Oats
½ tsp cinnamon powder
1 Tbsp Flaxseed
½ tsp baking soda
1 tsp vanilla extract
¼ tsp salt
1 c mixed berries

Directions:
1. Preheat oven to 350ºF
2. Spray a 10×7 cake pan with nonstick cooking spray
3. Mix all the ingredients and transfer to the pan
4. Bake for 25 minutes, a few minutes longer if you prefer a crunchier bar
5. Cool for 5 minutes and cut into 1″x2″ bars
6. Wrap leftover bars individually in saran wrap and refrigerate up to 1 week.

Enjoy!

Instant Pot Chole Yum

Growing up, one of my favorite North Indian dishes has always been Chole.  Whether we were eating at a wedding, an Indian restaurant, or requesting it as my special birthday dinner, Chole has always been a constant and a comfort in my life.  The aroma of it freshly made in the air, just pulls at you.
wp-1583865934648.jpg
There are so many different versions of making this recipe based on where in North India you are.  Sometimes, even in the same region, recipes differ vastly from home to home.  I prefer mine to have a thick red gravy, which is best achieved I’ve found by adding an abundance of tomatoes (and I really mean A LOT)  and spices.  The best part is that this dish is such a classic, you can never go wrong.  Serve it hot with rice, naan or Bhatura and be prepared to be wowed!
wp-1583865934527.jpg
From my Kitchen to yours, I really hope you enjoy this.

Ingredients:
1 c dried chickpeas, washed and soaked overnight (at least 4 hours)
1 ½ c water
1 Tbsp Olive or Avocado Oil
5 cloves garlic, minced
1″ ginger, grated
1 large yellow onion, finely chopped
3 med-large tomatoes, finely chopped
1 ¾ c tomato sauce
2 tsp cayenne pepper (or to taste)
2 tsp coriander powder
1 Tbsp Chole Masala
1 tsp aamchur (dry mango) powder
1 ½ tsp cumin seeds
2-3 bay leaves
½ tsp peppercorns
1″ cinnamon stick
cilantro to garnish

Directions:
1. Start the instant pot on sauté mode.  Add oil and let it heat up.
2. Add cumin seeds and let them splutter.  Add in the cinnamon stick, peppercorns and bay leaf.  Sauté for 30 seconds.
3. Add ginger and garlic and sauté for another 30 seconds.
4. Add in the onions and sauté for 3-5 minutes until they turn translucent and start shrinking.
5. Add in the tomatoes, cayenne pepper, coriander powder, chole masala, and salt.  Cook for 2-3 minutes until the tomatoes start softening.  Add in the tomato sauce and cook for another 2-3 minutes.
6. Drain the water from the chickpeas and add them to the instant pot.  Mix well with the gravy and cook for 2-3 minutes.
7. Add in the water and mix well.  Turn off the instant pot, cover with vent to sealing position and change setting to manual/pressure cook for 40 minutes.
8.  When the instant pot beeps, do a 20 minute NPR (natural pressure release).  If the pin has not dropped at this point, release the pressure and open the instant pot.
9.  Change setting to sauté, add in the aamchur powder and let boil for 3-5 minutes.  Taste and adjust for salt.
10. Garnish with fresh cilantro and serve hot with rice, naan or bhature.

Enjoy!

Desi Masala Bowl Yum

Lately, I’m hooked on salad bowls.  They’re so delicious, easy to make, loaded with healthy foods and vibrant in color – ensuring you get a variety of nutrients.
I’ve been talking to my daughters about “eating the rainbow” and this was a fun way to help them do that.
Another reason I really like to do the salad bowls is because it’s so easy to play around with the cuisine type, the textures, and the flavors.  I can add raw and roasted veggies, nuts, and choose whichever grain I want.  There’s really no wrong way to make these and super easy to substitute an ingredient you may not have.  Honestly, food can’t get easier than that!
We’ve been doing a lot of non-desi (non-Indian) foods lately and I wanted to get the girls into Indian spices without going over the top.  Plus, I don’t think I can go without Indian food and spices for that long anyways.

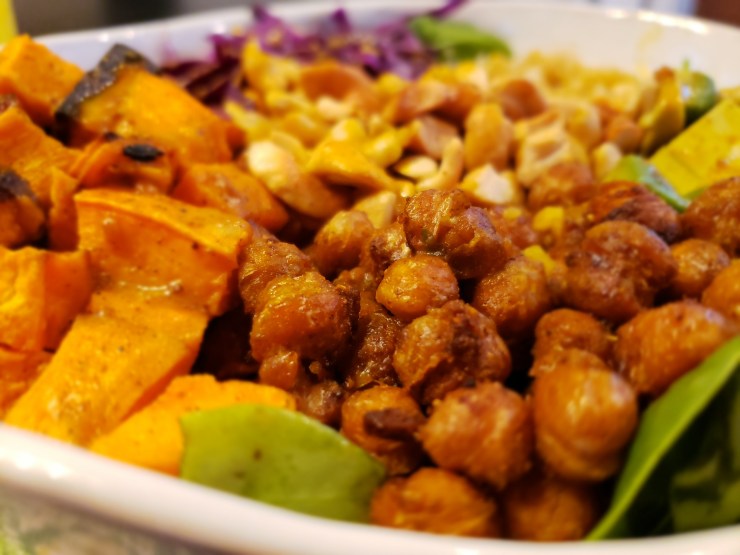
For the sweet potatoes, I did a simple roast with an addition of paprika for color and flavor.  I’m using paprika to gradually build up the girls to trying cayenne and other types of peppers and spices so this is especially great for those of you who prefer milder spices.
20190508_142541.jpg
I also roasted some chickpeas as those are so easy and delicious to make.  It made me proud that both my girls were eating them as soon as they cooled down from the oven.  These turned out so good and honestly, I had to go back and make more because between the three of us, we snacked on most of the beans! I’m definitely adding it to my snack rotation list!
20190508_143103.jpg
The dressing on here was probably the hardest to figure out as I wanted Indian flavors but nothing too intimidating.  I used almond butter to give it a little bulk and the addition of a little protein is always appreciated.  Because I had already used a lot of spices for the chickpeas, I fell back a little with the dressing and opted for curry powder, turmeric (for the color and my youngest happened to have a cold which needed some help) and some fresh garlic and ginger (which appears on 90% of Indian cooking!).
20190508_143014.jpg
I left the quinoa simple by cooking it only in salt water as there are so many flavors going around, I felt if I added more, everything would get lost in a chaotic world of spice.
20190508_142700.jpg
For the rest of the ingredients, it was nice to have the crunch from the vibrant red cabbage, the creaminess of the avocado, and oh! those toasted cashews were just the icing on top of a great salad!
20190508_143114.jpg
Try it out!  From my kitchen to yours, I hope you enjoy this one.

Ingredients:
1 Sweet Potato, diced into 1″ cubes
1 avocado, sliced
1 cup red cabbage, shredded
1 cup baby spinach
½ c quinoa, rinsed
¼ c raw cashews
2 Tbsp & 1 tsp olive oil
1 tsp paprika
Salt and pepper to taste

For the chickpeas:
1 15oz can chickpeas, rinsed, drained & dried with a paper towel
1 Tbsp olive oil
2 tsp cayenne pepper
2 tsp cumin powder
2 tsp coriander powder
1 tsp garlic powder
1 tsp garam masala
¼ tsp salt

For the dressing:
¼ c almond butter
½ lemon, juiced
1 tsp lemon zest
1/3 c water
2 cloves garlic, minced
1 tsp honey
1 tsp curry powder
½ ginger, grated
1 tsp turmeric
½ tsp salt

Directions:
Preheat oven to 400ºF.  In a baking sheet, toss sweet potatoes, 1 Tbsp olive oil, salt, pepper and paprika.  Mix well and roast for 20 minutes.
In a bowl, combine all the ingredients for the chickpeas.  Transfer to baking sheet and bake for 35 minutes.
In a medium pot, heat water and ½ tsp salt.  When it comes to a boil, add the rinsed quinoa and reduce heat to medium low.  Cover and cook quinoa for 15-20 minutes.  Remove from heat and use a fork to fluff it.
In a small pan, mix ½ tsp olive oil and cashews.  Toast on medium heat until they are a light golden red color.  Turn off heat and remove pan.  Set aside to use as topping.
For the dressing, combine all of the ingredients in a mason jar and shake well.

To assemble:
Line a bowl with spinach and add the quinoa, sweet potatoes, avocado slices, shredded cabbage, toasted cashews, and drizzle with almond curry dressing.  Enjoy!

Roasted Garden Salad

I don’t like to labor over big meals during the summer time – I’d rather spend my time outdoors!  To me, summertime is all about simple but filling foods and clean eating so I can enjoy the sun as much as possible.
This salad is just that.  It’s refreshingly light, satisfying, healthy, easy, and best of all, I can do it within 20 minutes!

20180709_185915.jpg

It truly is a one pan deal – all you have to do is line all the veggies in the pan, roast them in the oven and voila!
20180709_190720.jpg
I added in some roasted chickpeas for crunch and protein… let me tell you this completed the salad in the best way possible.
20180709_191223.jpg

Ingredients:
1lb fresh arugula
1 Bell Pepper
1 Onion
1 Zucchini
1 Yellow Squash
1 14oz can of Garbanzo beans, drained and rinsed
1 Tbsp Italian Seasoning
2 tsp smoked paprika
2 tsp Balsamic Vinegar
Salt to taste
Pepper to taste

Directions:
Heat oven to 350ºF.  Sliced all veggies and line in a baking sheet.  Drizzle with EVOO, add salt, pepper and Italian seasoning.  Mix well so all the veggies are equally seasoned.

Meanwhile, in another tray, spread out garbanzo beans in a flat layer.  Drizzle with EVOO, add salt and pepper and toss to coat evenly.  Sprinkle paprika on the top but don’t mix it.

Bake veggies for 20 minutes and beans for 20-25 minutes.  In a bowl, add arugula.  when veggies and beans are done, add them to the arugula.  Drizzle EVOO lightly, add balsamic vinegar, salt and pepper and toss.  Enjoy this salad as much as I do!

Almond Coconut Porridge

Breakfast is my favorite meal. There are so many fun foods to eat and start your day. Sweet or savory, light or hearty, healthy or greasy!

A couple of months ago, a friend recommended a local restaurant, Homegrown. The moment I walked in and saw their menu, I fell in love. They’re a casual place that serves food which is organic and from local farmers. Talk about tasting the freshness in my food!

I ordered their Coconut Chia Porridge. Was I blown away! The creamy porridge paired with the crunchy toasted coconut and almonds, topped with sweet banana slices. I was in breakfast heaven!

Since then, I’ve been obsessed. Especially over the last week. I just can’t get it out of my mind so I decided to try my hand at it and make my own version.

20180315_142907.jpg

In addition to chia seeds, I added flax seeds. A double dose of fiber and omega 3’s (which is a win-win when you’re feeding two toddlers)!

20180315_082228.jpg

If you don’t have time in the morning because you need to rush out of the house, then this is a very easy prepare the night before recipe. Just mix all the ingredients for the oats, cover and keep in the refrigerator. Heat it up the next morning and add your toppings.

20180315_083655.jpg

Here is what I added to mine: toasted coconut, walnuts, craisins, sesame seeds and fresh blueberries. Not the same as Homegrown obviously but still delicious!

20180315_083632.jpg

Try it out!

Ingredients:
1c Steel Cut Oats
2c Unsweeteened Coconut Almond Milk (or any milk of your choice)
1c Water
1tsp Salt
1Tbsp Ground Flax Seed
1Tbsp Chia Seeds

For Toppings:
1Tbsp shredded coconut, toasted
Handful of toasted walnuts
2tsp Craisins
Handful of fresh blueberries
½tsp sesame seeds
1Tbsp Almond milk (or more for your desired consistency)

In a medium saucepan, combine the almond milk and water and boil. Once it reaches a boil, reduce heat and add in the oatmeal and salt. Stir occasionally as the oats cook, approximately 20 minutes. As the oats start to thicken, about 10 minutes into cooking them, add in the chia and flax seeds. Mix well and continue to cook until the oats are done.

Spoon into a bowl and add the toppings.

I hope you and your family enjoy this bowl of porridge as much as me and mine did!

Spicy Garlic Hummus

I love snacking.  Who doesn’t?!  Hummus is one of my favorite foods.  Since the first time I tried it in college, I was in love.  Recently, S (my 2 year old) has also been snacking on hummus.  And my hubs too.  This is just one of those foods where I like to add it to everything.  A great snack for S with some carrots and broccoli, or on a sandwich for my hubby, or in a wrap for me.  The versatility of hummus is amazing.
Most hummus recipes have a key ingredient – tahini, which is a paste made of sesame seeds.  Well, I didn’t have any around but I was craving hummus so here is my versions of tahini free hummus.  Hope you enjoy it!

20180225_113458.jpg
That’s my little helper.  She loves helping me cook in the kitchen and makes me so proud!
Drain the garbanzo beans and reserve the liquid – you’ll be using it later.  I used canned beans but you can use dried beans and soak them and cook them.  If you do, reserve the water that you cooked it in.  It’ll be used later.
20180225_113503.jpg
In a blender, combine the garbanzo beans, garlic, salt, pepper, Sriracha, lemon juice, half of the reserved liquid and olive oil.
20180225_114521.jpg
I just love Sriracha!  The kick it adds at the end of each bite when you eat this hummus is the perfect touch!
20180225_115849.jpg
Blend it so it becomes a good chunky paste.  This picture is deceiving – it really is chunky!
20180225_141413.jpg
Serve it with your favorite veggies!  S’s current fave is carrots as she gets a kick out of dipping them in her hummus.  Hope you enjoyed this as much as our family did!

Ingredients:
1 ½ cans garbanzo beans, drained
½c liquid reserved from the garbanzo beans
juice squeezed from 1/2 lemon
1 Tbsp Sriracha sauce
4 cloves garlic
3 Tbsp EVOO
Salt to taste
Pepper to taste

Directions:
Combine all the ingredients in a blender and grind into a chunky paste.  Serve with your favorite veggies and crackers.  Enjoy!

A “Date” with Granola

This recipe has a couple of stories behind it.  The most simplest, my toddler was having issues and I need to find a way for fiber to be in her diet and her to like it! The second story is a bit cuter.
We had been invited for breakfast and a playdate with one of her dearest friends, E.  Her parents had laid out a delicious breakfast for us and part of it was Granola.  I know you’re thinking, this is nice, but cute?  Mmmmmm…… well let me tell you.  E calls granola Crunch Crunch.  My toddler, (like most toddlers), is a monkey see monkey do.  She ate quite a bit that day and a couple weeks later, when I ran into a dilemma of how to incorporate more fiber, I had just the perfect solution.  Yep, her new favorite word – crunch crunch!
Dates is my new fave thing.  I like to snack on that and nuts throughout the day so I don’t eat enough chocolate to get a tummy ache.  Plus, it is loaded with fiber so I knew I needed to include this in my recipe.  The rest, well, was trial and error.  This is a very simple recipe.  Try it!
No seriously, try it! Our house eats it alone, with milk, yogurt, in any form basically because it is that good!
20180210_092658.jpg
Chop up some dates

Add in the oats, walnuts, and coconut.  (if you eat a bit of your ingredients along the way – don’t worry! I won’t tell because I’m doing the same!)

20180210_095046.jpg
Add the salt, vanilla extract, and olive oil and mix well.  Finally, add in the honey and mix really well.  You want the honey to mix evenly so all the ingredients combine.
Be careful! I got greedy the first time and added too much honey.  I definitely regretted that decision!

20180210_095740.jpg
Line a 2inch baking sheet with a silicone mat and spread the granola evenly.  Bake for 15 minutes at 350F.

20180210_104949.jpg
Look at how beautifully golden that looks!
Let it cool for about 5 minutes then gently scoop it into an airtight container.  Or, if you are impatient like me, just eat it as soon as it cools and make excuses about tasting it!

I’m hoping my “Crunch Crunch” recipe will join you for breakfast soon!

Here’s the full recipe:

Date Granola

Ingredients:
2c chopped dates
3c Old Fashioned Oats
1c shredded coconut
1c chopped walnuts
2Tbsp honey
3tsp vanilla extract
3/4tsp salt
3/4c EVOO

Directions:
Preheat oven to 350ºF.  Line a 2inch baking sheet with a silicone mat.

In a bowl, combine dates, oats, coconut, and walnuts.  Add in vanilla extract, salt and EVOO.  Mix well.  Add in honey and mix until honey combines with granola.

Spread evenly into baking sheet and bake for 15 minutes.

When it’s golden brown, pull out of the oven and cool for 5 minutes before serving.  Store in an airtight container for future use.

Enjoy!

Roasted Butternut Squash Soup

There have been a series of storms lately with only rain in the forecast.  Days like these always make me yearn for the some warm soup in front of the fireplace.  The fireplace didn’t happen, but here’s how I put my twist of Thai and Indian fusion on Butternut Squash Soup.

wp-1490376371081.jpg

Heat the oven to 375º.  Add butternut squash to a sheet pan and drizzle with EVOO.  Add salt and pepper and toss so that all the cubes are evenly coated.  Bake for 45 minutes.

wp-1490376362204.jpg

The aroma as these are baking in the oven fills my whole house and has me salivating.  The 45 minutes seem so long but these nuggets are so sweet and delicious when they’re done.   Let’s be honest… I definitely dipped into these and a little more than “a couple” were gone!  Luckily, I had enough left to make soup!

wp-1490376348179.jpgIn a pot deep enough to make the soup, sauté onions until they are soft and starting to turn a little translucent.  While the onions are cooking, grate in fresh ginger.

The fresh ginger adds a great zing and I love watching it sizzle as I grate it straight into the pot.

wp-1490376340983.jpg

Next, I added all the spices – this is where the Indian comes in.  Cayenne, Cumin, Coriander, and Turmeric.  Mix it for a couple of minutes so you don’t have an uncooked taste of the spices in your soup.  If you don’t like spicy too much, feel free to cut out the cayenne pepper.

wp-1490376336070.jpg

Finally, add in the roasted butternut squash and mix everything together.  Add the veggie broth, and a little salt and pepper.  You’ll probably want to taste at this point.  Remember, the squash already had salt on it before you roasted it so you’re really adding enough to bring out the flavors of the spices at this point.  Once it boils, add lemon juice, basil and the coconut milk to it (my Thai inspiration).  With an immersion blender, blend everything so you have a nice, smooth texture.

wp-1490376319089.jpg

Let it simmer for an additional 10-15 minutes.  Enjoy with your favorite nostalgic memories.

Ingredients:
1 butternut squash, seeded and cubed
1 med red onion, chopped finely
3 Tbsp grated ginger
1/2 tsp cayenne pepper
2 tsp ground coriander
1 tsp cumin seeds
1/2 tsp turmeric powder
1/4 tsp cinnamon powder
4 c Veggie broth
1/4 c fresh basil, chopped
1 can coconut milk
salt to taste
black pepper to taste

Recipe:
Heat the oven to 375º.  Add butternut squash to a sheet pan and drizzle with EVOO.  Add salt and pepper and toss so that all the cubes are evenly coated.  Bake for 45 minutes.
Heat EVOO in a soup pot on medium heat and add onions.  Add in freshly grated ginger and sauté 5-10 minutes until onions are soft and translucent.  Add in cayenne pepper, coriander powder, cumin seeds, turmeric powder, and cinnamon powder and mix well.  Add the roasted squash, veggie broth and salt and pepper.  Once it boils, add lemon juice, basil and the coconut milk.  With an immersion blender, blend everything so you have a nice, smooth texture.  Let it simmer for an additional 10-15 minutes.  Serve hot.

Sabudana Patties

IMG_5704

If you’re an Indian, especially a Gujarati – you’ve grown up eating Sabudana Khichdi all your life.  For those of you who are clueless about this particular savory dish, let me explain.  Sabudana (or Tapioca seeds) are these tiny little white balls that look like bubbles.  I always thought they were aptly named since Sabudana literally translates as Sabu = Soap and Dana = pieces/bits (though they had nothing else in common with soap thank goodness!).

Growing up, we always had this on Saturdays or specific religious days.  It was this tradition that I always looked forward to every week – piling up my plate with sabudana khichdi and smothering it with Mom’s fresh, homemade yogurt.  Mmmmmmmmmm!

Sabudana Khichdi is usually made with potatoes, peanuts, serrano peppers and some cumin.  Making it into patties is a more recent trend versus the traditional cooking it up in a pot style.  Here’s my version of the patties! Hope you enjoy it!

In a large bowl, measure out 1 1/2 cups of Sabudana.
IMG_5616
Wash it out 3-4  times so all the white filmy residue is gone.  Fill the bowl with water, cover and let it soak overnight.
IMG_5617

The next morning, drain out the rest of the water from the sabudana and set aside.
IMG_5633

Meanwhile, boil and mash the potatoes.
IMG_5618

Add in the Sabudana, cumin, serrano peppers, ginger and salt.
IMG_5646
Mix until it becomes a dough-like consistency.  Everything should be sticking together.
IMG_5648
Form 2″ disks
IMG_5649
In a non-stick skillet, add some olive oil and let it heat up.  Add the patties and let them cook and crisp up for 3-5 minutes on each side.  Don’t flip it constantly as that will take longer to cook them and will probably break the patties.  You can tell that it’s cooked through when the color of the sabudana changes from white to translucent.
IMG_5682
You will get approximately 16 patties out of this.  Serve hot with yogurt on the side.  Enjoy!

IMG_5701

Ingredients:
1 1/2 c uncooked Sabudana
3 med sized potatoes
1-2 serrano peppers (depending on your spice level), minced
2″ knob of ginger, grated
1 tsp cumin
salt to taste
olive oil to pan fry

Directions:
Wash and soak sabudana overnight.
Boil and mash potatoes.
In a large bowl, mix together the mashed potatoes, drained sabudana, cumin, peppers, ginger, and salt.  Mix well to form a dough.  Make 16 2″ disks.
In a non-stick pan, heat the olive oil and add the patties to pan fry.  Each side will take 3-5 minutes.

Serve with yogurt and enjoy!

Three Bean Chili

*Updated Oct. 16, 2020

Sundays in our house are dedicated to football. Now that the season has started, I’m challenging myself to find some healthier recipes to get us through the games. Sure the chicken wings, nachos, creamy dips, and pizza sound good but they definitely don’t pass the healthy test. This is a hearty chili loaded with veggies, beans and definitely falls into the comfort zone. It makes you want to curl up on the sofa with a warm bowl while you’re watching football (or a movie or your favorite tv show).


The heat of the ancho chili and cayenne give this a perfect balance to some of the sweeter veggies like the carrots and bell peppers.  Using the canned beans also take a lot of the work out of this dish for you and I’ve included both stove top and slow cooker versions so you can make it any way that is easiest and most convenient.

Add a squeeze of lime and a sprinkle of spring onions to finish off this chili before eating with a side of cornbread.  Nothing can beat this delicious chili on a cold winter day.  I’d like to say, I’m definitely ready for this winter season!

I’ve made this chili vegan and it can remain so with toppings such as spring onions, cilantro, avocado and lime wedges.

Optional to add are toppings such as sour cream and cheese.  They will definitely soften up the taste if you choose these!

From my kitchen to yours, I hope this 3 Bean Chili brings a little warmth to your day!

I’ve made this both on the stove top and in the slow cooker.  Here is the equipment I used to make the chili:

Quinoa, Brown Rice and Black Beans

20150922_192054

Loaded with protein and yummy veggies, this is one of my new favorite go-to’s.  Simple to make and you can add whatever veggies you choose – I had colored bell peppers, tomatoes and onions in my fridge so that’s what I went with today.

Here’s how I made it:

Soak 1/3c Quinoa in some warm water for about 20 minutes.  This helps the seeds cook easier and softer.

Also soak 1/2c Brown Rice for 20 minutes.  Brown Rice can be tough to cook as it usually takes longer than white rice to make but if you soak it first, it comes out really nice and soft.

20150922_190435

Finely Dice colored Bell Peppers, Tomatoes, Onions and a couple of cloves of garlic.

In a nonstick pot, heat oil and ad the cumin.   Add the onions. garlic, tomatoes, bell peppers and mix well.

20150922_190940

Cook for 5 minutes, then add in the quinoa, rice and black beans.  Add some salt, pepper and just a touch of hot sauce – it adds that magical touch!   Add the water and bring to a boil.  Cook for about 30 minutes or until the rice is tender.  20150922_191538

Just before serving, squeeze some fresh lemon juice over the rice.  The extra zing tastes really good!  There you have it!  This is a great make ahead recipe and perfect for the fall.

Here’s the recipe all in one spot!

Ingredients:
½ c diced onions
½ c diced tomatoes
1c diced bell peppers (I like to include a variety of colors)
1 can (14oz) black beans, drained and rinsed
1/3 c Quinoa
½ c Brown Rice
1 tsp cumin
1 Tbsp Olive Oil
Salt to taste
Black Pepper to taste
1 tsp, freshly squeezed Lemon Juice
2 c Water
a couple dashes of hot sauce

Instructions:
Soak quinoa and brown rice in warm water for 20 minutes.
In a nonstick pot, heat oil and add the cumin.   Add the onions. garlic, tomatoes, bell peppers and mix well.
Cook for 5 minutes, and then add in the quinoa, rice and black beans.  Add some salt, pepper and the hot sauce.
Add the water and bring to a boil.  Cook for about 30 minutes or until the rice is tender.
Just before serving, squeeze some fresh lemon juice over the rice.