Instant Pot Kali Dal

**Original blog posted March 2020.  Updated March 2022**
Kali dal is a very popular Punjabi dish and one of those comfort food meals that my husband has grown up with.  It has also become one of Sanaya’s favorite comfort foods too so of course I had to find a way to perfect this recipe for both of them.  I would say this recipe rotates in our house at least every 2 weeks.

I love it for its nutritional content, loaded with protein, fiber and low in carbs and calories.  With all the rainy days we’ve had recently, this is one recipe I can’t pass up.  An easy, one-pot meal, this goes great with naan or rice.

Yep, I put a ton of jalapeños as a garnish.  Traditionally, it’s cilantro. But, it actually tasted good with the extra jalapeños on top!
A while back, we had a potluck and playdate with my friend Janani and her family.  I don’t remember what I made, but I do remember that both my husband and I fought for the last bite of her dal.  It was A-MA-ZING!  It had a burst of flavor to it that we were both impressed and he actually said it was one of the best dals he has had in his life…. that’s huge coming from a Punjabi!

Most recipes of this specific dal have a basic of three spices, and I’ve found pretty simple in flavor.  Works great for many but Janani’s recipe just had this burst of flavor, you didn’t want to stop eating it.

I begged her for her recipe, tried making it and failed.  I tried a few more times to the point my hubby was actually sick of seeing dal…….oops.  So I went to Janani’s house, had her tell me exactly what to do while I made it with her watching over me.  I’ve been using her recipe ever since, however, I did make a few changes to it.  I know, I know, why?  I changed a little of the technique on which ingredients she cooks in what order, and changed the ratio on some of the basic spices but they are all there.  The changed version is what I have listed below but if you’re interested in her original version, message me and I will send it to you.

When I talked to Janani about her recipe, that’s when I figured out it’s the spices and the amount of tomatoes that she uses which give the dal its integrity in flavor.  You really need to try out this recipe.  It’s so delicious!
If you don’t have an instant pot, follow the same instructions for a slow cooker and set slow cooker time for 8 hours.

Here are the tools I used for this recipe:


Easy Chicken Ramen with GF Noodles

I was never a big ramen fan until my sister-in-law Sarika took me to this tiny little ramen restaurant in Oakland.  I can’t stress enough how good that ramen was.  It was simply delicious with layers of flavor in the broth and each bite just filling you with warmth and comfort.
IMG_8033
Recently, Taste Republic and I decided to partner together to come up with some new recipes and when I saw their gluten free linguini, I knew I wanted to make ramen with it instantly.  Fresh pasta that are thin enough to substitute for traditional ramen noodles and they cook in just 3 minutes!
IMG_8032
IMG_8037
This recipe literally took me less than 30 minutes to make and part of the reason is I used rotisserie chicken.  A perfect weeknight recipe that’s a little different from having to precook in an instant pot or slow cooker (don’t get me wrong, I love both of those devices!) and you can still make a delicious meal in 30 minutes – yes please!
IMG_8044
Here are a few more weeknight meals you may enjoy:
Greek Tortellini Salad
15 minute Masala Pasta
Sausage & Zucchini Linguini
Roasted Garden Salad
Instant Pot Tortilla Soup

From my kitchen to yours, I hope you enjoy this recipe.
IMG_8044

What you’ll need:

*Disclaimer:  I have partnered with Taste Republic to use their gluten free pastas for my 30 minute meal series.  This recipe is a product of that partnership.

Rainbow Fajita Bowl

Summertime salads are one of my favorites to eat.  They’re simple, light, filling, and don’t take much time in front of the stove or oven.  I love this Rainbow Fajita Bowl because it is so easy to pull together and you can eat it as a dinner meal or prep it on the weekends for weekday lunches.
IMG_7380
Yum

It’s vegan but if you’re looking to add in some chicken, super simple to do that too.  I’ll include it in the notes below!   You can marinate the chicken 30 minutes ahead or overnight but still get an amazing, tasty, juicy chicken too!
IMG_7374
But on to my bowl.  I just love the colors in this salad.  And the fact that my girls ate it because of the rainbow foods (ok, well maybe they ate one leaf of salad but at least I got one in!).  Drizzle with some chili lime dressing and you’re set!  The spice, the crunch, the sweet corn… I think this salad bowl is calling my name for lunch again today!
IMG_7381
Get your kids involved in this one.  Once you have all the ingredients ready, have them help you assemble them for make ahead lunches for you  and your kids!

From my kitchen to yours, enjoy this rainbow of colors and burst of flavor!

Breakfast Oat Muffins

Breakfast is such an important meal for everyone.  It’s been more relaxed for us lately due to the quarantine, but when school restarts, it’s going to get crazy in my house.  With two kids in two different schools that are miles apart and me rushing to make sure both are on time.  Yeah, I can imagine how smooth that is going to be! Continue reading “Breakfast Oat Muffins”

Instant Pot Tortilla Soup

Tortilla Soup is one of my favorite soups.  Especially this instant pot recipe which takes only 4 minutes to cook!  It’s filled with delicious veggies and spices like ancho chile and chipotle powder to build a good depth of flavor.  Perfect for a hectic weeknight or a cold day, this tortilla soup is a great way to use up pantry essentials.  Continue reading “Instant Pot Tortilla Soup”

Tropical Fruit Smoothie

This is the most perfect afternoon drink on a hot summer day.  We’ve had temps in the high 90’s and low 100’s lately so we’ve been making ice cold drinks to stay cool.  One of our favorite is this Tropical Fruit Smoothie.  Though we can’t be in the tropics, the girls and I decided to bring the flavors of the tropics home.  Continue reading “Tropical Fruit Smoothie”

Fresco Carpaccio

So, traditionally, a carpaccio is an appetizer made of thinly sliced meat.  I decided to take the technique and make my own summer version of that.  The sharp tang of lemon, the fresh fruit, and the crunch of toasted pistachios on top are an amazing combination.  This Fresco Carpaccio is great as an appetizer for any dinner or party you are hosting, or just follow what I did and make a plate for yourself, and enjoy it in the sun!
wp-1590599555473.jpg
Yum
I really didn’t want to stop eating it!  Hubby and I finished it within minutes and this has become another of our favorite summer recipe.
wp-1590599560914.jpg
The best part, this is so healthy for you with not too many calories or fat, there’s no cooking involved, and it takes 10 minutes to make (I’m not counting how long you have to wait for it to marinate).
wp-1590599561161.jpg
wp-1590599556324.jpg
Notes:

I highly recommend marinating this as the flavor of the dressing will be sharper and will help breakdown the raw taste of the zucchini since you are not cooking it.

I used a mandolin for this but if you don’t have one, no worries.  Use a potato peeler and make thin ribbons of the zucchini and cucumbers.

What fruits and veggies will you use?  Share your pictures!

From my kitchen to yours, enjoy this carpaccio as much as we did!

Ingredients:  
1 zucchini
1 cucumber
1 avocado
1 lemon, zested and juiced
¼ c Avocado Oil
2 Tbsp pistachios
Salt to taste
Pepper to taste

Directions:  
1.  In a large bowl, mix together lemon zest and lemon juice.  Whisk to mix well.
2.  Add in oil and whisk 2-3 minutes until oil and lemon juice have emulsified.
3.  Add in salt and pepper and whisk one last time to mix.  Set aside.
4.  Trim the ends of the zucchini and cucumber.  Using slicer or peeler, make very thin ribbons.
5.  Add zucchini and cucumber ribbons to dressing and toss to coat each ribbon equally.
6.  Cover bowl and marinate in fridge for 30 minutes.
7.  Meanwhile, on a med flame, heat up a small skillet.  Add in the pistachios and toast 3-5 minutes until they are nice and crunchy.
8.  Give the toasted pistachios a rough chop and set aside.
9.  Pull zucchini and cucumber out of fridge.
10.  Thinly slice avocado.
11.  In a plate, line up each fruit with one slightly on top of the previous one.  If you have any dressing left, drizzle a little on top.  Garnish with toasted pistachios.

Enjoy!

Masala Omelette Yum

These days, I’ve seen and heard friends and family tell me they are working harder than ever, missing meals during the day.  Some are working from home trying to manage homeschool, work and life in general.  Others have a profession that is an essential role to our community right now and are giving so much to us.  While I hope missing meals doesn’t become daily routine, here is a breakfast omelette that will start out anyone’s day on the right foot! Continue reading “Masala Omelette Yum

Microgreens Salad Yum

About a month back, we finally had a weekend free to take the girls to the Farmer’s Market which we’ve desperately missed during the winter months.  The girls love tasting all the fruit samples and of course stopping at the kettle corn stand, while I love to check out all the new produce and imagine different recipes I can create. Continue reading “Microgreens Salad Yum

Apple Pie Oatmeal Yum

I really had to find a way to sell eating oatmeal to my kids.  We went through a phase where they loved oatmeal then, for the past 6 months, just the name would send them running in fear as if I was punishing them.

So, what does any desperate mother do?  Change the name, feed the same food, and take the win.  Seriously, I love this game where they think they won, and I know I definitely did!
wp-1586872927704.jpg

When I first started making steel cut oats, it was a dump and turn on the machine type deal.  You can absolutely still do that with this recipe instead of roasting the oats.  I just love to do that because it gives it a little more of a nutty flavor and aroma.  We are all busy these days and need more time so if you don’t have enough to roast the oats, don’t worry – the oatmeal will still taste just as great.  (Side note, I do not roast the oats in the slow cooker as it takes forever to heat up – at least for me – and I don’t have the patience for that).

wp-1586872927678.jpg

I love this recipe because it is so easy to make and you can batch cook it so it lasts you for a few days.  Let’s face it, life is crazy for a lot of us, between working from home, homeschooling children and just trying to keep sane.  My favorite method of cooking this recipe is either in a slow cooker or an instant pot as you don’t have to spend so much time watching over it.  It is therapeutic to just stand over the stove and stir it until it cooks (as I practice to zone out the kids bickering who will get a certain spoon or sit in a specific spot).
wp-1586872927634.jpg

I’ve made it all three ways so I know it turns out delicious regardless of your method of cooking.  The ratios below are for 4-6 servings.  You can double or triple the amount without any change in flavor and store it in the fridge for 2-3 days.  Just add a little milk or water when you are reheating it to loosen it up a bit.
wp-1585422235298.jpg

From my kitchen to yours, I hope you and your family enjoy this apple pie oatmeal!

Ingredients:
2 apples, peeled, cored and diced (reserve ½ apple, chopped for topping)
2 c almond milk
1 c water
1 c steel cut oats
2 Tbsp Brown Sugar
2 tsp cinnamon powder
2 Tbsp ground flaxseed
1 Tbsp EVOO or Avo Oil
¼ tsp salt
¼ c chopped walnuts

Directions:
For Instant Pot:
Set to sauté mode and heat up oil.  Add the oats and roast for 3-5 minutes.  Add in the apples and mix for 1 minute.  Add in the remaining ingredients and cover instant pot with vent in sealing position.  Change setting to pressure cook or manual and set time for 5 minutes.  When the instant pot beeps, do a 20 minute NPR (natural pressure release).  Release the steam left in the vent and open up the instant pot.  Add remaining apples and walnuts for topping and enjoy hot!

For Slow Cooker:
Spray the inside of your slow cooker with a little cooking spray to prevent burning and sticking.
Mix all ingredients and cover overnight.  Set a delay start for 4 hours with a cooking time for 4 hours on high heat.  Remove cover and stir to combine evenly.  Serve hot with toppings and enjoy!

For Stovetop:
Heat a large saucepan over medium heat and add in the oil.  Add the oats and roast for 3-5 minutes.  Add in the apples and mix for 1 minute.Add in the remaining ingredients and stir continuously for the first 3-5 minutes until the oats start thickening.  Cook for 35 minutes, stirring frequently.  As they start to become creamy and thick, you may want to lower the heat.  Once they are cooked, remove from heat and let them rest for about 5 minutes.  Serve hot with toppings and enjoy!

Roasted Brussels Sprouts Salad Yum

Brussels Sprouts are a vegetable that I didn’t realize I liked until I was an adult, going out on the town and pretending to eat it like I loved it with friends who actually did.  One day, I realized, I actually do like it.  Especially when they’ve been either fried or roasted so the outer leaves are nice and crunchy….ummm, I’m salivating just thinking about them again! Continue reading “Roasted Brussels Sprouts Salad Yum

Crispy Chickpeas and Sweet Potato Tacos Yum

When I first started experimenting with this recipe, I wasn’t sure how the sweet potato was going to work in my tacos.  I debated constantly trying to pair a different vegetable, but ultimately, I kept coming back to the sweet potatoes. Continue reading “Crispy Chickpeas and Sweet Potato Tacos Yum

Veggie Pasta Sauce Yum

When my kids were younger, I had a bit of a hard time getting them to eat certain vegetables.  Even today, my oldest will not eat any type of leafy green because it’s a “salad” and she doesn’t eat salads apparently.  My youngest pretty much copies her Sissy and does whatever she says.  Sanaya loves spinach….. if it’s cooked down into a saag, blended into her Popeye muffins or hidden in this veggie sauce.
20180803_172940.jpg
This recipe came into being when Aishani was new to eating foods at about almost 1 year old.  Sanaya used to love pasta and Aishani liked it because she was all about finger foods and rotini was big enough for her to hold in her cute little pudgy hands.  Added benefit, I can make a batch, freeze it for future use on a last minute day.
20180803_170102.jpg
I load this pasta sauce up with onions, carrots, bell peppers, spinach, and frozen mixed veggies.  I also add tons of spices including turmeric, especially in the winter which is rich in it’s anti-inflammatory properties.  It’s such a healthy pasta sauce and my wonderful kids don’t even notice further than it being a red pasta sauce.  Try it out…. trick your kids or even spouse and see if they notice the difference!
20180803_172931.jpg

20180803_174235.jpg
From my kitchen to yours, Enjoy!

Ingredients:
1 med onion, chopped finely
1 bell pepper, chopped finely
1 carrot, chopped finely
¼ c frozen mixed veggies
¼ c spinach
3 cloves garlic, minced
1 jar (about 1½ pounds) your favorite pasta sauce
¼ tsp ajwain (carom seeds)
¼ tsp haldi (turmeric)
½ tsp lal mirch (cayenne pepper)
¾ tsp cumin powder
1 tsp coriander powder
2 tsp Italian seasoning
1 Tbsp Avocado (or Olive) Oil
salt to taste
pepper to taste

Directions:
In a deep pot, heat oil on medium flame.  Add in the carom seeds.  When they splutter, add in the onions and sauté until translucent, about 3-5 minutes.  Add in garlic and sauté for another 30 seconds.  Add in the turmeric, and let it bloom for about 30 seconds.
Once the turmeric has mixed in well, add in all the veggies except the spinach, spices, salt and pepper.  Mix well and cook for about 10 minutes or until they are tender.  Finally add in the spinach and sauce and cook for 2 minutes stirring constantly.
Turn the flame off and with a hand blender, blend the veggies into the sauce.  You should get a chunky consistency though if you prefer a more smooth texture, you can blend in a blender.  If it’s too thick, add 1 Tbsp of water at a time until you achieve your desired consistency.
Taste and adjust for salt.

Serve with your favorite pasta!

Berry Bake Yum

Times are trying right now as we adjust to working from home, homeschooling and entertaining children at home and just keeping a normal routine for a minimum of the next month as we battle COVID-19.  The first couple of days at home, my children thought we were on vacation…… well, it kind of is I suppose.  In our household, that also means waking up earlier, knowing the children don’t have to pretend they’re sleeping to avoid going to school (they’re starting early!), and also, wanting to eat whatever they want whenever they want.
20190827_071837.jpg
I decided I needed to get an upper hand in this mess and started a frenzy of organizing my pantry and creating my menu.
20190904_080221.jpg
Over the years, I’ve learned that my munchkins are creatures of habit and though they would prefer to eschew breakfast in lieu of playing and running around or snacking all day, their bodies tell me different when we go through a tantrum.  This berry bake is loaded with fiber, protein, vitamins, and great flavor, it’s a win-win.
20190904_080205.jpg
I put this recipe of a bake together because it can loosely be termed as a breakfast bar and it’s a dump and bake deal.  It’s also really easy because you make a generous amount and refrigerate the rest up to a week and pull them out throughout the week without putting in much effort.  The best part is most of these items may already be in your pantry.
20190904_062945.jpg
Completely vegetarian and easily modified to be a vegan recipe if you replace the butter with vegan butter.  You can also substitute frozen berries instead of fresh or any other fruit you have on hand without compromising the integrity of the bars.  Try it out and tell me how you like it.
20190904_063422.jpg

From my kitchen to yours, I hope you enjoy!  Be safe, Be healthy!

Ingredients:
1 c almond milk
1 ripe banana, mashed
1 ½ Tbsp butter, melted
1 ½ c Old Fashioned Oats
½ tsp cinnamon powder
1 Tbsp Flaxseed
½ tsp baking soda
1 tsp vanilla extract
¼ tsp salt
1 c mixed berries

Directions:
1. Preheat oven to 350ºF
2. Spray a 10×7 cake pan with nonstick cooking spray
3. Mix all the ingredients and transfer to the pan
4. Bake for 25 minutes, a few minutes longer if you prefer a crunchier bar
5. Cool for 5 minutes and cut into 1″x2″ bars
6. Wrap leftover bars individually in saran wrap and refrigerate up to 1 week.

Enjoy!

Desi Masala Bowl Yum

Lately, I’m hooked on salad bowls.  They’re so delicious, easy to make, loaded with healthy foods and vibrant in color – ensuring you get a variety of nutrients.
I’ve been talking to my daughters about “eating the rainbow” and this was a fun way to help them do that.
Another reason I really like to do the salad bowls is because it’s so easy to play around with the cuisine type, the textures, and the flavors.  I can add raw and roasted veggies, nuts, and choose whichever grain I want.  There’s really no wrong way to make these and super easy to substitute an ingredient you may not have.  Honestly, food can’t get easier than that!
We’ve been doing a lot of non-desi (non-Indian) foods lately and I wanted to get the girls into Indian spices without going over the top.  Plus, I don’t think I can go without Indian food and spices for that long anyways.

For the sweet potatoes, I did a simple roast with an addition of paprika for color and flavor.  I’m using paprika to gradually build up the girls to trying cayenne and other types of peppers and spices so this is especially great for those of you who prefer milder spices.
20190508_142541.jpg
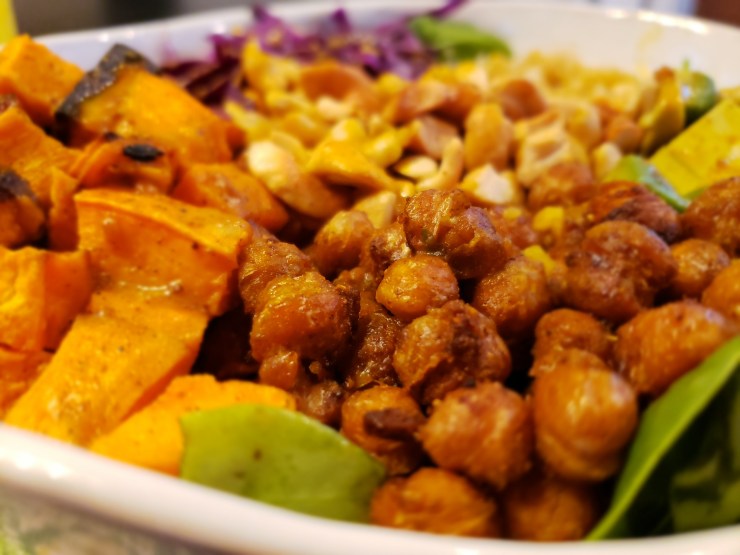
I also roasted some chickpeas as those are so easy and delicious to make.  It made me proud that both my girls were eating them as soon as they cooled down from the oven.  These turned out so good and honestly, I had to go back and make more because between the three of us, we snacked on most of the beans! I’m definitely adding it to my snack rotation list!
20190508_143103.jpg
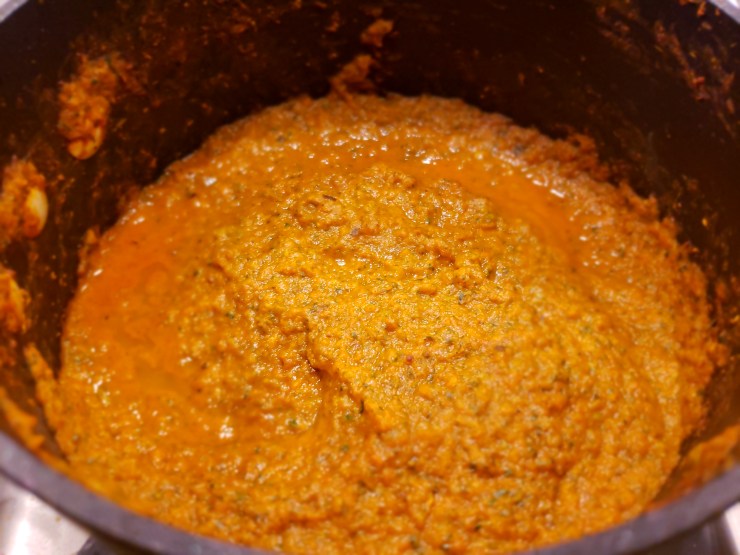
The dressing on here was probably the hardest to figure out as I wanted Indian flavors but nothing too intimidating.  I used almond butter to give it a little bulk and the addition of a little protein is always appreciated.  Because I had already used a lot of spices for the chickpeas, I fell back a little with the dressing and opted for curry powder, turmeric (for the color and my youngest happened to have a cold which needed some help) and some fresh garlic and ginger (which appears on 90% of Indian cooking!).
20190508_143014.jpg
I left the quinoa simple by cooking it only in salt water as there are so many flavors going around, I felt if I added more, everything would get lost in a chaotic world of spice.
20190508_142700.jpg
For the rest of the ingredients, it was nice to have the crunch from the vibrant red cabbage, the creaminess of the avocado, and oh! those toasted cashews were just the icing on top of a great salad!
20190508_143114.jpg
Try it out!  From my kitchen to yours, I hope you enjoy this one.

Ingredients:
1 Sweet Potato, diced into 1″ cubes
1 avocado, sliced
1 cup red cabbage, shredded
1 cup baby spinach
½ c quinoa, rinsed
¼ c raw cashews
2 Tbsp & 1 tsp olive oil
1 tsp paprika
Salt and pepper to taste

For the chickpeas:
1 15oz can chickpeas, rinsed, drained & dried with a paper towel
1 Tbsp olive oil
2 tsp cayenne pepper
2 tsp cumin powder
2 tsp coriander powder
1 tsp garlic powder
1 tsp garam masala
¼ tsp salt

For the dressing:
¼ c almond butter
½ lemon, juiced
1 tsp lemon zest
1/3 c water
2 cloves garlic, minced
1 tsp honey
1 tsp curry powder
½ ginger, grated
1 tsp turmeric
½ tsp salt

Directions:
Preheat oven to 400ºF.  In a baking sheet, toss sweet potatoes, 1 Tbsp olive oil, salt, pepper and paprika.  Mix well and roast for 20 minutes.
In a bowl, combine all the ingredients for the chickpeas.  Transfer to baking sheet and bake for 35 minutes.
In a medium pot, heat water and ½ tsp salt.  When it comes to a boil, add the rinsed quinoa and reduce heat to medium low.  Cover and cook quinoa for 15-20 minutes.  Remove from heat and use a fork to fluff it.
In a small pan, mix ½ tsp olive oil and cashews.  Toast on medium heat until they are a light golden red color.  Turn off heat and remove pan.  Set aside to use as topping.
For the dressing, combine all of the ingredients in a mason jar and shake well.

To assemble:
Line a bowl with spinach and add the quinoa, sweet potatoes, avocado slices, shredded cabbage, toasted cashews, and drizzle with almond curry dressing.  Enjoy!

Lentil Barley Soup Yum

A few years back, when I was sick, my husband brought home a veggie barley soup by Wolfgang Puck.  I fell in love instantly and now, it’s the first one I want when I’m feeling a little under the weather or even in the mood for some comfort soup.  There’s a heartiness about it without the fuss of heaviness to it.  As much as I love Chef Puck’s soup, I wanted to create my version at home.
For a couple of winters, I tried several variations but was never satisfied with it because none of them measured up to Chef Puck’s soup.  Well, how can anything really?  Anyways, I kept at it and I think I’ve found a great version that works for me.  I’m sure you will enjoy it as much as I do.
I found all of the produce at the farmer’s market, making it more sustainable, organic, and healthy (c’mon, we all know there’s more sodium in a can of anything….no matter how delicious it tastes!).
20190115_123925.jpg
I just love having fresh veggies, and for me, the more the better!  Added benefit, when my daughter was cooking this with me, she said, “Mamma, we’re eating the rainbow!”  Made me so proud as I’m trying to teach her to eat her colors to get a variety of nutrients.  Score 1 for Mom!
20190408_154956.jpg
If you’ve been following my blog, you’ll figure out that I’m a barley addict!  But really, what’s not to love?  It’s high in protein, high in fiber and has so much nutrition!
20190115_182533.jpg
So… what are you waiting for?!  Try out this delicious goodness and enjoy some comfort with rainbows and barley like me.

Ingredients:
½ c pearl barley
½ c green lentils
½ med onion, diced
1 med carrot, diced
3 ribs of celery, diced
½ zucchini, diced
½ yellow squash, diced
1 potato, diced
3 cloves garlic, minced
1 Tbsp Olive Oil
1 bay leaf
1/3 c tomato sauce
4 c low sodium veggie broth
1 c water
1 tsp cumin powder
1 tsp coriander powder
½ tsp turmeric powder
salt to taste
pepper to taste
cilantro to garnish

Directions:
In a deep pot, heat olive oil and sauté onions until they are browned.  Add in garlic and sauté for another 30 seconds to let the aroma bloom.  Add in all the veggies and sauté for a few minutes until the veggies are tender.  Mix in the spices and bay leaf.  Cook for 2 minutes.  Add in the tomato sauce and mix well.  Cook for 3-5 minutes.  Add the barley, lentils, veggie broth, water, salt and pepper.  Mix well and cook covered for 30 minutes.  Taste and season with more salt and pepper if necessary.
Serve with a slice of garlic bread and enjoy!

Roasted Garden Salad

I don’t like to labor over big meals during the summer time – I’d rather spend my time outdoors!  To me, summertime is all about simple but filling foods and clean eating so I can enjoy the sun as much as possible.
This salad is just that.  It’s refreshingly light, satisfying, healthy, easy, and best of all, I can do it within 20 minutes!

20180709_185915.jpg

It truly is a one pan deal – all you have to do is line all the veggies in the pan, roast them in the oven and voila!
20180709_190720.jpg
I added in some roasted chickpeas for crunch and protein… let me tell you this completed the salad in the best way possible.
20180709_191223.jpg

Ingredients:
1lb fresh arugula
1 Bell Pepper
1 Onion
1 Zucchini
1 Yellow Squash
1 14oz can of Garbanzo beans, drained and rinsed
1 Tbsp Italian Seasoning
2 tsp smoked paprika
2 tsp Balsamic Vinegar
Salt to taste
Pepper to taste

Directions:
Heat oven to 350ºF.  Sliced all veggies and line in a baking sheet.  Drizzle with EVOO, add salt, pepper and Italian seasoning.  Mix well so all the veggies are equally seasoned.

Meanwhile, in another tray, spread out garbanzo beans in a flat layer.  Drizzle with EVOO, add salt and pepper and toss to coat evenly.  Sprinkle paprika on the top but don’t mix it.

Bake veggies for 20 minutes and beans for 20-25 minutes.  In a bowl, add arugula.  when veggies and beans are done, add them to the arugula.  Drizzle EVOO lightly, add balsamic vinegar, salt and pepper and toss.  Enjoy this salad as much as I do!

Roasted Butternut Squash Soup

There have been a series of storms lately with only rain in the forecast.  Days like these always make me yearn for the some warm soup in front of the fireplace.  The fireplace didn’t happen, but here’s how I put my twist of Thai and Indian fusion on Butternut Squash Soup.

wp-1490376371081.jpg

Heat the oven to 375º.  Add butternut squash to a sheet pan and drizzle with EVOO.  Add salt and pepper and toss so that all the cubes are evenly coated.  Bake for 45 minutes.

wp-1490376362204.jpg

The aroma as these are baking in the oven fills my whole house and has me salivating.  The 45 minutes seem so long but these nuggets are so sweet and delicious when they’re done.   Let’s be honest… I definitely dipped into these and a little more than “a couple” were gone!  Luckily, I had enough left to make soup!

wp-1490376348179.jpgIn a pot deep enough to make the soup, sauté onions until they are soft and starting to turn a little translucent.  While the onions are cooking, grate in fresh ginger.

The fresh ginger adds a great zing and I love watching it sizzle as I grate it straight into the pot.

wp-1490376340983.jpg

Next, I added all the spices – this is where the Indian comes in.  Cayenne, Cumin, Coriander, and Turmeric.  Mix it for a couple of minutes so you don’t have an uncooked taste of the spices in your soup.  If you don’t like spicy too much, feel free to cut out the cayenne pepper.

wp-1490376336070.jpg

Finally, add in the roasted butternut squash and mix everything together.  Add the veggie broth, and a little salt and pepper.  You’ll probably want to taste at this point.  Remember, the squash already had salt on it before you roasted it so you’re really adding enough to bring out the flavors of the spices at this point.  Once it boils, add lemon juice, basil and the coconut milk to it (my Thai inspiration).  With an immersion blender, blend everything so you have a nice, smooth texture.

wp-1490376319089.jpg

Let it simmer for an additional 10-15 minutes.  Enjoy with your favorite nostalgic memories.

Ingredients:
1 butternut squash, seeded and cubed
1 med red onion, chopped finely
3 Tbsp grated ginger
1/2 tsp cayenne pepper
2 tsp ground coriander
1 tsp cumin seeds
1/2 tsp turmeric powder
1/4 tsp cinnamon powder
4 c Veggie broth
1/4 c fresh basil, chopped
1 can coconut milk
salt to taste
black pepper to taste

Recipe:
Heat the oven to 375º.  Add butternut squash to a sheet pan and drizzle with EVOO.  Add salt and pepper and toss so that all the cubes are evenly coated.  Bake for 45 minutes.
Heat EVOO in a soup pot on medium heat and add onions.  Add in freshly grated ginger and sauté 5-10 minutes until onions are soft and translucent.  Add in cayenne pepper, coriander powder, cumin seeds, turmeric powder, and cinnamon powder and mix well.  Add the roasted squash, veggie broth and salt and pepper.  Once it boils, add lemon juice, basil and the coconut milk.  With an immersion blender, blend everything so you have a nice, smooth texture.  Let it simmer for an additional 10-15 minutes.  Serve hot.