Spiced Plum Crumble Bars

One of my very good friends, Diana, has a plum tree that produces an abundance of plums every year.  One of my favorite memories is when Sanaya was just over a year old, we had gone to her house and she let us pick plums in her backyard.  We had so many plums in our hands, I had walked away to put them in a basket.  When I came back, Sanaya had eaten half a plum (most of the juice was around her mouth and on her clothes) and was holding another she was getting ready to dive into.  It was one the best afternoons ever!
IMG_7830
We are a fruit loving family and we don’t discriminate (well, unless it’s mangoes – then everyone has to fend for themselves while I devour them).  At any given time, there’s always fresh fruit in the house and I love that my girls share mine and hubby’s love for them.  In honor of Diana’s plum tree (which I heard may not be around much longer and I almost cried), I got creative and added a little spice spin to these crumble bars.
IMG_7824
I love this recipe because it is so easy to come together.  For the filling, I stayed true to Salted Mint‘s filling.  I tried out a few different variations but I love this one the best because it is simple, adds the warmth of star anise and cinnamon and tastes amazing!
IMG_7831
For the crumble, I added hints of ginger and cardamom (I seriously felt like I could call this a Chai Spiced Plum Crumble because of the similar spices used). And the best is I can use the same mixture for the crust and crumble!
IMG_7834
For the oats, I used old fashioned oats and mixed it by hand.  You can absolutely pulse it in a food processor until you get a crumbly mixture.

I don’t think anyone can stop eating just one bar!  These are so crumbly, flaky, sweet, tart, and have just a little hint of spice which just warms your insides up!

This recipe makes about 16 squares in a 8×8 baking pan.

Notes:
To store, place in a sealed container and keep in fridge for up to 1 week or in freezer for up to 2 months.

Keep the skin on the plums!  I wasn’t sure about this when I first started experimenting but it just becomes a part of the jam and you can’t even notice it!
IMG_7828
From my kitchen to yours, I hope you enjoy these delicious plum crumble bars!

Here are the tools I used for this recipe:
  

Breakfast Soufflé Bites

These Breakfast Soufflé Bites are so quick to make, delicious, and fun to play with the toppings.  Even better, you can make them ahead and freeze them to reheat on a busy morning.

Yum

Light, airy and packed with protein and a variety of nutrients, you don’t have to worry about what healthy breakfast to make in the mornings.  Wrap them in foil, pop them in the freezer and when you want to eat them, reheat in the toaster oven or oven and they’re the perfect breakfast on the go meal.
IMG_7462
Here are the add-ins I used:

  • Mushrooms and Spinach
  • Tomato, Basil and Mozzarella
  • Mexican Fiesta – bell peppers and onions with fajita seasoning
  • Broccoli and cheddar
  • Jalapeño Popper – jalapeños and cheddar cheese
  • Leftover Jamboree

What toppings will you play around with?

From my breakfast table to yours, I hope you enjoy this!

Rainbow Fajita Bowl

Summertime salads are one of my favorites to eat.  They’re simple, light, filling, and don’t take much time in front of the stove or oven.  I love this Rainbow Fajita Bowl because it is so easy to pull together and you can eat it as a dinner meal or prep it on the weekends for weekday lunches.
IMG_7380
Yum

It’s vegan but if you’re looking to add in some chicken, super simple to do that too.  I’ll include it in the notes below!   You can marinate the chicken 30 minutes ahead or overnight but still get an amazing, tasty, juicy chicken too!
IMG_7374
But on to my bowl.  I just love the colors in this salad.  And the fact that my girls ate it because of the rainbow foods (ok, well maybe they ate one leaf of salad but at least I got one in!).  Drizzle with some chili lime dressing and you’re set!  The spice, the crunch, the sweet corn… I think this salad bowl is calling my name for lunch again today!
IMG_7381
Get your kids involved in this one.  Once you have all the ingredients ready, have them help you assemble them for make ahead lunches for you  and your kids!

From my kitchen to yours, enjoy this rainbow of colors and burst of flavor!

Roasted Cilantro Mint Chutney

IMG_7549
Yum

Growing up in an Indian household, chutneys are a must. They are an integral part of any Indian household. Whether you are eating Dosa or Adai Waffles / Lentil Waffles with tomato or coconut chutney, or samosas with cilantro or tamarind chutney, or Kati Rolls or Bombay Masala Sandwiches with chutney used as a spread, it’s always prominent in Indian food.
IMG_7498
There are so many different kinds of chutneys prepared so many different ways, I just love the versatility of these dips.  I tried to a different approach to my Roasted Cilantro Mint Chutney by roasting the cilantro and mint with some cashews, chickpea flour, and plenty of spices.
IMG_7501
As you roast the herbs, they develop a char which carries into the final product and gives it just a hint of smoky flavor and smell when you eat it.
IMG_7509
I’ve used this chutney recipe to eat with Adai Waffles / Lentil Waffles, Paneer Cabbage Cups, Spinach Dal Paratha, Aloo Paratha, and Avocado Roti.  What will you eat it with?
IMG_7535
From my kitchen to yours, I hope this chutney becomes a staple for you!

Instant Pot Black Eyed Peas Curry

When Sanaya, my eldest, was about 3 years old, we had gone to Pankaj’s cousin’s house for a play date.  Sanaya and her cousin Aarya are besties.  They’re only 2 months apart in age and our families have gone through the journey of parenting together since we were pregnant.

Anyways, this story is from a time when Sanaya was very picky about food, especially Indian food.  Though I feel like in her short life, she’s either been picky or a proper foodie.  Kids!
wp-1592832548885.jpg
Yum

My sister-in-law, Aarya’s mother had made a black eyed peas curry.  I remember growing up my mom making this often so I got excited but nervous also.  Will Saanu eat it?  Will she like it?  I’m hoping she likes it because I’m really trying to get the girls to have an appreciation for Indian food.
wp-1592832549008.jpg
Surprisingly, and luckily, she loved it and for once, ate most of her food without a fuss.  I felt like I found a magical key.  Since then, this is one recipe I make often for the girls, especially when I’m in a pinch as it takes less than 30 minutes to make.
wp-1592832548885.jpg
These black eyed peas are perfect for a weeknight meal.  Not only are they delicious and quick to make, they are also rich in fiber, protein and non-dairy calcium.
wp-1592832548761.jpg
Notes:
I soak them at the beginning of meal prep.  If you don’t want to soak them, simply increase the cook time from 12 minutes to 20.

You can store any leftovers in the fridge for up to 3-4 days.

For Stovetop: Soak black eyed peas for at least 1 hour.  Then boil them in 4 cups of water for 45 minutes.  Drain and add to spices as indicated in step 5.  Add only 1 c water and cook for an additional 15 minutes.

For Slow Cooker:  Follow directions below and cook on low for 6 hours.

From my kitchen to yours, I hope you enjoy this Dal (Lentil)!


Instant Pot Black Eyed Peas Curry

  • Servings: 4
  • Print

Ingredients:

1 c dried black eyed peas, soaked

1 onion, chopped

2 tomatoes, chopped

4 garlic cloves, minced

1″ ginger knob, grated

1 bay leaf

1 tsp cayenne pepper

½ tsp turmeric

2 tsp coriander powder

1 tsp garam masala

1 tsp salt

2 c water for cooking

1 Tbsp lemon juice

1 Tbsp olive oil

1 tsp cumin seeds

½ tsp hing (asafoetida)

Directions:

1. Set Instant pot to saute mode.  Add oil and let heat.

2. Add cumin seeds and hing.

3. When the cumin seeds start to splutter, add in onions, ginger and garlic.  Saute for 3-5 minutes, until the onions are tender and translucent.

4. Add in the tomatoes and spices and cook for 3-5 minutes, or until the oil starts separating from the tomatoes.

5. Drain the water from the black eyed peas and add to the instant pot.  Add the 2 c water and mix well.

6. Cover instant pot and set vent to sealing postion.

7. Change setting to manual/pressure cook mode and set timer for 12 minutes.

8. When the timer goes off, let pressure release naturally for 10 minutes before releasing the remaining pressure.

9. Add lemon juice and give a quick stir before serving.

Serve with Naan or Rice.

Mango Pico

Mango is my absolute favorite in the whole world!  Done.  That’s it.  If I were stuck on an island and there were mangoes, I would be set.
wp-1591883427364.jpg
Yum
That being said, I think for my hubby, it would be salsa.  Honestly, I’ve never seen a salsa that man has not devoured.
wp-1591883427396.jpg
I love this mango salsa because it is so fresh, tangy, sweet, and spicy all at the same time!  I’ve paired this the traditional way with chips, fish, tacos, fish tacos, as a dip during parties and more recently with Hawaiian chicken.  There’s no wrong way to eat mango pico!
wp-1591706168380.jpg
The mango pico that I made is very easy and simple but it packs a punch of flavor.  I go a little heavy on the spice to balance the sweet of the mango and only 5 ingredients needed to make.

From my kitchen to yours, enjoy this recipe!

Instant Pot Tortilla Soup

Tortilla Soup is one of my favorite soups.  Especially this instant pot recipe which takes only 4 minutes to cook!  It’s filled with delicious veggies and spices like ancho chile and chipotle powder to build a good depth of flavor.  Perfect for a hectic weeknight or a cold day, this tortilla soup is a great way to use up pantry essentials.  Continue reading “Instant Pot Tortilla Soup” →

Roasted Chili Almonds

Chili almonds are the perfect snack.  You can make these ahead and have them after a workout, an afternoon snack, or even on a cheeseboard.  Quick to make, these chili almonds are a delicious combination of spicy and crunchy.  Continue reading “Roasted Chili Almonds” →

Tropical Fruit Smoothie

This is the most perfect afternoon drink on a hot summer day.  We’ve had temps in the high 90’s and low 100’s lately so we’ve been making ice cold drinks to stay cool.  One of our favorite is this Tropical Fruit Smoothie.  Though we can’t be in the tropics, the girls and I decided to bring the flavors of the tropics home.  Continue reading “Tropical Fruit Smoothie” →

Fresco Carpaccio

So, traditionally, a carpaccio is an appetizer made of thinly sliced meat.  I decided to take the technique and make my own summer version of that.  The sharp tang of lemon, the fresh fruit, and the crunch of toasted pistachios on top are an amazing combination.  This Fresco Carpaccio is great as an appetizer for any dinner or party you are hosting, or just follow what I did and make a plate for yourself, and enjoy it in the sun!
wp-1590599555473.jpg
Yum
I really didn’t want to stop eating it!  Hubby and I finished it within minutes and this has become another of our favorite summer recipe.
wp-1590599560914.jpg
The best part, this is so healthy for you with not too many calories or fat, there’s no cooking involved, and it takes 10 minutes to make (I’m not counting how long you have to wait for it to marinate).
wp-1590599561161.jpg
wp-1590599556324.jpg
Notes:

I highly recommend marinating this as the flavor of the dressing will be sharper and will help breakdown the raw taste of the zucchini since you are not cooking it.

I used a mandolin for this but if you don’t have one, no worries.  Use a potato peeler and make thin ribbons of the zucchini and cucumbers.

What fruits and veggies will you use?  Share your pictures!

From my kitchen to yours, enjoy this carpaccio as much as we did!

Ingredients:  
1 zucchini
1 cucumber
1 avocado
1 lemon, zested and juiced
¼ c Avocado Oil
2 Tbsp pistachios
Salt to taste
Pepper to taste

Directions:  
1.  In a large bowl, mix together lemon zest and lemon juice.  Whisk to mix well.
2.  Add in oil and whisk 2-3 minutes until oil and lemon juice have emulsified.
3.  Add in salt and pepper and whisk one last time to mix.  Set aside.
4.  Trim the ends of the zucchini and cucumber.  Using slicer or peeler, make very thin ribbons.
5.  Add zucchini and cucumber ribbons to dressing and toss to coat each ribbon equally.
6.  Cover bowl and marinate in fridge for 30 minutes.
7.  Meanwhile, on a med flame, heat up a small skillet.  Add in the pistachios and toast 3-5 minutes until they are nice and crunchy.
8.  Give the toasted pistachios a rough chop and set aside.
9.  Pull zucchini and cucumber out of fridge.
10.  Thinly slice avocado.
11.  In a plate, line up each fruit with one slightly on top of the previous one.  If you have any dressing left, drizzle a little on top.  Garnish with toasted pistachios.

Enjoy!

Brown Butter Toasted Tortellini Yum

I’m a pasta lover and and am so proud to say so are my girls.  I can get them to eat almost anything as long as I pair it with pasta.  The only caveat, they keep changing what type of sauce they want.  First, I couldn’t get them to eat anything but marinara sauce, then they moved on to pesto, and now they are stuck on brown butter. Continue reading “Brown Butter Toasted Tortellini Yum “ →

Masala Omelette Yum

These days, I’ve seen and heard friends and family tell me they are working harder than ever, missing meals during the day.  Some are working from home trying to manage homeschool, work and life in general.  Others have a profession that is an essential role to our community right now and are giving so much to us.  While I hope missing meals doesn’t become daily routine, here is a breakfast omelette that will start out anyone’s day on the right foot! Continue reading “Masala Omelette Yum “ →

Spinach Dal Yum

Both the girls need their dal (lentils) at least once a week and I love it!  It makes me so happy that they turn to Indian food for comfort and norm.  I try to vary out the dals that I feed them so they get a variety of nutrients and flavors and I get to rotate my lentils. Continue reading “Spinach Dal Yum “ →

Microgreens Salad Yum

About a month back, we finally had a weekend free to take the girls to the Farmer’s Market which we’ve desperately missed during the winter months.  The girls love tasting all the fruit samples and of course stopping at the kettle corn stand, while I love to check out all the new produce and imagine different recipes I can create. Continue reading “Microgreens Salad Yum “ →

Crispy Chickpeas and Sweet Potato Tacos Yum

When I first started experimenting with this recipe, I wasn’t sure how the sweet potato was going to work in my tacos.  I debated constantly trying to pair a different vegetable, but ultimately, I kept coming back to the sweet potatoes. Continue reading “Crispy Chickpeas and Sweet Potato Tacos Yum “ →

Instant Pot Chole Yum

Growing up, one of my favorite North Indian dishes has always been Chole.  Whether we were eating at a wedding, an Indian restaurant, or requesting it as my special birthday dinner, Chole has always been a constant and a comfort in my life.  The aroma of it freshly made in the air, just pulls at you.
wp-1583865934648.jpg
There are so many different versions of making this recipe based on where in North India you are.  Sometimes, even in the same region, recipes differ vastly from home to home.  I prefer mine to have a thick red gravy, which is best achieved I’ve found by adding an abundance of tomatoes (and I really mean A LOT)  and spices.  The best part is that this dish is such a classic, you can never go wrong.  Serve it hot with rice, naan or Bhatura and be prepared to be wowed!
wp-1583865934527.jpg
From my Kitchen to yours, I really hope you enjoy this.

Ingredients:
1 c dried chickpeas, washed and soaked overnight (at least 4 hours)
1 ½ c water
1 Tbsp Olive or Avocado Oil
5 cloves garlic, minced
1″ ginger, grated
1 large yellow onion, finely chopped
3 med-large tomatoes, finely chopped
1 ¾ c tomato sauce
2 tsp cayenne pepper (or to taste)
2 tsp coriander powder
1 Tbsp Chole Masala
1 tsp aamchur (dry mango) powder
1 ½ tsp cumin seeds
2-3 bay leaves
½ tsp peppercorns
1″ cinnamon stick
cilantro to garnish

Directions:
1. Start the instant pot on sauté mode.  Add oil and let it heat up.
2. Add cumin seeds and let them splutter.  Add in the cinnamon stick, peppercorns and bay leaf.  Sauté for 30 seconds.
3. Add ginger and garlic and sauté for another 30 seconds.
4. Add in the onions and sauté for 3-5 minutes until they turn translucent and start shrinking.
5. Add in the tomatoes, cayenne pepper, coriander powder, chole masala, and salt.  Cook for 2-3 minutes until the tomatoes start softening.  Add in the tomato sauce and cook for another 2-3 minutes.
6. Drain the water from the chickpeas and add them to the instant pot.  Mix well with the gravy and cook for 2-3 minutes.
7. Add in the water and mix well.  Turn off the instant pot, cover with vent to sealing position and change setting to manual/pressure cook for 40 minutes.
8.  When the instant pot beeps, do a 20 minute NPR (natural pressure release).  If the pin has not dropped at this point, release the pressure and open the instant pot.
9.  Change setting to sauté, add in the aamchur powder and let boil for 3-5 minutes.  Taste and adjust for salt.
10. Garnish with fresh cilantro and serve hot with rice, naan or bhature.

Enjoy!

Desi Masala Bowl Yum

Lately, I’m hooked on salad bowls.  They’re so delicious, easy to make, loaded with healthy foods and vibrant in color – ensuring you get a variety of nutrients.
I’ve been talking to my daughters about “eating the rainbow” and this was a fun way to help them do that.
Another reason I really like to do the salad bowls is because it’s so easy to play around with the cuisine type, the textures, and the flavors.  I can add raw and roasted veggies, nuts, and choose whichever grain I want.  There’s really no wrong way to make these and super easy to substitute an ingredient you may not have.  Honestly, food can’t get easier than that!
We’ve been doing a lot of non-desi (non-Indian) foods lately and I wanted to get the girls into Indian spices without going over the top.  Plus, I don’t think I can go without Indian food and spices for that long anyways.

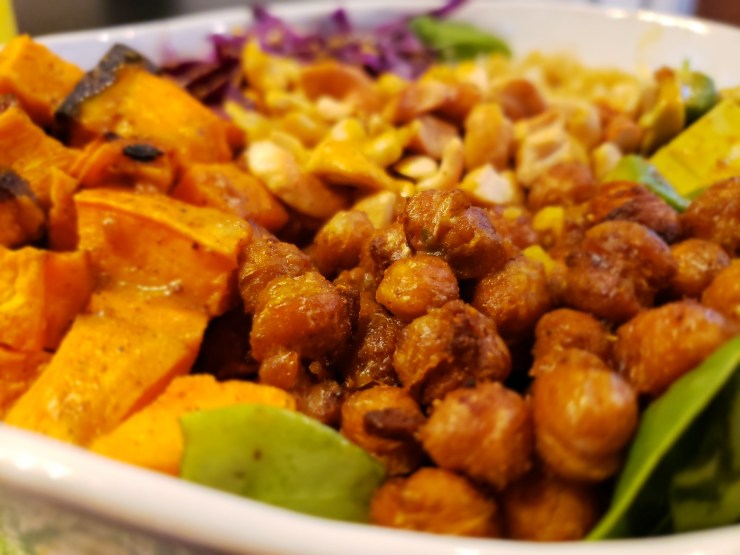
For the sweet potatoes, I did a simple roast with an addition of paprika for color and flavor.  I’m using paprika to gradually build up the girls to trying cayenne and other types of peppers and spices so this is especially great for those of you who prefer milder spices.
20190508_142541.jpg
I also roasted some chickpeas as those are so easy and delicious to make.  It made me proud that both my girls were eating them as soon as they cooled down from the oven.  These turned out so good and honestly, I had to go back and make more because between the three of us, we snacked on most of the beans! I’m definitely adding it to my snack rotation list!
20190508_143103.jpg
The dressing on here was probably the hardest to figure out as I wanted Indian flavors but nothing too intimidating.  I used almond butter to give it a little bulk and the addition of a little protein is always appreciated.  Because I had already used a lot of spices for the chickpeas, I fell back a little with the dressing and opted for curry powder, turmeric (for the color and my youngest happened to have a cold which needed some help) and some fresh garlic and ginger (which appears on 90% of Indian cooking!).
20190508_143014.jpg
I left the quinoa simple by cooking it only in salt water as there are so many flavors going around, I felt if I added more, everything would get lost in a chaotic world of spice.
20190508_142700.jpg
For the rest of the ingredients, it was nice to have the crunch from the vibrant red cabbage, the creaminess of the avocado, and oh! those toasted cashews were just the icing on top of a great salad!
20190508_143114.jpg
Try it out!  From my kitchen to yours, I hope you enjoy this one.

Ingredients:
1 Sweet Potato, diced into 1″ cubes
1 avocado, sliced
1 cup red cabbage, shredded
1 cup baby spinach
½ c quinoa, rinsed
¼ c raw cashews
2 Tbsp & 1 tsp olive oil
1 tsp paprika
Salt and pepper to taste

For the chickpeas:
1 15oz can chickpeas, rinsed, drained & dried with a paper towel
1 Tbsp olive oil
2 tsp cayenne pepper
2 tsp cumin powder
2 tsp coriander powder
1 tsp garlic powder
1 tsp garam masala
¼ tsp salt

For the dressing:
¼ c almond butter
½ lemon, juiced
1 tsp lemon zest
1/3 c water
2 cloves garlic, minced
1 tsp honey
1 tsp curry powder
½ ginger, grated
1 tsp turmeric
½ tsp salt

Directions:
Preheat oven to 400ºF.  In a baking sheet, toss sweet potatoes, 1 Tbsp olive oil, salt, pepper and paprika.  Mix well and roast for 20 minutes.
In a bowl, combine all the ingredients for the chickpeas.  Transfer to baking sheet and bake for 35 minutes.
In a medium pot, heat water and ½ tsp salt.  When it comes to a boil, add the rinsed quinoa and reduce heat to medium low.  Cover and cook quinoa for 15-20 minutes.  Remove from heat and use a fork to fluff it.
In a small pan, mix ½ tsp olive oil and cashews.  Toast on medium heat until they are a light golden red color.  Turn off heat and remove pan.  Set aside to use as topping.
For the dressing, combine all of the ingredients in a mason jar and shake well.

To assemble:
Line a bowl with spinach and add the quinoa, sweet potatoes, avocado slices, shredded cabbage, toasted cashews, and drizzle with almond curry dressing.  Enjoy!

Top 20 Brown Rice and Quinoa List!

The other day, I opened up my blog to type up a recipe and I got a notification.  Most of my notifications are the usual responses to my recipes but this one was different.  I had to read it a couple of times to make sure I was reading it correctly.  Rebecca, from www.simplerecipeideas.com, had compiled a top 20 list of the best Brown Rice and Quinoa recipes and mine made the list! I was honored that my Quinoa, Brown Rice and Black Beans was chosen for her top 20 and thank you Rebecca for including me and mine in your list!

When I came up with this recipe, I was had just discovered the Seeds of Change Brown Rice and Quinoa pouches.  They are so delicious, I could finish a whole pouch in one go (which could usually be enough for 2 servings!).  To make myself feel a little less guilty, I decided to add some veggies and beans, give it a southwest-ish flavor profile, and voila!  I ended up making a delicious meal out of the pouch!  It’s great because this is a 10 minute meal recipe, or a great side dish.  Check it out at the link above and tell me what you think!

Roasted Garden Salad

I don’t like to labor over big meals during the summer time – I’d rather spend my time outdoors!  To me, summertime is all about simple but filling foods and clean eating so I can enjoy the sun as much as possible.
This salad is just that.  It’s refreshingly light, satisfying, healthy, easy, and best of all, I can do it within 20 minutes!

20180709_185915.jpg

It truly is a one pan deal – all you have to do is line all the veggies in the pan, roast them in the oven and voila!
20180709_190720.jpg
I added in some roasted chickpeas for crunch and protein… let me tell you this completed the salad in the best way possible.
20180709_191223.jpg

Ingredients:
1lb fresh arugula
1 Bell Pepper
1 Onion
1 Zucchini
1 Yellow Squash
1 14oz can of Garbanzo beans, drained and rinsed
1 Tbsp Italian Seasoning
2 tsp smoked paprika
2 tsp Balsamic Vinegar
Salt to taste
Pepper to taste

Directions:
Heat oven to 350ºF.  Sliced all veggies and line in a baking sheet.  Drizzle with EVOO, add salt, pepper and Italian seasoning.  Mix well so all the veggies are equally seasoned.

Meanwhile, in another tray, spread out garbanzo beans in a flat layer.  Drizzle with EVOO, add salt and pepper and toss to coat evenly.  Sprinkle paprika on the top but don’t mix it.

Bake veggies for 20 minutes and beans for 20-25 minutes.  In a bowl, add arugula.  when veggies and beans are done, add them to the arugula.  Drizzle EVOO lightly, add balsamic vinegar, salt and pepper and toss.  Enjoy this salad as much as I do!

Teriyaki Salmon

Recently, we’ve been eating a rotation of mostly the same foods as at least 50% of our household has been taking shifts getting sick.  Well, I’m happy to say, we’re (hopefully) finally getting to the tail end of it so that means no more soup or tea!  My hubby recently picked up some Udon noodles for me (he knows I like them a lot!) and I’ve been trying to figure out what I want to do with them.  Sure they taste great on their own but let’s get real, they taste even better paired with a delicious filet of salmon.
I’ve also been playing around with my version of a teriyaki sauce.  Most of the recipes I found online included a sake but since I was going to experiment on my toddlers as well as my hubby, I decided to leave that one out.  I have to say, this sauce turned out pretty delicious – I even dipped my brussels sprouts in the leftover as if it were a dipping sauce.  Try it out and tell me what you think!

20180212_172550.jpg20180212_172922.jpgThe best part about this sauce is that it is very simple and most people have these ingredients at home!   In a little mixing bowl, add the soy sauce, brown sugar, ground ginger, and minced garlic.  I also added a little flour, some chili pepper flakes and EVOO to the bowl.
20180212_205843.jpg
This is my favorite part of the recipe – sesame seeds.  The nutty flavor and crunch adds just the right note of balance.
20180212_210113.jpg
Whisk everything really well.  You want all the ingredients to blend well and make sure there are no lumps from the flour added.  They won’t cook and trust me – it can ruin the taste.
In a large bowl, line 2 6oz salmon filets and cover with the teriyaki sauce.  Let it marinate for at least 30 minutes.
20180212_175912.jpg
Coat the bottom of a cast iron skillet with EVOO and heat on high until it starts to smoke.  Reduce the heat and place the salmon skin side up and let it cook for 4 minutes.  Do Not Touch the salmon for the next 4 minutes.  I know people get anxious and want to check if it is cooking properly, is it burned, there’s a char type smell coming, etc, etc.  I assure you nothing is wrong with it.  In fact, the more you try to check it, the more it will not cook properly.
Once your 4 minute timer goes off, flip the salmon the other side and cook for another 3 minutes.
Serve with noodles or rice and enjoy!

Teriyaki Salmon:
Ingredients:
2Tbsp Soy Sauce
1Tbsp Brown Sugar
3 cloves minced garlic
1/4tsp ground ginger
1/2tsp chili flakes
1Tbsp sesame seeds
1/2Tbsp flour
2tsp EVOO

2 6oz Salmon filets (can be replaced with tofu or any of your favorite veggies)

Directions:
In a small mixing bowl, add all of the ingredients and whisk to combine everything.
Coat a cast iron skillet with EVOO and heat on high over the stove.  When it starts smoking, add salmon skin side up and cook for 4 minutes.
Flip and cook another 3 minutes.

Serve hot with noodles or rice.
Enjoy!

Baked Asparagus Fries with Yogurt Dip

I’m a big fan of Asparagus.  And of snacking.  And with asparagus being in season now, I’m trying to consume as many as I can!
A couple of years ago during Thanksgiving, we decided to have a potluck with the family.  One of our cousins brought the most delicious Asparagus fries with garlic dip and I have to tell you, they flew off the pan as soon as they were out of the oven.  Definitely a huge hit!  I could snack on these all day!
I’ll let you in on a secret – even though they’re called fries, I’ve baked them, making them healthy along with delicious.  One of the simplest recipes ever that can work as a side, appetizer or hey! a snack all for me!
Try it out:
Wash and pat completely dry the asparagus (if you don’t dry the asparagus completely, the mixture will not stick properly and will become clumpy in places – trust me, I speak from experience)
You’re going to need 2 shallow bowls – 1 for the whisked egg and 1 for the bread crumb mixture.
20170515_163716
Mix 1 cup Italian seasoned bread crumbs and 1 cup grated parmesan cheese.

20170515_165314

Coat each asparagus first in the whisked eggs then in the bread crumb mixture and line on a cookie sheet.
Bake for 10-15 minutes till they are golden brown.  You don’t want to nuke them so they shrivel up, just enough to cook them.  You’ll get a nice crunch to them and they should still hold their original thickness.

For the yogurt sauce,
20170515_172112
Whip the yogurt so it looks nice and creamy and smooth.  Then add in the dill, salt and lemon juice.  Mix well and dip away!

20170515_172449

Here’s the recipe:
For the Asparagus:
1 lb fresh asparagus, trimmed 1″ from the bottom
2 eggs, whisked really well
1 c Italian bread crumbs
1 c grated Parmesan Cheese

For the Yogurt Sauce:
1/3 c non-fat plain yogurt
3 Tbsp fresh dill, chopped
2 tsp fresh lemon juice
1 tsp salt

Preheat oven to 425ºF.  Line a baking sheet with aluminum foil and grease with cooking spray.
Wash and pat completely dry the asparagus.  Dip one at a time in the egg first then in the bread crumb mixture.  Line on baking sheet.  Bake for 10-15 minutes until golden brown.

For the yogurt sauce,
Whip the yogurt to a smooth and creamy texture.  Add in the dill, lemon juice and salt.  Mix well.  Serve with hot Asparagus fries.

Zucchini Tacos

I’m addicted to cooking shows.  There.  I said it. I admit it.  I guess it’s not bad considering other things people are addicted to these days.  Every Saturday mornings, you can find me glued in front of the television watching my favorite show, The Kitchen.  I can’t bear to miss a single episode.  A few weeks ago, they had guest chef Nikki Dinki on the show who shared her zucchini tacos recipe and instantly I knew I had to try those.

They are amazing!  Forget eating them as tacos, my DH ate them on its own.  SO DELICIOUS!  I did make a few slight changes to her recipe to adjust for ingredients I had in the kitchen/pantry.  Hope you enjoy them as much as we did!


Ingredients:
4 medium zucchini, shredded
2/3 c shredded Mozarella cheese
2/3 c Italian bread crumbs
2 eggs
1 tsp cayenne powder
1 tsp cumin powder
1/2 tsp salt
1/2 tsp garlic powder
Olive Oil Cooking SprayDirections:
Preheat oven to 450ºF.Place shredded zucchini in microwave safe bowl and heat on high for for about 3 1/2 minutes.  Mix the zucchini around and replace in microwave for another 3 1/2 minutes.  Let it cool then place in a cheesecloth and drain as much of the water out as you can.  The drier it is, the better your batter and taco shells will turn out.

Add the eggs, cheese, bread crumbs, cayenne, cumin, salt and garlic powder.  Mix well into a dough-ish batter.  Line a baking sheet with parchment paper and spray lightly with Olive Oil Cooking Spray.

Make 8 portions in the shape of balls from the batter, the size just a tad smaller than a tennis ball.  Flatten them directly onto the baking sheet into 5″ diameter rounds with your hands.  They shouldn’t be too thick as the inside will not cook properly.  Bake for 15 minutes.  The taco shells should be slightly golden brown.  Once you remove them from the oven, let them cool slightly before adding filling to shells.

Enjoy!

Original recipe by Nikki Dinki

Pomegranate Eggplant

IMG_5081

This is one of my favorite recipes.  It’s such a simple go to; you can wow friends and family, or just make it for dinner when you’re short on time or feel lazy enough to not make something elaborate.  I originally found this recipe in a cookbook by Yotam Ottolenghi.  I’ve since adapted it to suit my palate but regardless of which version you try, I’m sure you’ll love the impact of so many flavors and textures packed in such few ingredients.

Here’s what I did:
Preheat your oven to 400°F.

Chop the eggplant into 2 inch cubes.  Add in dried thyme, rosemary, salt, crushed chili flakes, and olive oil.  Toss it all to mix well.
IMG_5044

Line a baking sheet with some aluminum foil and place the eggplant on there, skin side down.
IMG_5046

Bake for 20-25 minutes, until the eggplant is cooked through.  Make sure it’s not overcooked, otherwise, it gets mushy and definitely does not taste good!

The eggplant should look something like this:
IMG_5072

When you’re ready to serve, plate up some eggplant and drizzle a little tzatziki sauce over it.  Finally, sprinkle some pomegranate seeds and enjoy.

IMG_5080

Ingredients:
1 large eggplant, skin on, chopped in 2″ cubes
1 Tbsp dried thyme
1 Tbsp dried rosemary
1 Tbsp crushed red chili flakes
generous pinch of salt
1 Tbsp EVOO
1/2 c pomegranate seeds

Directions:
Preheat oven to 400°F
In a bowl, mix in the eggplant with the thyme, rosemary, dried chili flakes, salt and olive oil.  Toss well so every piece of the eggplant is covered with all the herbs.
Line a baking sheet with aluminum foil and place the eggplant on there skin side down.
Bake 20-25 minutes until the eggplant is cooked through.
When you’re ready to serve, drizzle with tzatziki sauce  and top off with pomegranate seeds.

If you’re interested in the original recipe by Yotam Ottolenghi, click here.

Lal Murgh (Red Chicken)

IMG_5009
I haven’t cooked Indian food in a while because it needs some good time and attention to come out perfect and those are two things I don’t have in abundance these days.  So I decided that needed to change and I needed to create something easy but vibrant and delicious, with lots of flavor.  The spices in this red chicken pack a great punch with an array of flavors and the meat is nice and tender from being marinated even for just a short time.  The best part, the spice mix I used is the Butter Chicken spice mix you get at any Indian grocery store – so easy and time saving!
One of my favorite ways to prep meat is to marinate them.  Did you know that marinating meats helps slow down the growth of bacteria?  Also, based on the ingredient you’re marinating you’re meat with, it affects in a different way.  For example, I’ve used citrus which is known to tenderize the meat and lock in the moisture when you’re cooking it.  Hope your chicken turns out juicy like mine did!

Chop up a boneless, skinless, chicken breast into cubes.  Set them in a container and add in a little spice mix, a splash of lemon juice, and some water.  Mix the chicken well, cover it, and let it marinate for at least 1 hour.  Doesn’t that just look gorgeous?!
IMG_4974

When you’re ready to cook the chicken, heat a little oil in a non-stick skillet over medium heat.  Add some red onions and sauté for a couple of minutes.
IMG_4999

Add in some grated ginger and minced garlic.  Oh, the smell of that garlic!
IMG_5000

Sauté all of the above for a couple of minutes, then add in the tomatoes.
IMG_5002

Mix well, and cook everything for 5-10 minutes. You’ll notice the tomatoes softening and the oil separating.  They should look something like this:
IMG_5004

Finally, add in the marinated chicken and mix well.  Cook it for about 7 minutes or until done.
IMG_5009

For the chicken marinade:
1 skinless, boneless chicken breast, chopped into 1 inch cubes
2Tbsp lemon juice
1Tbsp spice mix
1/3c water

To cook the chicken:
1Tbsp EVOO
1/3c finely chopped onions
1 garlic clove, minced
2tsp grated ginger
2 tomatoes, chopped finely

In a bowl, mix together the chicken, lemon juice, butter chicken spice mix, and water.  Toss well to coat all the chicken pieces evenly.  Cover and refrigerate for at least 1 hour.

To cook the chicken, heat the oil in a non-stick skillet over medium heat.  Add the onions and sauté for 2-3 minutes.  Add in the garlic and ginger and cook for another couple of minutes.  Finally, add in the tomatoes and mix well.  Cook for 5-10 minutes until the oil separates from the tomatoes.  Add in the marinated chicken with all the juices and cook for another 6-7 minutes or until the chicken is completely cooked through.

Garnish with cilantro and serve hot with Roti, Naan or Rice.  Enjoy!

Goat Cheese Lingonberry Crostini

Goat Cheese Lingonberry CrostiniI love cheese in any form, especially if it is goat cheese.  Something about the creamy, sweet texture just hits the spot.  This recipe was an accident made in cheese heaven during my pre-marriage days when my roommate and I wanted to be “fancy” without putting in much effort.  We wanted to create a wine and cheese platter and all we really had in our fridge/pantry was a half log of goat cheese, lingonberry jam, grapes, crackers and honey.  Of course we had wine….. lots and lots of it =)

Though it originated with crackers (which you can totally use if you don’t want to do a crostini), over the years, I’ve “refined” it to truly reflect our original vision of a fancy wine and cheese platter.  This crostini is a great hit whether the husband and I are having a “quiet” night in or friends and family over for a dinner party.  Ready in 10 minutes, how can you go wrong?  Here’s how I made it:

1 Sweet Bread Baguette
1/4c Lingonberry preserves
1 small log of goat cheese (about 4oz)
Honey to drizzle

Preheat oven to 375°F.  Take 1 baguette of Sweet bread and slice into 1/2″ slices (be careful not to cut them too thick – they’ll become too “bready” and the other flavor profiles won’t pull through).  Line them on a cookie sheet and drizzle a little olive oil on them.  Pop them into the oven for about 5-7 minutes until they crisp up and look golden brown.

Pull the baguette slices out of the oven and spread some goat cheese on each one.  Next, add a dollop of lingonberry preserve, then drizzle a little honey over them.

There you have it! Easy peasy Goat Cheese Lingonberry Crostinis.  I hope they bring the same smile to your face as they do to mine!

Guacamole

IMG_4518

Whether it’s watching sports, a party we’re hosting, or just snacking while sitting around the table with friends, this Guacamole recipe finds its way into our bellies often.  The husband and I are big avocado lovers and this guac is filled with simple flavors that hit the spot no matter the occasion.  I hope this becomes a favorite in you kitchen too!  Here’s how I made it:

Ingredients:
2 Avocados, peeled and pitted
2 tomatoes, seeded, finely diced
½ onion, finely diced
1 jalapeno, finely diced
3 Tbsp freshly squeezed lemon juice
Salt & Pepper to taste

Directions:

Mash the avocados in a bowl. I like to leave some chunks when mashing as it adds a nice texture. Add in all the ingredients and mix. Don’t over mix, as this will make the avocado pasty. Season with salt and pepper per your taste. Serve with chips, in tacos, or just about anything you want!

Lemon Herb Salmon

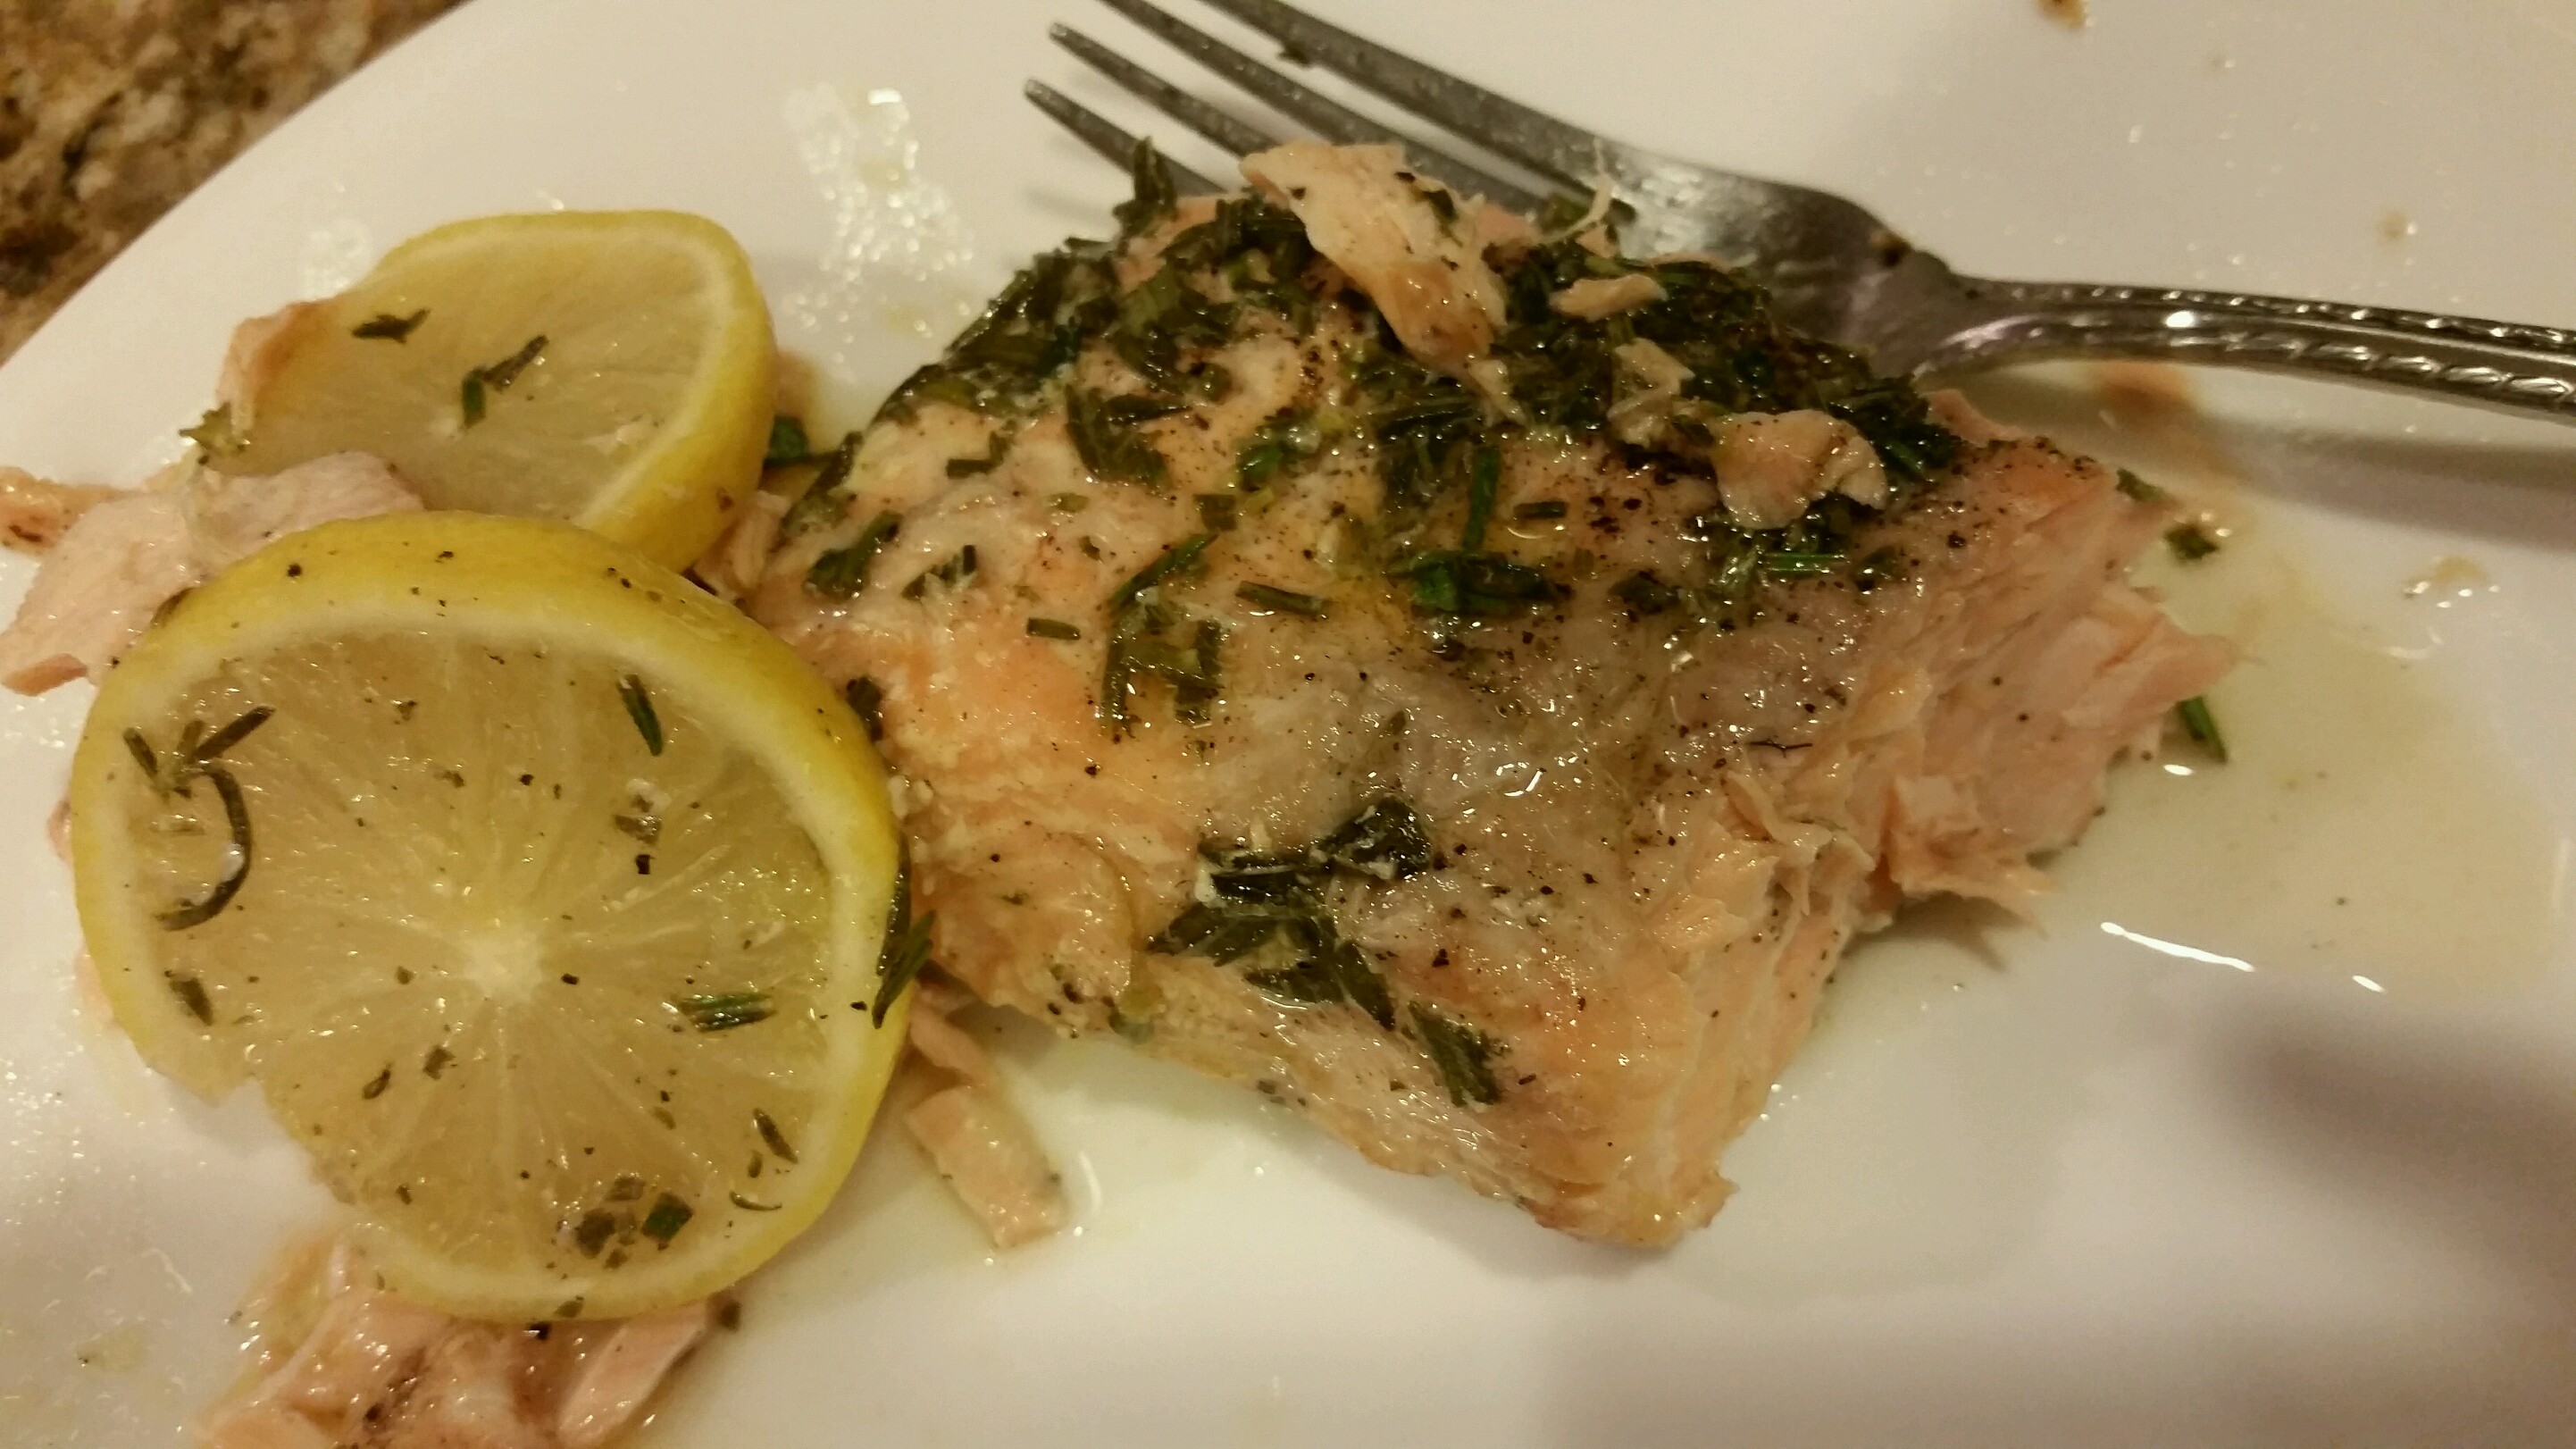
A quick and easy weeknight recipe that tastes good and doesn’t require any effort – sounds like something I can go for all the time.  I’m not a fish expert by any means but I like to experiment whenever I can.  Here’s one of the simplest but tastiest (according to the husband) salmon I’ve made.

I got a 1lb wild salmon filet from the market (you can ask your butcher to take off the skin – I’ll admit, I hate doing that!)

Heat the oven to 400°F.  In a pan, line foil so it overflows about 2 inches on all sides.

Add the salmon, drizzle olive oil, salt and pepper on both sides.

Sprinkle finely chopped rosemary and thyme on the top.

20150923_192551

Cover with thinly sliced lemons

20150923_192715

Fold two of the sides over to make a handle.  Then fold over each of the other two sides so that none of the steam or liquid seeps out when it’s baking.

20150923_192846

Bake in the oven for 20 minutes.  When you pull it out, poke a couple of holes in to let the steam out before opening the foil completely.  Portion out into two servings and serve with rice and your favorite veggies!

16361

Makes 2 servings so it’s perfect for a date night!

Ingredients: 

1lb salmon filet
1Tbsp finely chopped rosemary
1Tbsp finely chopped thyme
1/2 lemon, thinly sliced
1Tbsp olive oil
Salt to taste
Pepper to taste

Instructions:

Heat the oven to 400°F.  In a pan, line foil so it overflows about 2 inches on all sides.
Add the salmon, drizzle olive oil, salt and pepper on both sides.
Sprinkle finely chopped rosemary and thyme on the top.
Cover with thinly sliced lemons
Fold two of the sides over to make a handle.  Then fold over each of the other two sides so that none of the steam or liquid seeps out when it’s baking.
Bake in the oven for 20 minutes.  When you pull it out, poke a couple of holes in to let the steam out before opening the foil completely.  Portion out into two servings and serve with rice and your favorite veggies!

Quinoa, Brown Rice and Black Beans

20150922_192054

Loaded with protein and yummy veggies, this is one of my new favorite go-to’s.  Simple to make and you can add whatever veggies you choose – I had colored bell peppers, tomatoes and onions in my fridge so that’s what I went with today.

Here’s how I made it:

Soak 1/3c Quinoa in some warm water for about 20 minutes.  This helps the seeds cook easier and softer.

Also soak 1/2c Brown Rice for 20 minutes.  Brown Rice can be tough to cook as it usually takes longer than white rice to make but if you soak it first, it comes out really nice and soft.

20150922_190435

Finely Dice colored Bell Peppers, Tomatoes, Onions and a couple of cloves of garlic.

In a nonstick pot, heat oil and ad the cumin.   Add the onions. garlic, tomatoes, bell peppers and mix well.

20150922_190940

Cook for 5 minutes, then add in the quinoa, rice and black beans.  Add some salt, pepper and just a touch of hot sauce – it adds that magical touch!   Add the water and bring to a boil.  Cook for about 30 minutes or until the rice is tender.  20150922_191538

Just before serving, squeeze some fresh lemon juice over the rice.  The extra zing tastes really good!  There you have it!  This is a great make ahead recipe and perfect for the fall.

Here’s the recipe all in one spot!

Ingredients:
½ c diced onions
½ c diced tomatoes
1c diced bell peppers (I like to include a variety of colors)
1 can (14oz) black beans, drained and rinsed
1/3 c Quinoa
½ c Brown Rice
1 tsp cumin
1 Tbsp Olive Oil
Salt to taste
Black Pepper to taste
1 tsp, freshly squeezed Lemon Juice
2 c Water
a couple dashes of hot sauce

Instructions:
Soak quinoa and brown rice in warm water for 20 minutes.
In a nonstick pot, heat oil and add the cumin.   Add the onions. garlic, tomatoes, bell peppers and mix well.
Cook for 5 minutes, and then add in the quinoa, rice and black beans.  Add some salt, pepper and the hot sauce.
Add the water and bring to a boil.  Cook for about 30 minutes or until the rice is tender.
Just before serving, squeeze some fresh lemon juice over the rice.