Minestrone Soup
A hearty and nourishing Minestrone Soup made with fresh vegetables, beans, and pasta. A comforting, nutrient-packed meal perfect for cozy fall and winter days.
Continue reading “Minestrone Soup”

A hearty and nourishing Minestrone Soup made with fresh vegetables, beans, and pasta. A comforting, nutrient-packed meal perfect for cozy fall and winter days.
Continue reading “Minestrone Soup”

Indulge in the exquisite symphony of flavors with our Butternut Squash and Sage Risotto. Immerse your senses in the nuanced sweetness of roasted butternut squash, complemented by the fragrant dance of fresh sage.
Continue reading “Butternut Squash and Sage Risotto”

There’s something magical about the simplicity of a loaf of bread, but when it comes to the Italian classic, Focaccia, magic reaches new heights. With its tantalizing aroma, golden crust, and airy interior, Rustic Focaccia Bread has captured the hearts and taste buds of food enthusiasts worldwide.

Focaccia’s generous size and inviting appearance make it an ideal bread for sharing with family and friends. Whether you’re hosting a casual gathering, a potluck, or a cozy dinner, a freshly baked Rustic Focaccia loaf is sure to impress your guests.

The charm of Rustic Focaccia lies in its simplicity. The key ingredients include:
Once your Rustic Focaccia is out of the oven, let it cool slightly before cutting it into squares or slices. Serve it warm or at room temperature, alongside a bowl of olive oil and balsamic vinegar for dipping. Focaccia pairs wonderfully with soups, salads, pasta dishes, or even enjoyed on its own as a delightful snack.

Rustic Focaccia Bread encapsulates the essence of Italian cuisine, with its simplicity and deliciousness making it a favorite around the world. Whether you’re a seasoned baker or a novice in the kitchen, baking this delightful bread is a gratifying experience that will leave you craving for more. So why not embark on your Focaccia journey and savor the joy of creating this Italian masterpiece in the comfort of your home? Happy baking!
Here are the tools I used to make this recipe:

This Turkey Bolognese Sauce is a thick, delicious, and hearty sauce made with simple ingredients. It’s a healthier take on an authentic recipe, each bite is so rich and flavorful.
Continue reading “Turkey Bolognese Sauce”

This Pesto Risotto with Roasted Tomatoes and Chickpeas is creamy and cozy, bursting with flavor! Topped with roasted tomatoes and chickpeas,it becomes a luscious main course.
Continue reading “Pesto Risotto with Roasted Tomatoes and Chickpeas”

Artichokes are abundant everywhere you go these days. My favorite are the ones from our local Farmer’s Market. You can taste the fresh quality and they are so much easier to cook than the store bought ones.

When I first starting eating these, my roommate in college introduced me to dipping them in butter. While they tasted good dipped in butter, I can only imagine all of the calories and cholesterol my body was ingesting. So I started using yogurt as a dipping base instead and I love it. The yogurt dip is so easy to change the flavor profile and I can keep it as simple or complex as I am in the mood for. This particular recipe, I kept it on the simple side with a little roasted garlic, cayenne, and salt mixed into the yogurt.

The traditional way of eating artichokes is by steaming them. I could (and actually have) eaten many whole artichokes all by myself. The husband used to eat them but eventually tired of steamed artichokes and stopped. I really wanted to him to share my love for artichokes so I’ve been trying many other ways to cook them. I’ve roasted (and burnt) them in the oven, stuffed them with various fillings that just didn’t hit the spot before I created this recipe.

All I can say is, you have got to try it! Oh man am I excited to share this stuffed artichoke recipe. Here are a couple of tips though when you are making these artichokes:

Well….. what is the stuffing? Oh man, the most delicious and easiest to make. I used:
red onion (the color comes out so pretty)
bread crumbs (a combination of Italian seasoned and panko)
garlic (of course!)
lemon juice
vegetable broth (though you could replace it with white wine – the taste would still be excellent)
Parmesan cheese
a hint of pepper

Because I am stuffing the artichoke, I also did a 2 step cook. First, I par-steamed the artichoke while I made the stuffing, then I baked it all in the oven to finish cooking the artichoke and get that glorious color on the Parmesan cheese.

I really hope you get a chance to try this recipe out as it has become one of my favorites already!

From my kitchen to yours, I hope you enjoy this Italian Stuffed Artichoke with a Garlic Cayenne Dip.

The sun is finally coming out, we are able to see friends and family after a long time, and I am ready to share apps around the table as I catch up with my loved ones. Nothing says fun in the sun with loved ones like bruschetta. Fresh tomatoes mixed with garlic, basil, olive oil, balsamic vinegar, and parmigiano reggiano served on garlic rubbed Italian bread. Yep. Count me in!

Growing up, I would order bruschetta every time we ate out at an Italian restaurant. It still is one of my favorite appetizers. I can name so many members of my family that also love it just as much as I do. There was even a time when bruschetta was a given at any family gathering. And rightly so.

Just a few ingredients that makes this recipe absolutely divine.

So, what are you waiting for?! This is the perfect appetizer for a wine and cheese night (my favorite), for a gathering, or if you want to create a beautiful Italian dinner!
From my kitchen to yours, I hope you enjoy this recipe!

Crispy, buttery crust with a creamy coconut filling topped with fresh mango puree and garnished with luscious fruit, this fresh and light Mango Coconut Panna Cotta Tart is what dreams are made of!

Continue reading “Mango Coconut Panna Cotta Tart”

Naturally gluten-free, chewy a crisp exterior, these Vegan Amaretti Cookies are a delicious treat to have with your afternoon coffee, or to pack in a holiday tin, or to simple devour like I tend to.
Continue reading “Vegan Amaretti Cookies”

This Chickpea and Tomato Soup is healthy, delicious, carb-free and easy to make in less than 30 minutes! All you have to do is chop and simmer the soup until it’s done! A family favorite, we add this to the rotation in the fall and winter months almost on a weekly basis!

The girls love this because it is simple, yet flavorful and they have so much fun making it with me (and eating half the ingredients).
Though traditionally mild in flavor, I’ve added fresh and dried herbs as well as a small parmesan rind to bump up the flavor. You will be amazed at the difference the cheese rind makes. If you don’t have any, don’t worry … the soup is still delicious!

To store cheese rinds, simply keep the rinds in a sealable plastic bag and place in the freezer indefinitely. Pull it out whenever you are ready to use it. Such a simple and delicious trick!
I did omit the pasta that is usually part of a traditional Italian Chickpea and Tomato Soup because I do serve this with bread on the side. However, feel free to add in the pasta if your heart and belly desire. Simply add in 1 cup of any small pasta you have at home (mini macaroni, ditalini, mini shells are some examples you can use).

From my kitchen to yours, I hope this soup brings as much comfort and warmth to you as it does to my family!

Summer salads are my favorite. Simple ones that take less than 10 minutes to make are even better. Ok let’s be honest, pretty much any salad is my favorite. They’re just so delicious and fun and contrary to popular belief, don’t have to be filled with just greens!

When I started making this tomato avocado cucumber salad, it was originally for the girls so I can get them used to eating fresh uncooked veggies too and in salad form. For them of course I did a simple dressing of oil, salt and pepper, and for the adults, I added a couple more ingredients to bring it to the next level.

Just like the salad, the dressing is simple and I didn’t worry about making it separately. I just added the dressing ingredients directly to the salad and gave it a good toss. Saves me on an extra dish and also, worrying about the ratios of oil to acid.
What do I need for the DRESSING?
Olive Oil
Fresh Squeezed Lemon Juice
Salt
Pepper
Red Chili Flakes
What do I need for the SALAD?
Tomatoes
Avocado
Cucumber
Red Onions
Oregano – lots of it
Basil – definitely tons of it
Ok I know what you’re probably thinking. Lots of Basil and Oregano in the salad? Have I lost it? Actually, surprisingly no! The peppery basil and the earthy oregano completely transform this dish!

When I made this salad, it was supposed to be for a side and I actually ended up eating a little more than a side’s worth which left no room for dinner………
So it’s safe to say this salad can be a side or an entree!
From my kitchen to yours, enjoy this delicious salad!

I had my first ricotta pancakes a few years ago when I was out for a brunch with my girl friends. They were light, fluffy and creamy all in one bite! Oh so delicious!

I added a hint of lemon to these to give it a bit of tang and brighten them up. My girls could taste it and loved it which I thought was amazing! I believe it’s going to become our weekend tradition!
You can taste the ricotta but it adds moisture and creaminess to the pancakes that takes them to a whole other level. It really is the perfect start to your day and weekend.

While you heat up your griddle, mix the dry ingredients in 1 bowl and the wet ingredients in another bowl. Then combine the two and whisk so the batter is nice and smooth! It’s really a simple recipe that doesn’t take too long.

Add in some berries while the pancakes are on the griddle or serve a bowl of berries on the side – you can never go wrong with berries on pancakes.
From my kitchen to yours, enjoy these delicious pancakes.

*This is an ad post.
All I can say is that things are getting crazier! My first born is starting Kindergarten tomorrow and though it’s going to be different because she’s going to be upstairs in her room instead of at a new school with new friends, I’m still an emotional wreck! I just can’t believe she’s grown so much! Where’s my baby that I brought home from the hospital? I have a 5 year old now!

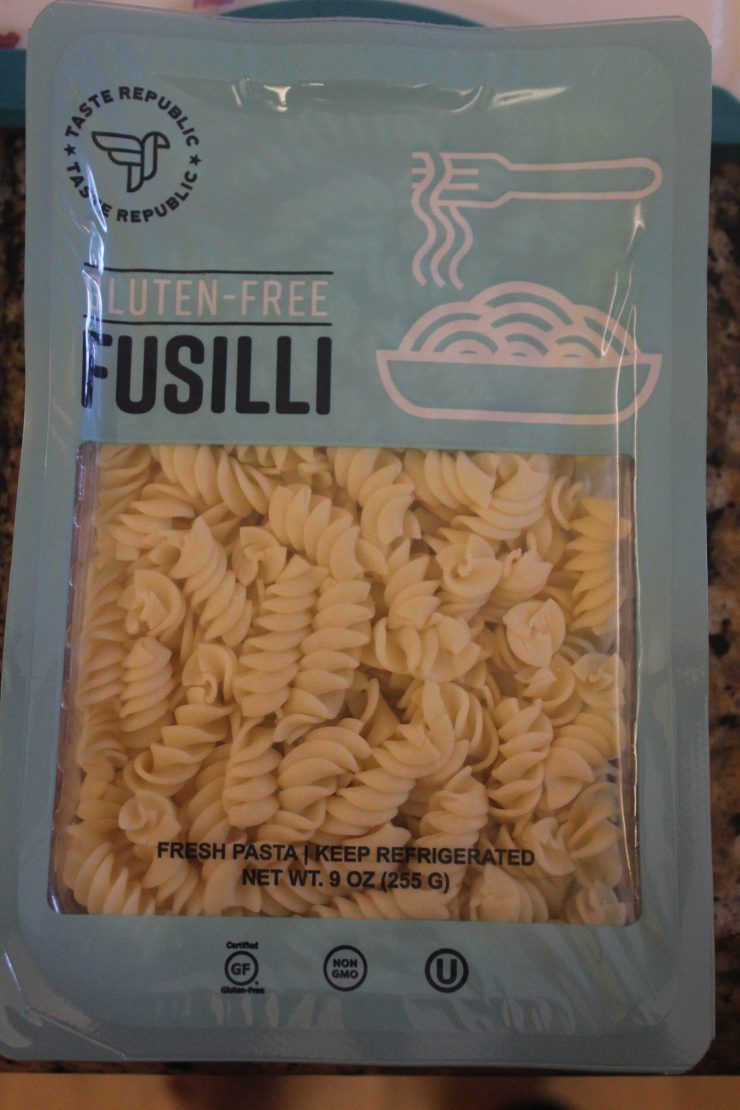
Let’s talk food so I don’t have to think about that… for now. This dish actually does take 15 minutes to make. No joke. How? Because I use Taste Republic‘s gluten free, fresh fusili pasta. The more I try their fresh pastas, the more I’m loving them. So far, the cauliflower linguini, tortellini, and now the fusili have been on point! Even better, because it is fresh pasta, it takes 3 minutes to cook!
Once upon a time, the girls would eat nothing but red sauce with their pasta. Then it went to green (pesto). Then brown butter. We are now back to the red sauce which I am thankful for because this masala pasta uses marinara sauce combined with spices to give it an Indian twist.

Here are some ingredients that are key to this pasta:
Taste Republic Gluten Free Fusili – fresh pasta that is great with taste and time!
Frozen Mixed Vegetables – this is my first hack to make this dish in under 15 minutes.
Favorite Marinara Sauce – I use whatever jar I have opened in my fridge and it works perfect
Indian spices: cayenne pepper, garam masala, cumin powder, coriander powder – this give the pasta additional depth of flavor. Add just enough to give it a hint not take over the dish!
This fusion dish is amazing because of the mix of flavors and how quickly you can put it together. Try it out and bring a little of India and a little of Italy to your home.

From our kitchen to yours, I hope you enjoy this 15 Minute Masala Pasta!

I’m a firm believer in easy meals that are healthy and don’t take much of my time. This Sausage & Zucchini Linguine is just that. It literally took me 15 minutes to make (with Aishani in the kitchen “helping” me) and was loved by everyone.

Here are a few things I like about this pasta dish:


Taste Republic has their cauliflower linguine in most grocery stores so go get a pack! (This is not a paid ad, I just love their pasta).

From my kitchen to yours, enjoy this fun and easy meal!

So, traditionally, a carpaccio is an appetizer made of thinly sliced meat. I decided to take the technique and make my own summer version of that. The sharp tang of lemon, the fresh fruit, and the crunch of toasted pistachios on top are an amazing combination. This Fresco Carpaccio is great as an appetizer for any dinner or party you are hosting, or just follow what I did and make a plate for yourself, and enjoy it in the sun!

Yum
I really didn’t want to stop eating it! Hubby and I finished it within minutes and this has become another of our favorite summer recipe.

The best part, this is so healthy for you with not too many calories or fat, there’s no cooking involved, and it takes 10 minutes to make (I’m not counting how long you have to wait for it to marinate).


Notes:
I highly recommend marinating this as the flavor of the dressing will be sharper and will help breakdown the raw taste of the zucchini since you are not cooking it.
I used a mandolin for this but if you don’t have one, no worries. Use a potato peeler and make thin ribbons of the zucchini and cucumbers.
What fruits and veggies will you use? Share your pictures!
From my kitchen to yours, enjoy this carpaccio as much as we did!
Ingredients:
1 zucchini
1 cucumber
1 avocado
1 lemon, zested and juiced
¼ c Avocado Oil
2 Tbsp pistachios
Salt to taste
Pepper to taste
Directions:
1. In a large bowl, mix together lemon zest and lemon juice. Whisk to mix well.
2. Add in oil and whisk 2-3 minutes until oil and lemon juice have emulsified.
3. Add in salt and pepper and whisk one last time to mix. Set aside.
4. Trim the ends of the zucchini and cucumber. Using slicer or peeler, make very thin ribbons.
5. Add zucchini and cucumber ribbons to dressing and toss to coat each ribbon equally.
6. Cover bowl and marinate in fridge for 30 minutes.
7. Meanwhile, on a med flame, heat up a small skillet. Add in the pistachios and toast 3-5 minutes until they are nice and crunchy.
8. Give the toasted pistachios a rough chop and set aside.
9. Pull zucchini and cucumber out of fridge.
10. Thinly slice avocado.
11. In a plate, line up each fruit with one slightly on top of the previous one. If you have any dressing left, drizzle a little on top. Garnish with toasted pistachios.
Enjoy!


