A luscious, warm, rich, and creamy dish filled with fruity flavors and warm spices. The classic combination of mango and cardamom shine bright in each bite of this delectable Mango Berry Bread Pudding. Perfect for breakfast, brunch, dessert, or any special occasion! Continue reading “Mango Berry Bread Pudding”→
This Pomegranate Curd and White Chocolate Tart is a showstopper that is perfect to take to your next holiday or special occasion party. The crust is made from a combination of graham crackers and macadamia nut, with a pomegranate curd layer topped with a sweet, white chocolate layer. Decorated with sugared rosemary and pomegranate arils, it’s almost too pretty to eat. Almost. Continue reading “Pomegranate Curd and White Chocolate Tart”→
This Cranberry Curd Tart is a beautiful show stopping dessert that has a velvety sweet and tart curd filling inside a macadamia nut and graham cracker crust. Continue reading “Cranberry Curd Tart”→
Crispy exterior with a soft interior made with ghee, thandai masala, sugar, and a little bit of milk. Nankhatai is a traditional Indian cookie similar in texture to shortbread. There are many variations of flavors and flours used based on where in India you are eating this delicious cookie. Continue reading “Nankhatai Bars”→
Sweet, flaky, melt in your mouth delicious, and best of all, perfect to make in a pinch or for a simple dessert that looks as if you spent hours making it!
Figs are one of my favorite fruits and every year, I look forward to seeing them at the Farmer’s Market. I saw the most delicious looking figs at the market last week and knew I had to get them. I’ve been eating them with my chia pudding parfait, and just snacking on them throughout the day but wanted to jazz them up a little more.
These Fig and Pistachio Tartlets are so perfect to elevate the figs without completely losing them in a myriad of ingredients. They are extremely easy and quick to make too! I used store bought puff pastry squares (though a large sheet cut into squares works just as well), added a little butter and brown sugar to help caramelize the base, some ground pistachios to give it a nutty flavor and balance the earthiness of the figs, layered on the sliced figs and finally topped it off with some honey. Yep, I’m drooling thinking about them again!
What if Figs are not available anymore?
Yes, I dread when the Farmer’s Market doesn’t have anymore figs because they have such a short season that I try to get my figs in as much as I can during that time. But no worries! Here are a few more fruits you can use:
Stone fruits such as peaches, nectarines, plums, and apricots are in season now also. Try one of those!
Apples, pears, and even berries would work well!
Instead of pistachios, try using ground almonds or walnuts
How do I serve the Tartlets?
Warm and fresh out of the oven is the best way to eat these. I’ve found that if I let them sit for too long, the puff pastry can get a bit chewy. Also, don’t forget the vanilla ice cream to go with these babies.
From my kitchen to yours, I hope you enjoy eating this delicious Fig and Pistachio Tartlets!
12 squares store-bought frozen puff pastry defrosted but chilled (or use 1 large sheet and divide into 12 squares)
2 Tbsp unsalted butter, melted
3 tsp brown sugar
2 Tbsp pistachios, ground
3 Tbsp honey
Vanilla Ice Cream to serve
Instructions
Preheat oven to 400ºF.
Line a baking sheet with parchment paper or silicone mat.
Using the back of a butter knife, mark a square about 1/2 inch from the edge. Make sure you don't slice through the puff pastry. This will help the edges rise while keeping your filling in the center.
Brush melted butter over each pastry square.
In each inner square, sprinkle brown sugar first then the ground pistachios.
Arrange fig slices overlapping on the pastry.
Drizzle honey over the figs.
Bake for 15-18 minutes until pastry it puffed and browned and figs are softened
Crispy, buttery crust with a creamy coconut filling topped with fresh mango puree and garnished with luscious fruit, this fresh and light Mango Coconut Panna Cotta Tart is what dreams are made of! Continue reading “Mango Coconut Panna Cotta Tart”→
A creamy, rich, aromatic custard with a beautiful caramelized crust that is unbelievably easy to make. This Thandai Infused Crème Brûlée is a twist on the classic French dessert by using coconut cream and coconut milk making it vegan and gluten-free.
Holi has always been one of my favorite Indian festivals. The colors, the food, the fun. What makes it even more special is that 8 years ago, my husband bent down on one knee in the middle of a very public festival (the organizers were in on it as were our siblings and friends) and everyone (about at least 100 people) stopped playing to watch him ask me to marry him. I will always treasure that moment.
So for this Holi, I decided to do a fun fusion in honor of my very special husband. His favorite dessert is crème brûlée. What better way than to infuse a Holi special drink of Thandai and combine my two favorite events together? Honestly, it tastes SO YUM that I had to stop myself from “tasting” the custard before it set.
WHAT DO I NEED FOR A VEGAN CREME BRULEE?
Full-fat Coconut Milk and Coconut Cream – this is important to give the custard it’s rich creamy texture. Arrowroot Powder – this acts as a thickening agent.
Agave – for that hint of sweet Thandai Masala – this is going to lend that brilliant aromatic and floral flavor to the custard Saffron – for a beautiful golden color
Vanilla Extract
Almond Milk
Sugar
Rainbow Sprinkles – optional but I love how the colors brighten up the dessert
Salt
THREE IMPORTANT STEPS TO A PERFECT THANDAI INFUSED CREME BRULEE
1. Infusing the thandai masala. This is important to get that flavor in there. The longer you infuse, the better the end result will be.
2. Blending all of the ingredients. This is extremely important because the arrowroot powder can clump and that would ruin the whole dessert. When you blend it into a smooth liquid, you end up with a rich, silky dessert.
3. Once it’s blended, whisk the mixture on the stove constantly to prevent it clumping and/or burning until you get your custard consistency.
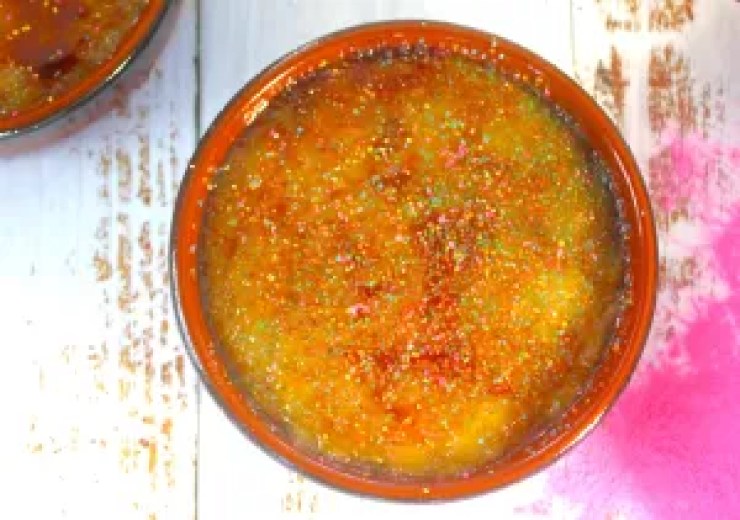
THE CHERRY SUGAR ON TOP
How can I possibly leave this part out? This is my favorite part. I used cane sugar to layer on top of the custard but for my Holi special, I used colored sugar and dusted the caramelized sugar to symbolize the fun of Holi. Take a blowtorch and carefully caramelize the sugar. If you don’t have a blowtorch – don’t worry! I’ve included directions in the recipe card to caramelize the sugar using a broiler. Reminder – the top won’t be as crunchy using the broiler setting but it will do the trick to caramelize your sugar.
This recipe is perfect for Holi, Diwali, Valentine’s Day, St. Patrick’s Day, or pretty much any occasion you want to celebrate. I might even make this again for our next date night. Feel free to add berries. I chose not to this time because I wanted the colors to shine.
I hope you enjoy this as much as we did! Feel free to follow and share comments on my Instagram and Facebook pages! I would love to hear your thoughts!
From my kitchen to yours, I hope you enjoy this decadent THANDAI INFUSED RAINBOW CREME BRULEE!
Combine the coconut milk and thandai masala in a medium sized saucepan and bring to a boil on high heat. Reduce heat to medium flame and let simmer for 5 minutes while you whisk every 2-3 minutes to avoid the milk from boiling over or burning.
Add in the saffron and continue simmering for another 10 minutes.
Let the milk cool down then strain into your blender. Add in the the coconut cream, almond milk, vanilla extract, sugar, agave, arrowroot powder, and salt. Blend on high for 1-2 minutes to achieve a smooth texture.
Transfer back to the saucepan and cook on medium heat for another 10 minutes. Be sure to stir continuously so as to avoid clumping and burning.
It will thicken up into a pudding consistency. Once it reaches to this consistency, turn off heat and transfer immediately into 4 ramekins.
Refrigerate for 6-8 hours.
Remove from fridge and top each ramekin with an even and slightly thick layer of sugar.
Using a blowtorch (keep it about 1" away to avoid burning), caramelize the sugar. Dust the rainbow sprinkles once the caramelized sugar has cooled down.
Serve immediately and enjoy!
Notes
**If you do not have a blowtorch, set your ramekins on the highest rack in the oven and broil on high for 3-5 minutes. Watch carefully so as not to burn.
**Note: The ramekins I used are passed on to me from a family member but the ones I’ve featured in the tools list are the closest in size and shape to the ones that I used.
A little variation on banana bread, I added in some sweet apples, lots of cinnamon (as requested by my little ones), just a hint of nutmeg, and a streusel topping to finish it off is the perfect afternoon snack. (Spoiler Alert: It doesn’t last more than a day – maybe two – in our house. It flies so quickly!)
I first made this loaf to take as a treat with me when I took the girls hiking last month. We did almost 4 miles with quite an uphill so I was proud of my littles ones who not only trekked without a single complaint, they also put up with me while I took pics of them with cows in the background as they thought their Mom was crazy!
Let me get back on track though and tell you a little more about this delicious loaf! The base recipe is similar to that of a banana bread but I wanted it a little more moist to balance the addition of spices so I added in a bit of yogurt. The sweetness of ripe bananas and the warm spices to give a hint of apple pie is so amazing of a combination. Who says you can only have apple pie in the fall?!
This recipe makes enough for two large loaves or 4 minis. I’ve made both depending on what occasion I’m using these. I love the minis for gifts or travel (the hike was a perfect example) and the large loaves I’ll use to pack in lunches, give as an afternoon snack, or even with breakfast on the weekends.
Here are a few other loaves to check out: Spiced Pear Loaf Pumpkin Bread Zucchini Bread Lemon Blueberry Mini Loaves
Can you tell we love fruity loaves in this house?!
From my kitchen to yours, I hope you enjoy eating this Apple Pie Bread.
1 c ripe bananas, mashed (2 large or 3 medium sized)
1 c peeled & diced apple (about 1 small apple)
1 c brown sugar
1/2 c white sugar
1 tsp vanilla extract
2 c AP flour
1 tsp baking soda
1 tsp cinnamon
1/2 tsp nutmeg
1/2 tsp salt
For the Streusel Topping
3 Tbsp flour
1/4 c brown sugar
1/2 tsp cinnamon
1 1/2 Tbsp butter, softened
Instructions
Preheat oven to 325°F. Spray two 9x5 loaf pans with non-stick baking spray and set aside.
In a large bowl, whisk together the eggs, yogurt and oil until completely emulsified. Add mashed bananas, sugars and vanilla and stir until well combined.
In a smaller bowl combine dry ingredients and whisk until well incorporated.
Pour the dry ingredients into the wet ingredients and stir until just combined. Fold in apples.
Pour half the batter into each baking pan.
Combine streusel ingredients and stir until mixture is uniform and crumbly. Sprinkle half streusel mix over each loaf.
Bake for 60-70 minutes. Check with a toothpick in the center of the loaf to see if it comes out dry.
Remove from oven and let cool in bread pans for about 10 minutes. Overturn onto a cooling rack to cool fully.
Wrap in plastic wrap and store at room temp on your counter for up to 5 days or in the fridge for up to 1 week.
Notes
**To make the mini loaves, reduce baking time by 25% or bake for 40-45 minutes.
A few days ago, my brother and sister-in-law were blessed with an adorable little baby! Throughout her pregnancy, we had nicknamed the baby Blueberry and called him as such. It is in honor of his birth that I dedicate this recipe to my little munchkin. He is so adorable and cute, I’m so excited and lucky to be his aunt!
In the spirit of welcoming the new baby, I made these loaves in mini pans but you can absolutely bake them in a regular 9×5 loaf pan.
Last week, a friend was kind enough to share lemons from her lemon tree and they are absolutely amazing. The juice from the lemons were the perfect complement to brighten up these lovely blueberry loaves. In addition, I added a little yogurt and replaced the sugar with honey to give it just a hint of sweet without overpowering it. The addition of these two ingredients makes the loaves even more fluffy and light.
Pair it with coffee or chai to complement a slice of this delicious loaf for breakfast, snack, or dinner. Once you’ve baked them, they will keep at room temperature for up to 1 week and in the fridge for up to 2 weeks. Though, we’re pretty good about making sure they are eaten pretty quickly!
From my kitchen to yours, enjoy these delicious Lemon Blueberry Mini Loaves.
Preheat oven to 350 degrees F. Grease with cooking spray 4 mini loaf pans and set aside.
Combine flour, salt, and baking powder and mix well to incorporate.
In a separate bowl, add eggs and whisk until you start seeing bubbles and the eggs are light and airy. Add in yogurt, honey, oil, and lemon juice. Whisk well to combine.
Add the dry ingredients to the wet and mix until completely combined.
In a small bowl, combine the blueberries with the remaining 1 Tbsp flour and toss to coat all the blueberries evenly. This process will help prevent the blueberries from sinking.
Gently fold the blueberries into the batter with the lemon zest. Be careful to not over mix.
Transfer the batter to loaf pans and bake for 30 minutes.
Remove from the oven and let cool for 10 minutes.
Loaves will keep at room temperature for up to 1 week and 2 weeks in the fridge.
Notes
**To make 1 large loaf, use a 9x5 loaf pan and bake 50 minutes at 350 degrees F.
One of the best things about the Fall season is pumpkin bread. The spices and the aroma when you are baking it compares to no other. It makes me feel so warm and cozy and ready for the winter.
I love this pumpkin bread recipe because:
It’s moist
Easy to make
Isn’t too dense
Has all the Fall spices: Cinnamon, Ginger, Cloves, & Nutmeg
Fun to make with the kids
Here’s a little trick….. to keep it moist, I added applesauce to the batter. You can’t taste it but it makes the pumpkin bread so much better!
The girls have been eating it in the mornings with breakfast and I love having a slice in the afternoon with my cuppa chai. It’s perfect to snack on any time of the day! And with the holidays right around the corner, make an extra batch for a relative or neighbor. What a great gift to give too!
If you like this Pumpkin Bread recipe, try out….
From as far back as I can remember, my brother and I have always loved oreos. Dunking them in milk, twisting them and eating the cream first, in shakes (mostly from fast food places), or hiding in the pantry and eating them (so my kids don’t catch me).
Don’t Judge. A mom’s gotta do what a mom’s gotta do!
So many years later, cookies and cream remains our favorite flavor; definitely a go to for me.
Monday is Raksha Bandhan which is a big festival for Hindus. In a nutshell, this is a celebration between brothers and sisters where we promise to protect and honor each other. The sisters usually feed the brothers their favorite dessert after tying a Rakhi (kind of like a friendship bracelet) and receive a gift from their brothers as token of love (my favorite part).
Traditionally, I’ve done Indian sweets but my brother has never been a big fan of them. Don’t get me wrong, they’re delicious, but just not what he prefers. As I was sitting at the table planning Rakhi, I knew without a doubt in my mind I was going to make something with Oreos in it for him.
This Oreo Cheesecake is one of my favorites because it is not too sweet, is very easy to make and I don’t have to deal with a water bath. I know the cheesecake masters are probably gasping and worried that I haven’t used a water bath, but to be honest, I don’t think this one needed it!
It is very creamy on the inside with chunks of cookie in each bite and the cookie crust just finishes off this amazing cake.
I know Cheesecake is not a very traditional Mithai (dessert) for Rakhi, but it’s all about what my brother likes and I think I hit this one out of the park.
What event will you make this delicious Oreo Cheesecake for?
From my kitchen to yours, enjoy every bite of this cheesecake!
15 Oreo cookies with cream filling, Original not double crust
1 1/2 Tbsp butter, melted
For the Filling:
12 oz cream cheese, softened at room temp
1/2 c + 2 Tbsp granulated sugar
1 tsp vanilla
1 egg
15 cookie halves, filling removed, crushed into chunks or pieces
Instructions
For the crust:
Line springform pan with parchment paper, close the spring and cut around the edges removing excess parchment paper.
In a food processor, blend the cookies into a fine crumb. Add in the butter and pulse 5-6 times.
Line cheesecake pan and press down with your fingers evening out the crust.
Set in fridge until filling is ready.
For the filling:
Preheat oven to 325ºF.
In a large bowl, beat cream cheese with sugar until smooth. Add in egg and vanilla and beat until it is just combined.
Fold in the cookie pieces being careful not to let in too much air.
Fill cheesecake pan with the filling.
Tap onto your counter a good 3-4 times to remove any air bubbles.
Bake 20-22 minutes
Cheesecake should be a little jiggly when you remove from the oven. Let it cool completely (about 30 minutes) before covering with foil wrap and refrigerate over night or at least 6 hours before serving.