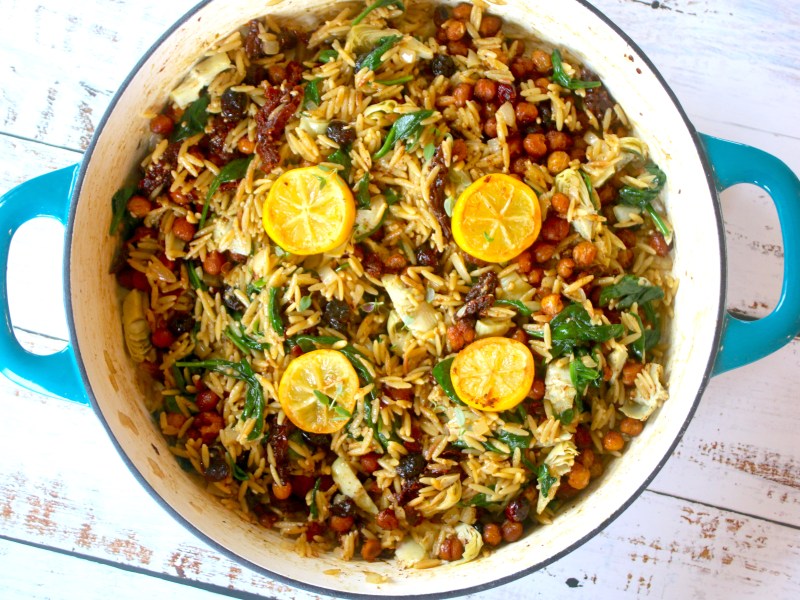
An effortless one skillet vegan recipe filled with sun-dried tomatoes, artichokes, chickpeas, spinach, grilled lemon slices, and of course orzo! Simple, healthy ingredients that come together quickly for a perfect weeknight meal, this Lemon Chickpea Orzo Skillet is a dish that everyone can enjoy! Continue reading “Lemon Chickpea Orzo Skillet”→
Grain-free, gluten-free, and vegan, these chickpea chocolate chip cookies are out of this world. Pillowy soft, fluffy, sweet, melt in your mouth, chunky chocolate chip cookies. Continue reading “Chickpea Chocolate Chip Cookies”→
Thick and creamy chia pudding layered with shredded coconut, mango chunks, and roasted pistachios. The fresh tropical flavors for a healthy breakfast will become your favorite way to start the day! Continue reading “Mango Coconut Chia Pudding”→
Crispy, sweet, and salty bites of tofu paired with sauteed bright broccoli on a bed of rice noodles. It can’t get any better than this. Filled with protein, this Teriyaki Tofu Noodle Bowl is perfect for a weeknight dinner or lunch prep. Continue reading “Teriyaki Tofu Noodle Bowl”→
These healthy almond butter muffins are the perfect tasty treat. They are perfect to add in the lunchbox for a snack or dessert, or even to eat for breakfast. Continue reading “Almond Butter Muffins”→
This Dragon fruit Smoothie Bowl is a beautiful, quick, and easy tropical breakfast recipe! Dragon fruit, also known as pitaya, is nutrient dense food packed with antioxidants, low calories making it a great option for vegan and paleo diets. Made with just 3 ingredients, dragon fruit, mango, and coconut water, add your favorite toppings and enjoy! Continue reading “Dragon Fruit Smoothie Bowl”→
Growing up in an Indian household meant turning to natural and food remedies for minor ailments. If you had a tummy ache, Mom made us eat carom seeds or even cumin seeds. If we had a cold sore in the mouth, she would make us keep a clove on the sore for a few hours. There are so many more remedies that my mom and grandmother used but the one I remember and is most popular these days is turmeric.
As soon the cold weather set in or the first cough or sneeze of the season was heard, my mother would add turmeric to everything we ate. She would also make us drink Haldi Doodh or turmeric milk before bed each night. As a child, I hated this. As an adult and a mom, it is now my go to. Over the years, I’ve changed it from the basic turmeric and milk to adding a few new ingredients. Take a look!
Turmeric – the most important ingredient as it has natural anti-inflammatory and antioxidant properties. The powder form is most commonly used though sometimes, I do use the actual root.
Black Pepper – has anti-inflammatory properties and improves brain function. It is most important in this recipe because it activates the curcumin properties in turmeric therefore making the turmeric much more effective.
Honey – is full of antioxidants, antibacterial, and antifungul properties. It’s also an age old remedy used to help sore throats.
Cardamom pods – have antioxidant and diuretic properties, and is rich in compounds that help fight against inflammation.
Ginger – also has anti-inflammatory properties, helps lower blood sugars, and improve heart disease risk factors. Ginger also helps fight against bacteria and viruses which can help reduce the risk for infections.
Cinnamon – is also loaded with antioxidants and anti-inflammatory properties. In addition, it helps lower blood sugar levels, and helps fight bacterial and fungal infections.
Basically, every spice added to this recipe has anti-inflammatory or antioxidant properties or both. I normally use cow’s milk when I make this for the kids but I have made it with almond milk and it has turned out just as good. I do recommend not to use sweetened milk if you are using a plant based milk as it changes the taste of the final product.
Here’s to wishing a healthy winter and a Happy New Year with my first recipe this year!
Rosemary Olive Artisan Bread has a beautiful crust with a chewy inside filled with olives and fresh rosemary. It is easy to make because there is no kneading required. The scent and taste of warm bread and the ease of this recipe will want you making this bread over and over again. Continue reading “Rosemary Olive Artisan Bread”→
This Cranberry Apple Quinoa Salad is filled with bursts of sweetness, texture, and nutrients. The quinoa soaks up a delicious Maple Dressing and the arugula gives just a hint of a peppery note. What’s best is it’s great to eat for lunch, or have as a side dish. Continue reading “Cranberry Apple Quinoa Salad”→
Creamy and nourishing, this delicious Autumn Squash Soup is just perfect for a cozy dinner at home during these cold days. This soup is a spin off of Panera’s Autumn Squash Soup without the extra calories. But don’t worry! It still tastes amazing and just like Panera’s. The best part is that whilst you make this delicious soup, your home is going to smell like fall. Can it get any better? Continue reading “Autumn Squash Soup”→
**Note: Original post created Jul 2017. Updated October 2021**
The first time I was introduced to this traditional Punjabi meal was during my wedding planning. My husband and in-laws requested that this be on the menu somewhere. I didn’t understand what it was or the goodness of it until quite a bit later (much later than my wedding). Of course, during my wedding, I didn’t remember eating or tasting anything with so much going on. After I got married, I remember my mother-in-law making it a few times for my husband and seeing the pure joy on his face as he ate the Saag and Roti. I felt, wow, such a simple meal (for Indian food) and yet it brings him so much happiness. Of course I decided to try it out on my own.
I am always told, even to this day, how this is supposed to be a really hard recipe to master. I’m definitely not making it the way my mother-in-law does, but my shortcut recipe has managed to impress her, my husband and my daughter! As they say, a way to a man’s heart is through his stomach. I’m already in my hubby’s heart, but this is one recipe that guarantees a spot for any of you out there looking to impress your significant other.
Sarson da Saag is basically a vegetable dish made of Mustard Greens. It is very earthy in taste and rich not only in flavor but nutrients also. Mustard Greens provide an abundance of potassium and Vitamins K, A, C, and E. Traditionally, it is cooked in water and hand churned until you get the creamy, buttery consistency. If I had the time, I might try it. But since I don’t, I obviously created a shortcut (my handy dandy blender). Try it out and tell me what you think:
The saag tastes great on its own, but man does it just go a whole other level with Makki di Roti. Makki di Roti is basically corn bread. It’s not your traditional Roti that is usually soft and pliable. This is a bit thicker and can hold all that saag without getting the roti soggy. One more thing – Makki di Roti is typically made by flattening the dough between the palms. I am using a different technique by placing the dough in between a ziploc bag and rolling it out with a rolling pin. This just works better for me.
In a deep non-stick pot, heat 1 Tbsp EVOO. Add in onions and sauté til they are translucent. Add in the ginger and garlic and sauté for 1 minute.
Add in the mustard leaves and sprinkle with ½ Tbsp salt. Mix in well and when they start to shrink, add in the spinach. Sprinkle the spinach with the remaining salt. Mix in well until all the greens have shrunk and started to cook. Add in the corn meal.
When the corn meal has mixed in well and the greens are cooked, turn off stove and place the mixture into a blender. Pulse until you have a smooth and creamy texture.
In the same pot, add 1 Tbsp EVOO and the blended mixture. Cook on low heat for 2-3 minutes.
For the Roti:
In a bowl, add the corn flour and mix in the carom seeds. Add cold water a little at a time while kneading the dough. You want the dough to be a little soft and sticky but not wet. It should form in your hands without falling apart.
Divide the dough equally into balls. Place one inside a plastic ziploc and roll with a rolling pin into a flat tortilla shape.
On high heat, place a little EVOO on a tava/frying pan. Add the roti and cook for a few minutes. Add a little oil on the top and flip to cook on the other side.
This homemade Moroccan Spice Blend is the perfect way to add a little flavor to your meats, fish, or even vegetables! Roast, grill, saute, marinate, or even simmer in a soup, this blend is versatile and will enhance any recipe you use it in. Continue reading “Homemade Moroccan Spice Blend”→
A big name with big bold flavors, this dipping sauce is creamy, tangy, fresh, and vibrant. It lightens up any foods you are eating and is great healthy dip to add to your appetizer table. Continue reading “Avocado Cilantro Lime Dipping Sauce”→
This vegan, nutritious poke bowl filled with lots of veggies and a sriracha dressing is so delicious and addicting. A one-bowl recipe with so many beautiful ingredients and easy to make is a perfect meal that is customizable for your palate. Continue reading “Vegan Poke Bowl”→
Fresh and beautiful veggies from across the rainbow to make amazing salads are my favorite. This Quinoa Fiesta Salad is one of my family’s favorites. As a mom, it makes me happy that the girls are getting so much nutrition in one bowl. The kids look at the colors and get excited to eat a rainbow and I love that they are enjoying fresh and healthy ingredients!
This salad does triple duty which I love. A dish which becomes a meatless entree can also serve as a side dish or a salad depending on my mood. The cherry on top of this recipe is that it takes less than 30 minutes to make and is very forgiving if you need to substitute or leave out ingredients.
HOW DO I MAKE A QUINOA FIESTA SALAD?
1. Cook the quinoa. While the quinoa is cooking, you can get the dressing and your other ingredients ready!
2. Make the Cilantro Lime Dressing. I love this dressing because it is so light. If you choose to leave it out as I do for my girls, simply replace it with a drizzle of Olive Oil, lemon juice, salt, and pepper.
3. Combine all of your ingredients in a large bowl and toss well to mix.
4. Enjoy and get addicted to this salad as much as my family and I are!
This chickpea salad is a refreshing summer salad filled with fresh produce. It tastes great served as a side salad or your main lunch meal. Best of all, you don’t need to make a special dressing for this salad. Continue reading “Chickpea Avocado Salad”→
When I first started making brown rice, I was a bit intimidated. I can cook Basmati rice with my eyes closed but when it comes to brown rice, the ratio to water is different, cook time is different, and sometimes, there is a chewy bite to brown rice. I felt so out of my element.
I have tried multiple ways to cook brown rice and this recipe has become my fail-proof method. Even better, I’ve nailed both stove top and Instant Pot methods so you can choose what works for you.
Having rice in the fridge has helped me on numerous occasions. I can use it to make Pineapple Fried Rice, serve it on the side with a salmon, serve it up with lentils and so much more.
WHAT IS BROWN RICE?
Brown rice is actually rice with the hull still on it making it a whole grain. The germ and bran are in there too which gives it a chewy texture and nutty flavor. Because brown rice has the hull, germ, and bran, it takes longer to cook.
BE PATIENT
Trust me. I feel like I’m constantly on the go, but this one recipe will make you stop and smell the roses. And it’s worth it. All you have to do is keep the cover on the saucepan and not mess with it. Once it’s done cooking, let it rest. Just like all meats, rice also wants a little rest after spending all that time cooking to perfection. The additional 5 minutes of steam will make the rice fluffy and soft.
As I raise my girls, it has become very important to me that they keep connected to their roots and one of the ways I do this is through food. Lucky for me, they both love the typical comfort food fare of “Dal Chawal” or Lentils and Rice. A twist on the traditional Moong Dal Fry, this recipe adds zucchini and is low in calorie but nutrient dense.
Ready in just 15 minutes, this has become my latest go to recipe when I’m tight on time. Because moong dal cooks very quickly, I don’t soak them for more than 20 minutes.
Nutrition is also very important when I’m serving this dish as a main meal to the girls, and this dish doesn’t disappoint.
1 cup of zucchini moong dal gives you:
156 kcal
8.7 gm protein
7 gm fiber
As to cooking it over the stove versus the instant pot, traditionally, the dal was boiled first then added to the spices. I love just using one pot to make the whole dish so I usually add the uncooked dal into the spices/gravy mix then cook it in the instant pot.
I hope you get a chance to try out this delicious recipe and enjoy it as much as my family does.
Once it is heated, add cumin seeds and asafoetida.
When the cumin seeds start to sizzle, add the onions, garlic, and ginger and saute for 2-3 minutes until the onions have become translucent.
Add tomatoes, turmeric, cayenne, cumin, coriander, and salt. Mix well and saute for 2 minutes.
Add the washed dal and water. Mix well.
Press Cancel and close the lid with vent in sealing position.
Change the instant pot setting to manual or pressure cook mode at high pressure for 4 mins. After the instant pot beeps, let the pressure release naturally for 5 minutes, then release the pressure manually (5 minute NPR).
Once the pressure is released and you have opened the lid, in a tempering pan, heat oil. When it is heated through, add cayenne powder and dried red chili. When it starts to sizzle, add chili oil to cooked dal. Squeeze in lemon juice and give it a good stir.
One of my favorite times of the year is the spring when the Farmer’s Market starts to get bigger with more and more farmers who start to bring a larger variety of produce and goodies. I’ve mentioned in the past that I like to make a menu for the week (more so my kids don’t complain they want something else than what is served), but what I haven’t mentioned is how I love going to the Farmer’s Market to do my weekly produce shopping. Sometimes, I will even tailor some of my dishes to include produce I find at the Market.
Recently, I partnered with our local Farmer’s Market (Danville Farmer’s Market) and I will be creating recipes for them a few times a month in the hopes that I can bring awareness to locally farmed produce at all of our farmer’s market. Having fresh, organic produce and supporting the local farms is a win-win.
This Spring Crudites Platter is so beautiful, we all had a bit of hard time digging in. No one wanted to mess it up. Ah well, our stomachs won that round. The beauty of this platter is that you are not restricted to the same produce I picked up. Pick up what your farmer’s market has, just make it colorful.
Here is what I used:
Purple Cauliflower (chop these into big chunks)
Rainbow Baby Carrots (trim the stems off and save to make pesto – be sustainable!)
Radishes
Watermelon Radishes (slice these a little thick into rounds to give a beautiful effect)
Snap Peas
Cucumbers (I sliced these on the diagonal for aesthetics. Feel free to slice into rounds or sticks to make them easier to serve)
Cherry Tomatoes
As for the hummus, I chose purple sweet potato and red beets to be the base of each hummus. For the Red Beets, I roasted it with garlic, then pulsed it with a little tahini and a few other ingredients. This is by far one of my favorite variations on hummus. Paired with all that beautiful produce, it’s perfect!
For the Purple Sweet Potato, I baked it in the oven then pulsed it with tahini as well. Though the idea behind both hummus’ are the same, the flavor profile differ vastly. Yet both are addicting.
I hope you have a chance to make a beautiful Spring Crudites Platter like this for your next gathering. I promise you will love it.
Try it out and let me know what you think!
Place sweet potatoes, beets, and garlic in individual foil sheets. Drizzle beets and garlic with olive oil. Wrap each food tightly into a ball and place on a baking sheet. Bake for 40 minutes.
Remove and let cool before opening the foil wraps.
For the Sweet Potato Hummus:
Remove foil wrap and peel skin. Chop into rough chunks and add to food processor. Add roasted garlic cloves and the rest of the ingredients. Blend until smooth (about 2-3 minutes).
Transfer to a bowl and garnish with parsley, a drizzle of oil, and/or roasted chickpeas.
For the Roasted Beet and Garlic Hummus:
Remove beets from foil and chop into rought chunks.
Add into food processor with roasted garlic and the remaining ingredients.
Blend until smooth (about 2-3 minutes)
Transfer to a bowl and garnish with roasted chickpeas, toasted sesame seeds, and/or a drizzle of olive oil.
To Assemble the Crudites platter:
Place the bowls of the hummus in the center of the platter. Add the larger veggies first, i.e. cauliflower and carrots.
Fill in with medium sized veggies, i.e. cucumbers and snap peas.
Add the smaller veggies, i.e. radishes and cherry tomatoes.
Finally garnish with watermelon radish slices and edible flowers if you have any.
Enjoy!
Notes
**Note: I used a whole bulb of garlic and divided between the two hummus dips as I knew I was making them at the same time (and a little extra garlic is always appreciated). If you are making only one hummus dip, follow the instructions of roasting cloves instead of the whole bulb.
Naturally gluten-free, chewy a crisp exterior, these Vegan Amaretti Cookies are a delicious treat to have with your afternoon coffee, or to pack in a holiday tin, or to simple devour like I tend to. Continue reading “Vegan Amaretti Cookies”→
If I had to choose any other fruit besides mango, figs would definitely take second place. The soft exterior, the honey sweet flesh, and the crunch of the seeds as you eat each one is just heaven. Pair it with chia pudding topped with fresh baked granola and garnished with a sprig of mint, well, you just won’t want anything else for breakfast! Continue reading “Fig and Chia Pudding Parfait”→
Vibrant, fresh, mildly spicy, and packed with flavor, this Cilantro Chutney is a necessity in Indian cuisine. This particular chutney is made using fresh cilantro, mint, curry leaves, green chilies, cashews and spices. Continue reading “Cilantro Chutney”→
Crunchy, creamy, spicy, tangy, with just a hint of sweet, these Guacamole Chaat Tostadas are the perfect marriage between Indian and Mexican cuisine! Continue reading “Guacamole Chaat Tostadas”→
A creamy, rich, aromatic custard with a beautiful caramelized crust that is unbelievably easy to make. This Thandai Infused Crème Brûlée is a twist on the classic French dessert by using coconut cream and coconut milk making it vegan and gluten-free.
Holi has always been one of my favorite Indian festivals. The colors, the food, the fun. What makes it even more special is that 8 years ago, my husband bent down on one knee in the middle of a very public festival (the organizers were in on it as were our siblings and friends) and everyone (about at least 100 people) stopped playing to watch him ask me to marry him. I will always treasure that moment.
So for this Holi, I decided to do a fun fusion in honor of my very special husband. His favorite dessert is crème brûlée. What better way than to infuse a Holi special drink of Thandai and combine my two favorite events together? Honestly, it tastes SO YUM that I had to stop myself from “tasting” the custard before it set.
WHAT DO I NEED FOR A VEGAN CREME BRULEE?
Full-fat Coconut Milk and Coconut Cream – this is important to give the custard it’s rich creamy texture. Arrowroot Powder – this acts as a thickening agent.
Agave – for that hint of sweet Thandai Masala – this is going to lend that brilliant aromatic and floral flavor to the custard Saffron – for a beautiful golden color
Vanilla Extract
Almond Milk
Sugar
Rainbow Sprinkles – optional but I love how the colors brighten up the dessert
Salt
THREE IMPORTANT STEPS TO A PERFECT THANDAI INFUSED CREME BRULEE
1. Infusing the thandai masala. This is important to get that flavor in there. The longer you infuse, the better the end result will be.
2. Blending all of the ingredients. This is extremely important because the arrowroot powder can clump and that would ruin the whole dessert. When you blend it into a smooth liquid, you end up with a rich, silky dessert.
3. Once it’s blended, whisk the mixture on the stove constantly to prevent it clumping and/or burning until you get your custard consistency.
THE CHERRY SUGAR ON TOP
How can I possibly leave this part out? This is my favorite part. I used cane sugar to layer on top of the custard but for my Holi special, I used colored sugar and dusted the caramelized sugar to symbolize the fun of Holi. Take a blowtorch and carefully caramelize the sugar. If you don’t have a blowtorch – don’t worry! I’ve included directions in the recipe card to caramelize the sugar using a broiler. Reminder – the top won’t be as crunchy using the broiler setting but it will do the trick to caramelize your sugar.
This recipe is perfect for Holi, Diwali, Valentine’s Day, St. Patrick’s Day, or pretty much any occasion you want to celebrate. I might even make this again for our next date night. Feel free to add berries. I chose not to this time because I wanted the colors to shine.
I hope you enjoy this as much as we did! Feel free to follow and share comments on my Instagram and Facebook pages! I would love to hear your thoughts!
From my kitchen to yours, I hope you enjoy this decadent THANDAI INFUSED RAINBOW CREME BRULEE!
Combine the coconut milk and thandai masala in a medium sized saucepan and bring to a boil on high heat. Reduce heat to medium flame and let simmer for 5 minutes while you whisk every 2-3 minutes to avoid the milk from boiling over or burning.
Add in the saffron and continue simmering for another 10 minutes.
Let the milk cool down then strain into your blender. Add in the the coconut cream, almond milk, vanilla extract, sugar, agave, arrowroot powder, and salt. Blend on high for 1-2 minutes to achieve a smooth texture.
Transfer back to the saucepan and cook on medium heat for another 10 minutes. Be sure to stir continuously so as to avoid clumping and burning.
It will thicken up into a pudding consistency. Once it reaches to this consistency, turn off heat and transfer immediately into 4 ramekins.
Refrigerate for 6-8 hours.
Remove from fridge and top each ramekin with an even and slightly thick layer of sugar.
Using a blowtorch (keep it about 1" away to avoid burning), caramelize the sugar. Dust the rainbow sprinkles once the caramelized sugar has cooled down.
Serve immediately and enjoy!
Notes
**If you do not have a blowtorch, set your ramekins on the highest rack in the oven and broil on high for 3-5 minutes. Watch carefully so as not to burn.
**Note: The ramekins I used are passed on to me from a family member but the ones I’ve featured in the tools list are the closest in size and shape to the ones that I used.
Sweet, crunchy, nutty, and deliciously addicting! This Crunchy Granola has it all and it is so quick and easy to make! Add it to your yogurt, cereal or eat it for a snack. It also makes a great gift!
I’ve got this friend Michelle. She is one the most amazing moms I know. She and I are workout buddies, lunch wine partners, we turn to each other when our children worry or frustrate us, and she’s who I bounce my recipes off of all the time. Between our busy schedules, toddler/kid tantrums, and crazy lives whilst dealing with Covid, somehow we always find time to talk about food.
Whether we discuss what’s for dinner, ordering out, trying to find ways to get our kids to eat breakfast in a decent amount of time that is faster than a snail’s pace, food always makes its way into our daily conversations.
Several years ago, I had hosted an Easter Egg hunt and brunch potluck. Michelle was kind enough to volunteer to make some granola. Before this, I never thought to make granola at home, we always bought it. Man it was good.
At that time, my oldest was not really fond of eating granola. At another time, we were invited over to their place for brunch and sure enough there was granola. Michelle’s daughter Eleanor called it crunch-crunch and of course, in toddler language, that was good enough for Sanaya to start eating granola.
This crunchy granola recipe is in honor of Michelle and Eleanor who introduced homemade granola to my family after which we have never turned back to store bought. It is especially a nod of thank you and love to Eleanor’s love of crunch-crunch.
WHAT MAKES THIS GRANOLA SO CRUNCHY?
I’ve recently learned a secret during my experiments in the kitchen. If I melt the maple syrup and olive oil together for a couple of minutes. Once I’ve added this to the granola mix and it starts to cool down, the maple syrup starts to coagulate. As this heats and cools during the baking process, it will help the granola harden into one large chunk which you can then break into pieces.
WHAT MAKES THIS SO SPECIAL?
The simplicity of this granola I think is what I love best. It literally takes me 3 minutes to combine all the dry ingredients, another 3 minutes to heat up the syrup and oil and add it to the granola mix. After that, basically a waiting game for the granola to cook and cool down enough so we all can eat it without burning our mouths.
I always use coconut in my granola – it’s a staple I don’t think I can live without in my granola. As for the nuts, I chose to use almond slivers and pistachios. I kept the pistachios whole for an added crunch and they taste SO good roasted. You can easily give them a rough chop if you have little ones who are not able to have whole nuts just yet.
Well… what are you waiting for? Go ahead. Try this recipe and get hooked like we have!
From my kitchen to yours, I hope you enjoy this deliciously Simple Homemade Crunchy Granola.
Line a baking sheet with parchment paper or silicone mat.
In a large bowl, combine oats, coconut flakes, almonds, pistachios, brown sugar, and salt. Stir to mix well.
In a small saucepan, combine maple syrup and oil. Simmer over medium heat for 2-3 minutes until completely emulsified. Add in the vanilla extract and give it a quick whisk.
Pour over the oats mixture and stir to combine thoroughly.
Transfer granola mix to the baking sheet and spread into a thin, even layer.
Roasting vegetables is one of my favorite ways to eat any vegetable. Having several different colors and cooking them together is the best in my book! You get plenty of vitamins and minerals and the different colors are just so pretty to look at! These Roasted Rainbow Veggies are the perfect way to serve your veggies for adults and kids, making them fun, easy, and healthy.
Rainbows have always been popular in our home, with me always telling my girls to eat their colors and the girls loving anything to do with rainbows, unicorns, and princesses. Roasting the veggies in a rainbow on a sheet pan is about the easiest recipe I have ever made. The vast array of vitamins and minerals that we get to eat with our dinner makes this one of my healthiest recipes.
For my colors, I chose beets, carrots, yellow squash, asparagus, and purple potato. You don’t have to stick to those same colors. Honestly, go for what you find in your fridge. Here are a few ideas to get you started for your own Roasted Rainbow Veggies:
RED: beets, tomatoes, red bell pepper
ORANGE: carrots, butternut squash, acorn squash, pumpkin
YELLOW: yellow squash, yellow bell pepper, golden beets, yellow onions
GREEN: zucchini, broccoli, asparagus, brussels sprouts
BLUE/PURPLE: purple sweet potatoes, purple carrots, eggplant, purple onions
So now that you have options, how do you make your own Roasted Rainbow Veggies? All you need is a good chopping board, a sharp knife, and a sheet pan. As to the flavors, my standard is to add a little dried oregano for taste with salt, pepper, and olive oil. Roast in the oven for 25-30 minutes (times do vary based on the type of veggies you choose), and serve it up with any dinner.
I can’t wait to see what veggies you chose to make your rainbow. Be sure to let me know in the comments or tag me on Instagram or Facebook!
From my kitchen to yours, I hope you enjoy these quick, delicious, and healthy Roasted Rainbow Veggies!