Fall Nourish Bowl
Warm up with this cozy Fall Nourish Bowl — packed with roasted veggies, quinoa, and creamy hummus for the ultimate autumn comfort meal. Nutritious, hearty, and full of seasonal flavor!
Continue reading “Fall Nourish Bowl”

Warm up with this cozy Fall Nourish Bowl — packed with roasted veggies, quinoa, and creamy hummus for the ultimate autumn comfort meal. Nutritious, hearty, and full of seasonal flavor!
Continue reading “Fall Nourish Bowl”

Discover a fresh take on hearty veggie barley soup! Packed with vibrant, nutrient-rich vegetables, this homemade version brings comfort and flavor without the heaviness. Perfect for cozy days or when you’re craving a healthy, feel-good meal.
Continue reading “Lentil Barley Soup”

These Cauliflower Steaks with Hummus Dressing are simply seasoned with a balsamic marinade and making them absolutely delicious. Tender and packed with flavor, the pomegranates add a but of crunch, the hummus adds a bit of tang. It makes the perfect vegetarian meal or side dish.
Continue reading “Cauliflower Steak with Hummus Dressing”

Simple, easy, earthy, and sustainable, this delicious Carrot Top Pesto is a versatile dish that can be used as a sauce, dip, or a topping.
Continue reading “Carrot Top Pesto”

Creamy and nourishing, this delicious Autumn Squash Soup is just perfect for a cozy dinner at home during these cold days. This soup is a spin off of Panera’s Autumn Squash Soup without the extra calories. But don’t worry! It still tastes amazing and just like Panera’s. The best part is that whilst you make this delicious soup, your home is going to smell like fall. Can it get any better?
Continue reading “Autumn Squash Soup”

Vibrantly pink, nutty, tart, and tasty, this Beet Pesto is absolutely delectable.
Continue reading “Beet Pesto”

**Note: Original post created Jul 2017. Updated October 2021**
The first time I was introduced to this traditional Punjabi meal was during my wedding planning. My husband and in-laws requested that this be on the menu somewhere. I didn’t understand what it was or the goodness of it until quite a bit later (much later than my wedding). Of course, during my wedding, I didn’t remember eating or tasting anything with so much going on. After I got married, I remember my mother-in-law making it a few times for my husband and seeing the pure joy on his face as he ate the Saag and Roti. I felt, wow, such a simple meal (for Indian food) and yet it brings him so much happiness. Of course I decided to try it out on my own.

I am always told, even to this day, how this is supposed to be a really hard recipe to master. I’m definitely not making it the way my mother-in-law does, but my shortcut recipe has managed to impress her, my husband and my daughter! As they say, a way to a man’s heart is through his stomach. I’m already in my hubby’s heart, but this is one recipe that guarantees a spot for any of you out there looking to impress your significant other.

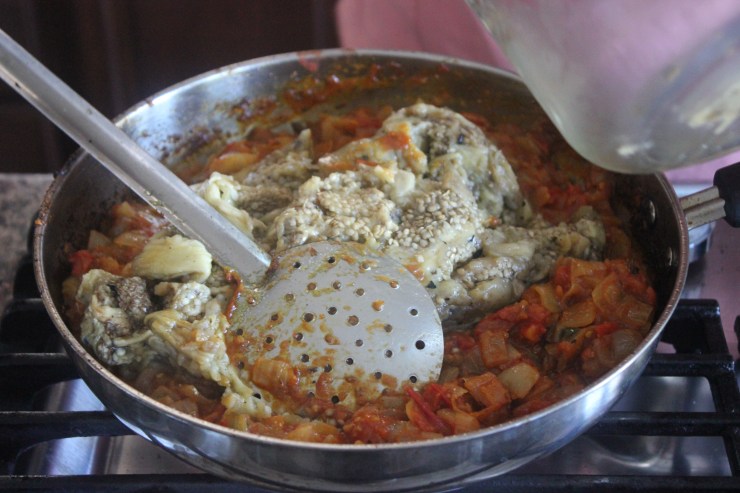
Sarson da Saag is basically a vegetable dish made of Mustard Greens. It is very earthy in taste and rich not only in flavor but nutrients also. Mustard Greens provide an abundance of potassium and Vitamins K, A, C, and E. Traditionally, it is cooked in water and hand churned until you get the creamy, buttery consistency. If I had the time, I might try it. But since I don’t, I obviously created a shortcut (my handy dandy blender). Try it out and tell me what you think:


The saag tastes great on its own, but man does it just go a whole other level with Makki di Roti. Makki di Roti is basically corn bread. It’s not your traditional Roti that is usually soft and pliable. This is a bit thicker and can hold all that saag without getting the roti soggy. One more thing – Makki di Roti is typically made by flattening the dough between the palms. I am using a different technique by placing the dough in between a ziploc bag and rolling it out with a rolling pin. This just works better for me.


Looking for more Indian recipes? Check out some of these:
Sprouted Moong Beans Sabzi Gujarati Style
Instant Pot Rajma (Kidney Beans)
Methi Thepla
Instant Pot Kali Dal
Avocado Roti
Here are the tools I used for this recipe:


A big name with big bold flavors, this dipping sauce is creamy, tangy, fresh, and vibrant. It lightens up any foods you are eating and is great healthy dip to add to your appetizer table.
Continue reading “Avocado Cilantro Lime Dipping Sauce”

**Original post published Nov. 2020. Updated Aug. 2021**
A couple of months ago, I won our local Farmer’s Market cooking competition and part of my prize was a big box of fresh goodies from the market. I don’t know if I’ve ever been so excited to get fresh veggies and fruits! I honestly felt like a contestant on Chopped from The Food Network in that I wanted to use all of my produce and come up with a delicious dish.

Well, considering there were so much produce, I’m not sure I would be able to eat more than 3 bites of any dish made from all of the veggies and fruits! One of my favorites in that box was the beet greens with their beautiful red stems. I’ve had quite a few people ask me what I use them for and what they can cook out of them. A definite go to are to cook them down like collard greens but I wanted to do something more creative and decided to add the beet greens to a hash and topping it with an egg made it the perfect breakfast for a busy day or a big, healthy lunch bowl.

The vibrant orange and red colors of the root veggies as they are being cooked, the bold green of the beets…..eeek! I’m salivating just thinking about this recipe. The best part is all the nutrition you get in this sustainable hash:

Topping this hash with a fried or hard boiled egg adds a little extra protein though to keep it vegetarian/vegan, you can always replace the egg with a grilled tofu steak.

From my kitchen to yours, enjoy this delicious and healthy Sweet Potato and Beet Hash!

One of my favorite times of the year is the spring when the Farmer’s Market starts to get bigger with more and more farmers who start to bring a larger variety of produce and goodies. I’ve mentioned in the past that I like to make a menu for the week (more so my kids don’t complain they want something else than what is served), but what I haven’t mentioned is how I love going to the Farmer’s Market to do my weekly produce shopping. Sometimes, I will even tailor some of my dishes to include produce I find at the Market.

Recently, I partnered with our local Farmer’s Market (Danville Farmer’s Market) and I will be creating recipes for them a few times a month in the hopes that I can bring awareness to locally farmed produce at all of our farmer’s market. Having fresh, organic produce and supporting the local farms is a win-win.

This Spring Crudites Platter is so beautiful, we all had a bit of hard time digging in. No one wanted to mess it up. Ah well, our stomachs won that round. The beauty of this platter is that you are not restricted to the same produce I picked up. Pick up what your farmer’s market has, just make it colorful.

Here is what I used:
As for the hummus, I chose purple sweet potato and red beets to be the base of each hummus. For the Red Beets, I roasted it with garlic, then pulsed it with a little tahini and a few other ingredients. This is by far one of my favorite variations on hummus. Paired with all that beautiful produce, it’s perfect!

For the Purple Sweet Potato, I baked it in the oven then pulsed it with tahini as well. Though the idea behind both hummus’ are the same, the flavor profile differ vastly. Yet both are addicting.

I hope you have a chance to make a beautiful Spring Crudites Platter like this for your next gathering. I promise you will love it.

Try it out and let me know what you think!
Here are the tools I used for this recipe:

If you are looking for more delicious recipes, check these out:
Roasted Masala Chickpeas
Roasted Red Pepper Hummus
Spicy Garlic Hummus
Crispy Chickpeas and Sweet Potato Tacos

Roasting vegetables is one of my favorite ways to eat any vegetable. Having several different colors and cooking them together is the best in my book! You get plenty of vitamins and minerals and the different colors are just so pretty to look at! These Roasted Rainbow Veggies are the perfect way to serve your veggies for adults and kids, making them fun, easy, and healthy.

Rainbows have always been popular in our home, with me always telling my girls to eat their colors and the girls loving anything to do with rainbows, unicorns, and princesses. Roasting the veggies in a rainbow on a sheet pan is about the easiest recipe I have ever made. The vast array of vitamins and minerals that we get to eat with our dinner makes this one of my healthiest recipes.

For my colors, I chose beets, carrots, yellow squash, asparagus, and purple potato. You don’t have to stick to those same colors. Honestly, go for what you find in your fridge. Here are a few ideas to get you started for your own Roasted Rainbow Veggies:
RED: beets, tomatoes, red bell pepper
ORANGE: carrots, butternut squash, acorn squash, pumpkin
YELLOW: yellow squash, yellow bell pepper, golden beets, yellow onions
GREEN: zucchini, broccoli, asparagus, brussels sprouts
BLUE/PURPLE: purple sweet potatoes, purple carrots, eggplant, purple onions
So now that you have options, how do you make your own Roasted Rainbow Veggies? All you need is a good chopping board, a sharp knife, and a sheet pan. As to the flavors, my standard is to add a little dried oregano for taste with salt, pepper, and olive oil. Roast in the oven for 25-30 minutes (times do vary based on the type of veggies you choose), and serve it up with any dinner.

I can’t wait to see what veggies you chose to make your rainbow. Be sure to let me know in the comments or tag me on Instagram or Facebook!
From my kitchen to yours, I hope you enjoy these quick, delicious, and healthy Roasted Rainbow Veggies!
Here are the tools I used for this recipe:


If you have been following me then you know how much I love my bowls. Experimenting with different flavor profiles, playing around with new dressings, and oftentimes using whatever vegetables are left in the fridge waiting to be saved from their last moments are the best part of creating my new bowl.

My brussels sprouts were facing a similar fate as mentioned above. I had enough left that I could create a whole new dish with just them, but so few that I didn’t want to waste them either. Grain bowls are perfect for these types of situations especially if you are using a variety of different ingredients.

This one turned out so delicious that I actually went out and bought more brussels sprouts even though I am trying to move on to spring veggies! We’ve now had this bowl 4 times in the last 2 weeks and no one in my household minds – in fact, they love it !

I added in some sweet potato for a little starch, sweetness, and fiber, and avocado for protein. As for the dressing, keeping it simple was the best route. I made a honey dijon dressing that worked wonders. The tang from the dijon and the sweet honey are a perfect balance to the bowl.
So…what are you waiting for? Try this delicious Brussels Sprouts Grain Bowl and become a fan too!
Here are the tools I used for this recipe:


Growing up, my Mom would make these sprouted moong beans for dinner often. I remember my brother and I were not big fans and would hate eating them. Now that I’m an adult, maybe a switch has flipped? I don’t know but I definitely love this recipe and could easily eat this dish 2-3 times a week. Thanks Mom!

WHAT ARE SPROUTED MOONG BEANS?
Sprouted moong beans are basically moong beans that have been soaked in water then left in a warm place to germinate. They are very popular in Indian and Pakistani cooking though many people across the globe are starting to embrace this food more and more.
Some of the more popular ways to eat sprouted moong beans is to add them in to salads and sandwiches, however, some of the more traditional ways to make them is to make a curry, a sabzi, and even dosas out of these delicious babies.

WHY SHOULD I EAT SPROUTED MOONG BEANS?
Because they are a powerhouse of nutrients. These legumes are one of the best sources of plant based protein providing ~14gm in 1 cup cooked. Take a look at some of these other benefits:
WHERE CAN I GET SPROUTED MOONG BEANS?
Moong Beans are easy to sprout at home (I love this method provided by Piping Pot Curry) or you can find them at your local Indian or Asian grocery store.

So now that you know what I know about these delicious and nutritious legumes, let me tell you how to make them. This particular recipe is my mom’s (I’ve not made a single change to it because it’s so perfect the way it is!) and I love the simplicity of it as it carries a depth of flavor too.
There are two methods of making this dish. One is in the instant pot and the other over the stove. I’ve given both versions in the recipe card below so feel free to try both to see which you prefer!

From my kitchen to yours, I hope you enjoy these Sprouted Moong Beans as much as we do!
Here are the tools I used to make this recipe:


The holidays this year have been as non-traditional as possible but that hasn’t kept many of us from cooking and baking our favorite foods. I have definitely been doing my share of baking, cooking and eating massive amounts of desserts, drinks, and carbs. As always, this leads me to making New Year’s resolutions which have standards that are set too high. Instead of setting impossible standards and going on an extreme diet, one of my resolutions is to eat healthy, nutrient dense foods. Less processed, more home made where I can control the ingredients, especially the salt and sugar.
To help “reboot” our bodies and cleanse it of the all the heavy (and mostly unhealthy) foods eaten over the holidays, I’ve compiled a list of 21 Healthy Recipes to Kick Start the New Year. It is my sincere hope that this list will help you eat healthier without having to sacrifice great taste. Welcome to 2021 everyone!
Breakfast Oat Muffins

An easy make ahead, these delicious oat muffins are versatile and fun to make with kids. Grab one on your way to work, school, or your home office!
Almond Coconut Porridge

A delicious porridge that you can make ahead the night before and add so many healthy toppings to, this Almond Coconut Porridge is the perfect healthy start to your day!
Apple Pie Oatmeal

Steel cut oats cooked with apples and cinnamon to give you a creamy apple pie taste are one of our favorite types of oats. Try them out and you will want a bowl of this Apple Pie Oatmeal over and over again!
Breakfast Soufflé Bites

These easy egg bites filled with fresh and healthy veggies. Perfect to make ahead, freeze and reheat for busy mornings.
Sweet Potato and Beet Hash with Fried Eggs

A superfood dish that can be used for breakfast or brunch, this delicious meal is the perfect start to any day. Packed with fiber, non-dairy calcium, beets help fight inflammation, detox the body, and boost energy!
Butternut Squash and Lentil Salad

The perfect winter salad that keeps you full, nourished and packs a punch with a variety of flavors and textures, this Butternut Squash and Lentil Salad is a great lunch or dinner option!
Rainbow Fajita Bowl

Filled with colorful and fresh veggies, this healthy bowl is low on carbs and calories but provides a good source of nutrition.
Paneer Cabbage Cups

A fun healthy option with a bit of Indian fusion, these Paneer Cabbage Cups are light and filling.
Adai Waffles / Lentil Waffles

Who says waffles have to be for breakfast only? Or that they have to be sweet? These savory lentil waffles are filled with 4 different types of lentils and lots of veggies. Have a couple with a side of Masala Salsa or Chutney, you can’t go wrong!
15 minute Masala Pasta

Make a batch of this pasta sauce filled with veggies and delicious spices to freeze and use for any meal. Combine it with your gluten free or fresh pasta and you will have a veggie loaded pasta that even fussy kids will eat in less than 15 minutes!
Fresco Carpaccio

A light and healthy salad, this Carpaccio is very simple to make and disappears just as quickly! A great afternoon snack or side salad, you must try this!
Tomato Avocado Cucumber Salad

Packed with protein, healthy fats, and fresh fruit, this delicious salad is perfect to take to work or have on the side with a meal!
Microgreens Salad

A nutrient-dense salad that is light to eat and will make you wanting more, it’s very simple and quick to put together.
Roasted Masala Chickpeas

A healthy snack that will keep you going when you have munchies in the afternoon. Store these in an air tight container and enjoy whenever your tummy desires!
Roasted Chili Almonds

Another great snack to have or one to add to a cheese board, these Roasted Chili Almonds take only 5 minutes to make. Store in an airtight container and enjoy for up to 2 weeks.
Rainbow Lentil Stew

This stew is filled with fresh, colorful veggies that are packed with nutrition and flavor. You can make it in a dutch oven or slow cooker and enjoy it for one of the many rainy days ahead this winter and spring.
Sweet & Spicy Harvest Bowl

Just as it’s name implies, there are plenty of sweet and spicy notes in this bowl. Beets, brussels sprouts, acorn squash, and pears over a bed of quinoa is just the beginning of the deliciousness here. The veggies are roasted with chipotle powder to give it hints of spicy and smoky that bring together the perfect amount of pepper.
Spinach Dal

On a consistent rotation in our home, this Spinach Dal has becoming popular. Taking only 10 minutes to make, you can’t go wrong with this delicious Indian lentil dish.
Quinoa Stuffed Butternut Squash

This Quinoa Stuffed Butternut Squash is filled with fruits and veggies and topped with a delicious Apple Cider Vinaigrette, every bite will burst with a multitude of flavors.
Easy Chicken Ramen with GF Noodles

For those rainy nights, this Ramen is the perfect way to cuddle up and enjoy a warm broth filled with veggies and gluten free fresh pasta noodles. The best part, it takes less than 30 minutes to make!
Tandoori Gobi (Cauliflower) Zucchini Boats

A fun fusion dish that is filled with the traditional Tandoori flavor. Roasted in the oven then broiled, the cauliflower give hints of the charred smoky flavor combined with the Tandoori marinade. Serve it with a side of cooling Mint-y Pomegranate Raita and be prepared to have your taste buds take a trip to India!
Well, I hope you enjoyed this list of healthy recipes to kick start your New Year! I’m going to be adding more to continue our journey of healthy eating. In the meantime, tag me when you make a recipe of mine on Facebook or Instagram or feel free to leave a comment below. Let me know what recipes you would like to see also.
I wish all of you a Happy New Year filled with lots of healthy eating (and a little not so healthy eating).
~Sapna


This fall and winter season I have been obsessed with acorn squash and pomegranates. It only made sense that I find a way to combine the two together. The girls love the rainbow shape this takes on when cut so I wanted to create something fun for them too.

The great thing about acorn squash is that it is a little sweet naturally but it will still take on any flavor you give it. If you haven’t tried them yet, I made some Fire Roasted Poblano Tacos recently with acorn squash part of the filling. It took on the spices really well so I wanted to go on the opposite spectrum this time and season it with something a little more mild.

I chose mostly fresh herbs that would bring out the more earthy flavors. To help give it a little crust, I also added a little Parmesan.

Anyways, here are a few fun nutrition facts about acorn squash:
So now that you know about my favorite squash this season, let’s move on to my favorite fruit of the season.

Pomegranates!
Basically, this is one healthy dish that you can have this winter season and enjoy every bite of it! Try it out and tag me on Instagram @bitofspice146.

From my kitchen to yours, I hope you enjoy this delicious Herb Roasted Acorn Squash with Pomegranates and Pistachios.
Here are the tools I used to make this dish:

I’ve made zucchini boats a few times so far. Each time has been to use up leftovers from our Skinny Skillet Enchilada the previous night. They turn out really good and Sanaya loves them but it’s the same flavor profile so as much as I love it, I still crave something a little different.
I knew I wanted to create a different filling and haven’t done much with Indian food lately so I played around with my options. I kept circling back to this one idea of Tandoori Gobi as the stuffing. I’m not sure where I thought of it but it wouldn’t go away so I decided, ok, let’s give it a try.
I have a great Tandoori marinade recipe that I have been using with chicken so I decided, to use the same for the cauliflower. I treated the cauliflower as the chicken substitute and marinated it overnight also.

The cooking part was a little tricky as I didn’t want a soggy Zucchini Boat and the marinade definitely looked like it would promise a lot of liquid. Simple trick, I baked them separately, then stuffed the zucchini with the cauliflower and broiled it on high for 5 minutes to get a good char. Can I just say, Oh so delicious!
Also, please don’t throw out the flesh of the zucchini when you scoop it out to create the cavity for the cauliflower. Let’s be sustainable here and make some Zucchini Bread out of it!

One more thing I love about this recipe is that it is totally a weeknight meal. So the time on the recipe card may be a little daunting, but it’s the ease of it. And most of the time you spend is waiting for the flavors to marinate. It really takes maybe 15 minutes to put the marinade together, then the next day, 5 minutes to shell out the Zucchini and the rest of the time, you are waiting for it to finish baking. Honestly, it can’t get any easier for a weeknight meal.
Serve this delicious boat with a cooling Mint-y Pomegranate Raita to finish it off.
From my kitchen to yours, we hope these Tandoori Gobi Zucchini Boats rock your world!

The year was 2013, I had been married only a couple of months and was hosting this grand Thanksgiving for my in-laws. My mother-in-law is vegetarian as am I and so I wanted something special for a veggie dish at the table instead of roasted veggies.

No offense to roasted veggies, I love them. In fact I eat them all the time and therein lies the problem. I wanted something “fancy”, something different that I don’t have on any given night.
So I scoured the internet and landed upon this gorgeous picture of Ratatouille and thought, I can make this! And I did. It didn’t look so pretty but hey, that’s ok, I hoped it would taste delicious though. It was bland. There literally was no flavor profile to it and safe to say, both my mother-in-law and I were disappointed.

She was nice enough to pretend it was good but I couldn’t even do that!
So ever since, I’ve been on a mission to create a Ratatouille that has layers and dimensions of flavor. Safe to say, I think I found it!

Here’s the secret!
I have been playing with the recipe for a while now and when I made the final version, I was satisfied aesthetically. The question was, would my girls eat the eggplant in it?
Recently, they’ve become very finicky eaters and it can be a real struggle to feed them even their favorite foods sometimes. But they both ate all the veggies and I couldn’t have been a prouder Mama!

Try this out for your next Holiday dinner, weeknight surprise, or Sunday dinner. It’s easy to make ahead, stores in the fridge and freezer well and is fairly simple to make!

From my kitchen to yours, I hope you enjoy this delicious Ratatouille!
The tools that I used to make this recipe are:

The weather is still pretty warm out but I am mentally ready for fall! Especially with all the delicious veggies at the Farmer’s Market that are coming out for the season. The pomegranates, Brussels sprouts, root vegetables and especially all the squash and pumpkins I’m seeing everywhere! They’re all so beautiful, colorful and oh so yummy!

I was inspired during my last visit to the Farmer’s Market for this recipe. I used acorn squash because it is mild in flavor and one of the easiest squash to peel and cut. The beets added beautiful color and flavor (and lots of nutrition!), and crispy brussels sprouts once roasted are the perfect addition for texture in this bowl.

Here are a few other ingredients I used though, I definitely didn’t roast them:
As for the dressing, I debated whether to add one or not but in the end, I decided a simple squeeze of lime would do justice without taking away from the other flavors.

I was so excited just roasting the veggies because they looked so bright, bold and beautiful! The spice that I added to balance the sweet of the beets and pears out was smoky chipotle pepper to the veggies that I roasted.

This is one dish that I think is going to come up often on our table through this season! Make a big batch for a holiday dinner side, a small batch for a lunch or make it a meal for a weeknight! It’s simple, healthy, delicious, and you get to eat many of your colors!
Here are some of the health benefits from this yummy bowl:
Well! What are you waiting for? You have got to try this out!
From my kitchen to yours, I hope you enjoy this delicious Sweet and Spicy Harvest Bowl!
Ok so I know that the name alone makes this salad sound like an explosion of so many different flavors and it is! But….. that’s what makes this salad work so well!

Between my obsession for salads and my inclination towards making my own dressings, my salad game is going strong right now. I’ve been wanting to use watermelon radish for a while now because of it’s flavor and just how pretty it looks!

Here are a few fun facts about watermelon radishes:

The fennel was added in to balance out the peppery flavor of the radish (though, to be honest, I wasn’t sure how the hubby was going to like it as he is not a big licorice flavored guy. The best part about eating fennels to me is the licorice!). Luckily, the fennel taste was mild when combined with the flavors of the salad.

As to the Ginger Lime dressing, adding the hint of ginger balanced with a little honey in the dressing and the lime to brighten up the salad, it was the perfect choice to use this for the salad.
When I think about this salad, it really has a great balance of sweet, spicy and tangy! So perfect for a lunch meal, side dish, or a Covid free Thanksgiving dinner!
From my kitchen to yours, enjoy this salad!
Here are the tools that I used:

Bright, crunchy, colorful and easy to assemble with a creamy coconut jalapeño dressing, this salad is a perfect addition to your meal.

Easy to make, this salad has plenty of texture, meets my rainbow requirements, and is quick to pull together for any meal. A twist on the traditional slaw, the Rainbow Crunch Salad is a healthier version with a low cal coconut jalapeño dressing to finish off a delicious salad.

With school started, life still crazy between Covid, fires, and whatever else you want to throw in there, I want to keep it easy and quick for this salad. Chopping the veggies doesn’t take very long and the Coconut Jalapeño dressing is blended in less than a minute.

Here’s what you need for the salad:
I’ve used this as a lunch meal, a side salad for fish and chicken dishes, or even a quick afternoon snack if I had some leftovers.

Try it out! From my kitchen to yours, enjoy!

Growing up, mango lassis were one of my favorite to order when we ate out at Indian restaurants. The sweet mangoes, the tangy yogurt, and the hint of rose at the end of each sip…. oh so delicious! The fact that mangoes are my absolute favorite fruit just adds to my love for this lassi!

A summer time must have, even my girls look forward to having a glass almost daily which just makes my heart happy. Easy to whip up, you don’t need much. A blender and the ingredients are all you have to use. I did use a dash of rose syrup to give it a summer-y floral hint which takes this lassi to a whole new level.

Have this delicious mango lassi as an afternoon snack to cool down in the heat, or pair it with some delicious Indian food. It pairs well with Masala Omelette for breakfast, or even a lunch time drink with a Desi Masala Bowl or with dinner when you try out this Instant Pot Chole.

From my kitchen to yours, enjoy this delicious treat!

We’ve been doing some heavy eating lately so I decided to play around with some easy, simple salads. I didn’t get past this one to try any others this week. This Spinach Watermelon Salad is so good, I just want to eat it all the time! The Basil Vinaigrette adds the perfect zing and hint of spice to bring it together perfectly.

I love to cut up the watermelon and keep in the fridge so that it is nice and cold. The cold sweet watermelon, crunchy spinach and onions, the salty feta…. yep, I want some now!

This salad took less than 10 minutes to make (including the vinaigrette). You absolutely have to try it out. It’s amazing!

From my kitchen to yours, I hope you eat this over and over again as much as I do!

If you’ve been reading my blog, you know that growing up I was not an eggplant fan. So why am I posting 2 recipes (Baba Ghanouj and this one) with eggplant within a month? They became a part of my adult life and I learned what I was missing out on.

I’m not sure about the timeline but I do remember maybe a few months after I got married, we had gone down to see my in-laws for the weekend. Mom had made baingan bharta and I was trying to be nice so I ate it without telling her I was not a big fan of eggplant. It was ingrained in me since I was a kid that you ate what you got, especially at someone else’s house without a fuss. Man am I thankful for that specific rule!

Though I took maybe only about a tablespoon’s worth (and spread it out so my MIL wouldn’t notice – yep…. totally resorting to childhood antics), baingan bharta became a new favorite of mine. Since then, I have tried it at various restaurants and at home but nothing compares to the way my MIL makes it. This recipe is hers and I’m excited to share it.

Notes:
Try to pick eggplants with fewer seeds as this will give you more flesh and will be less bitter. Male eggplants tend to have fewer seeds and to tell the difference, at the bottom of the eggplant, there will be an indentation. If it is deep and shaped like a dash, the eggplant is female, if it is shallow and round, it is a male.
If you do end up with an eggplant with more seeds, after roasting the eggplant, don’t skin it right away. Let the eggplants sit on a tray and continue steaming to soften the seeds.

You can store the roasted eggplant in the fridge for up to 3 days or in the freezer for up to 1 month.
From my Mother-in-Law’s kitchen to yours, we hope you enjoy this one!

One of my very good friends, Diana, has a plum tree that produces an abundance of plums every year. One of my favorite memories is when Sanaya was just over a year old, we had gone to her house and she let us pick plums in her backyard. We had so many plums in our hands, I had walked away to put them in a basket. When I came back, Sanaya had eaten half a plum (most of the juice was around her mouth and on her clothes) and was holding another she was getting ready to dive into. It was one the best afternoons ever!

We are a fruit loving family and we don’t discriminate (well, unless it’s mangoes – then everyone has to fend for themselves while I devour them). At any given time, there’s always fresh fruit in the house and I love that my girls share mine and hubby’s love for them. In honor of Diana’s plum tree (which I heard may not be around much longer and I almost cried), I got creative and added a little spice spin to these crumble bars.

I love this recipe because it is so easy to come together. For the filling, I stayed true to Salted Mint‘s filling. I tried out a few different variations but I love this one the best because it is simple, adds the warmth of star anise and cinnamon and tastes amazing!

For the crumble, I added hints of ginger and cardamom (I seriously felt like I could call this a Chai Spiced Plum Crumble because of the similar spices used). And the best is I can use the same mixture for the crust and crumble!

For the oats, I used old fashioned oats and mixed it by hand. You can absolutely pulse it in a food processor until you get a crumbly mixture.

I don’t think anyone can stop eating just one bar! These are so crumbly, flaky, sweet, tart, and have just a little hint of spice which just warms your insides up!
This recipe makes about 16 squares in a 8×8 baking pan.

Notes:
To store, place in a sealed container and keep in fridge for up to 1 week or in freezer for up to 2 months.
Keep the skin on the plums! I wasn’t sure about this when I first started experimenting but it just becomes a part of the jam and you can’t even notice it!

From my kitchen to yours, I hope you enjoy these delicious plum crumble bars!
Here are the tools I used for this recipe:


Paneer is a staple in any Indian household. It is so versatile, the possibilities are endless. I’ve marinated it in Roasted Cilantro Mint Chutney and grilled it over the BBQ, you can also grill it and use it as an addition to a salad, make Paneer Cabbage Cups, Matar Paneer, and most famously known Palak Paneer.

It may sound daunting but making paneer at home is actually very easy. There’s literally 2 ingredients involved – milk, and an acidic agent to separate the curd. I like homemade better than store bought because you can choose which type of milk you want (low-fat or full-fat) and there are no preservatives like in the store bought ones.

How to make paneer at home:
Step 1: Boil the milk

Step 2: Add in your acidic agent and keep stirring to help the solids separate from the whey

Step 3: Drain the whey so you have just the solids left over

Step 4: Rinse the solids to remove smell and taste of acidic agent

Step 5: Squeeze out excess water and hang the paneer to remove moisture

Step 6: Mold the paneer into desired shape
Step 7: Remove the block of paneer from the cheesecloth and use as desired

Notes:
1. I suggest double lining the cheesecloth so that it is more sturdy and holds the paneer well when draining. This is the cheesecloth that I use and love!
2. Acidic agents that can be used are lemon juice or vinegar. I’ve found vinegar works better with curdling the solids without leaving behind a tart taste in the paneer
3. Keep the acidic agent close by so you can use it as soon as the milk is ready so it doesn’t boil over.
4. If you need to add more acid, add a teaspoon at a time. Adding too much can make the paneer rubbery
From my kitchen to yours, I hope you have fun and enjoy making your own paneer!

These Breakfast Soufflé Bites are so quick to make, delicious, and fun to play with the toppings. Even better, you can make them ahead and freeze them to reheat on a busy morning.


Light, airy and packed with protein and a variety of nutrients, you don’t have to worry about what healthy breakfast to make in the mornings. Wrap them in foil, pop them in the freezer and when you want to eat them, reheat in the toaster oven or oven and they’re the perfect breakfast on the go meal.

Here are the add-ins I used:
What toppings will you play around with?


From my breakfast table to yours, I hope you enjoy this!

Summertime salads are one of my favorites to eat. They’re simple, light, filling, and don’t take much time in front of the stove or oven. I love this Rainbow Fajita Bowl because it is so easy to pull together and you can eat it as a dinner meal or prep it on the weekends for weekday lunches.

Yum
It’s vegan but if you’re looking to add in some chicken, super simple to do that too. I’ll include it in the notes below! You can marinate the chicken 30 minutes ahead or overnight but still get an amazing, tasty, juicy chicken too!

But on to my bowl. I just love the colors in this salad. And the fact that my girls ate it because of the rainbow foods (ok, well maybe they ate one leaf of salad but at least I got one in!). Drizzle with some chili lime dressing and you’re set! The spice, the crunch, the sweet corn… I think this salad bowl is calling my name for lunch again today!

Get your kids involved in this one. Once you have all the ingredients ready, have them help you assemble them for make ahead lunches for you and your kids!
From my kitchen to yours, enjoy this rainbow of colors and burst of flavor!

Growing up in an Indian household, chutneys are a must. They are an integral part of any Indian household. Whether you are eating Dosa or Adai Waffles / Lentil Waffles with tomato or coconut chutney, or samosas with cilantro or tamarind chutney, or Kati Rolls or Bombay Masala Sandwiches with chutney used as a spread, it’s always prominent in Indian food.

There are so many different kinds of chutneys prepared so many different ways, I just love the versatility of these dips. I tried to a different approach to my Roasted Cilantro Mint Chutney by roasting the cilantro and mint with some cashews, chickpea flour, and plenty of spices.

As you roast the herbs, they develop a char which carries into the final product and gives it just a hint of smoky flavor and smell when you eat it.

I’ve used this chutney recipe to eat with Adai Waffles / Lentil Waffles, Paneer Cabbage Cups, Spinach Dal Paratha, Aloo Paratha, and Avocado Roti. What will you eat it with?

From my kitchen to yours, I hope this chutney becomes a staple for you!

Growing up, my mom would make traditional Gujarati food for dinner most days. My brother and I loved eating a Gujarati thaali (not all the time) and one of my favorites was Bhinda Bataka nu Shaak. The crunchy exterior of the potato that’s just soft enough to melt on the inside and the crispy okra to finish off the dish is just the perfect reminder of home to me.

Yum
When I made this dish, I was so excited to share my love for it with kids. I’ll be honest though, they didn’t take to the okra which broke my heart. Sort of. They ate the potatoes though. But I’m going to keep trying to share my love of okra and hope one day they do like it as much as I do.

But okra is so slimy!
Trust me, I know! So my hack…. use frozen or pre-cut okra. And fresh squeezed lemon juice. Wait, what? Yep, lemon juice helps break down the slime without turning your veggies into mush.

Want to know something even more cool? The “slime” (known as mucilage) actually contains soluble fiber. Here are a few more benefits of eating okra:
So try this delicious sabzi for your next Gujarati thaali. It’s delicious and healthy and so easy to make. Try it out!

From my kitchen to yours, I hope this dish brings you the joy it brings me.

Mango is my absolute favorite in the whole world! Done. That’s it. If I were stuck on an island and there were mangoes, I would be set.

Yum
That being said, I think for my hubby, it would be salsa. Honestly, I’ve never seen a salsa that man has not devoured.

I love this mango salsa because it is so fresh, tangy, sweet, and spicy all at the same time! I’ve paired this the traditional way with chips, fish, tacos, fish tacos, as a dip during parties and more recently with Hawaiian chicken. There’s no wrong way to eat mango pico!

The mango pico that I made is very easy and simple but it packs a punch of flavor. I go a little heavy on the spice to balance the sweet of the mango and only 5 ingredients needed to make.
From my kitchen to yours, enjoy this recipe!


