Chai Spice Pumpkin Muffins

The perfect afternoon snack with your cup of coffee or chai.  Soft and moist muffins filled with pumpkin flavor and loaded with chai spices, this muffin is sure to be your new fall favorite.
Continue reading “Chai Spice Pumpkin Muffins”

Quinoa Fiesta Salad

Fresh and beautiful veggies from across the rainbow to make amazing salads are my favorite.  This Quinoa Fiesta Salad is one of my family’s favorites.  As a mom, it makes me happy that the girls are getting so much nutrition in one bowl.  The kids look at the colors and get excited to eat a rainbow and I love that they are enjoying fresh and healthy ingredients!

This salad does triple duty which I love.  A dish which becomes a meatless entree can also serve as a side dish or a salad depending on my mood.  The cherry on top of this recipe is that it takes less than 30 minutes to make and is very forgiving if you need to substitute or leave out ingredients.

HOW DO I MAKE A QUINOA FIESTA SALAD?

1.  Cook the quinoa.  While the quinoa is cooking, you can get the dressing and your other ingredients ready!
2.  Make the Cilantro Lime Dressing.  I love this dressing because it is so light.  If you choose to leave it out as I do for my girls, simply replace it with a drizzle of Olive Oil, lemon juice, salt, and pepper.
3. Combine all of your ingredients in a large bowl and toss well to mix.
4.  Enjoy and get addicted to this salad as much as my family and I are!


Here are the tools I used for this recipe:


Secret Ingredient Brownie Bites

Back to school is all I can think of at the moment.  We’ve made it through the first week successfully so this week, we are adding a challenge – soccer practice.  I’ve got two schools in opposite directions of each other, different timings for both kids, and now practice days.  I’m definitely going to need as many snacks with me as possible.  Easy to eat snacks and as healthy-ish as I can make them for my picky eaters are what I’m looking for.

These secret ingredient brownies are the perfect solution because the girls can’t taste or guess the secret ingredient!  But the girls did approve of them and that is all I need to keep making deceptively delicious foods.  Well, what is the secret ingredient you ask?  BLACK BEANS!  So when I first told the husband about my idea, he was very skeptical.  He loved the black beans idea just wasn’t sure about adding it to a dessert.

But it works!  You can’t taste the black beans at all, courtesy of my blender.  And the addition of the beans gives the brownies a truffle-like consistency.  They also remove the necessity of using flour so these become gluten free!  My favorite part is that I can make these brownie bites in less than 15 minutes!  Yep, ever heard of a baked dessert ready to eat within 15 minutes?  It’s right here and it tastes delicious.

I wouldn’t count this as a healthy food but it is a good option to straight sweets.  I won’t be making them all the time but often enough to get the girls moving.  Make sure to pack one of these delicious brownie bites in your child’s lunch bag!

Here are the tools I used to make this recipe:

For more snack ideas, check out these recipes:
Popeye Muffins
Almond Cacao Energy Bites
Simple Homemade Crunchy Granola
Lemon Blueberry Mini Loaves


Back to School Breakfast on the Go!

Summer is practically over in less than a week for us.  I’m going to miss the lazy mornings, the relaxed schedules, and eating pancakes and french toast for breakfast.  I’m looking forward to having a regular schedule in the mornings but planning them out will take some effort.

If you are looking for easy and healthy breakfasts then you’re in the right place!  I’ve compiled some of our favorite breakfast recipes below.  There are several chia pudding recipes as that has become a family favorite lately.  Others, like the Apple Pie Oatmeal takes 3 minutes in the Instant Pot.  I also like to make Almond Butter Breakfast Bars and Breakfast Oat Muffins over the weekend for on the go days.

If you want to see certain recipes on the blog, leave a comment below.  I would love to create recipes for you!


Almond Coconut Porridge  


Breakfast Soufflé Bites


Breakfast Oat Muffins


Apple Pie Oatmeal


How to make a Nutty Granola


Almond Butter Breakfast Bars


Pomegranate Pistachio Chia Pudding


Fig and Chia Pudding Parfait


Avocado Banana Smoothie


Date Smoothie

Back to School Lunch Ideas

Last year, I had this beautiful plan of meal planning and prepping during the school week.  The goal – to provide as many nutritious and yummy meals as I possibly could for the family.  By May, I gave in to grilled cheese and mac and cheese being on the weekly rotation too often.  I did have a great run of healthy meals most of the year though which empowers me to write another Back to School blog post.  Continue reading “Back to School Lunch Ideas”

Citrus Herb Salmon with a Mango Pico and Cilantro Lime Rice

It doesn’t get any tastier (or easier) than this delicious Citrus Herb Salmon topped with a sweet and spicy Mango Pico on a bed of Cilantro Lime Brown Rice.  Ready in 30 minutes (yep, even the brown rice), this is the perfect healthy meal to serve your family.  Continue reading “Citrus Herb Salmon with a Mango Pico and Cilantro Lime Rice”

Zucchini Moong Dal

As I raise my girls, it has become very important to me that they keep connected to their roots and one of the ways I do this is through food.  Lucky for me, they both love the typical comfort food fare of “Dal Chawal” or Lentils and Rice.  A twist on the traditional Moong Dal Fry, this recipe adds zucchini and is low in calorie but nutrient dense.

Ready in just 15 minutes, this has become my latest go to recipe when I’m tight on time.  Because moong dal cooks very quickly, I don’t soak them for more than 20 minutes.

Nutrition is also very important when I’m serving this dish as a main meal to the girls, and this dish doesn’t disappoint.
1 cup of zucchini moong dal gives you:

  • 156 kcal
  • 8.7 gm protein
  • 7 gm fiber


As to cooking it over the stove versus the instant pot, traditionally, the dal was boiled first then added to the spices.  I love just using one pot to make the whole dish so I usually add the uncooked dal into the spices/gravy mix then cook it in the instant pot.

I hope you get a chance to try out this delicious recipe and enjoy it as much as my family does.

Looking for more lentil/dal recipes?  I’ve got you covered.  Check out some of these amazing dishes:
Sprouted Moong Beans Sabzi Gujarati Style
Spinach Dal 
Instant Pot Kali Dal 
Adai Waffles / Lentil Waffles

Here are the tools I used for this recipe:


Farmer’s Market Crudites Platter with Hummus Two Ways

One of my favorite times of the year is the spring when the Farmer’s Market starts to get bigger with more and more farmers who start to bring a larger variety of produce and goodies.  I’ve mentioned in the past that I like to make a menu for the week (more so my kids don’t complain they want something else than what is served), but what I haven’t mentioned is how I love going to the Farmer’s Market to do my weekly produce shopping.  Sometimes, I will even tailor some of my dishes to include produce I find at the Market.

Recently, I partnered with our local Farmer’s Market (Danville Farmer’s Market) and I will be creating recipes for them a few times a month in the hopes that I can bring awareness to locally farmed produce at all of our farmer’s market.  Having fresh, organic produce and supporting the local farms is a win-win.

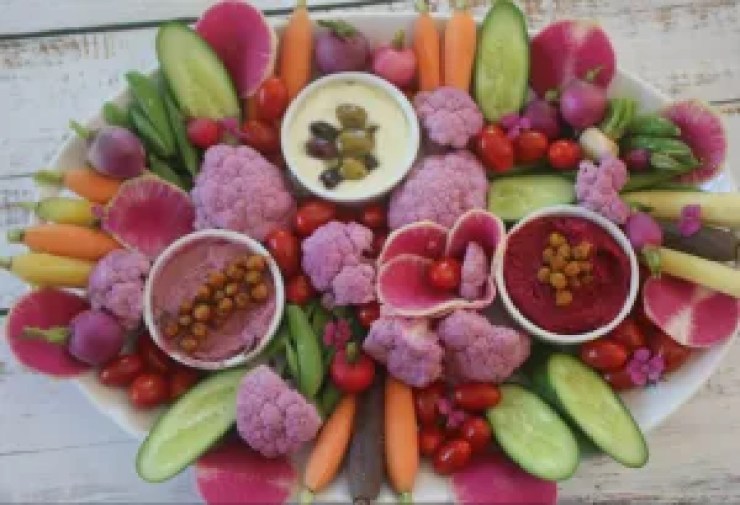
This Spring Crudites Platter is so beautiful, we all had a bit of hard time digging in.  No one wanted to mess it up.  Ah well, our stomachs won that round.  The beauty of this platter is that you are not restricted to the same produce I picked up.  Pick up what your farmer’s market has, just make it colorful.

Here is what I used:

  • Purple Cauliflower (chop these into big chunks)
  • Rainbow Baby Carrots (trim the stems off and save to make pesto – be sustainable!)
  • Radishes
  • Watermelon Radishes (slice these a little thick into rounds to give a beautiful effect)
  • Snap Peas
  • Cucumbers (I sliced these on the diagonal for aesthetics.  Feel free to slice into rounds or sticks to make them easier to serve)
  • Cherry Tomatoes

As for the hummus, I chose purple sweet potato and red beets to be the base of each hummus.  For the Red Beets, I roasted it with garlic, then pulsed it with a little tahini and a few other ingredients.  This is by far one of my favorite variations on hummus.  Paired with all that beautiful produce, it’s perfect!

For the Purple Sweet Potato, I baked it in the oven then pulsed it with tahini as well.  Though the idea behind both hummus’ are the same, the flavor profile differ vastly.  Yet both are addicting.

I hope you have a chance to make a beautiful Spring Crudites Platter like this for your next gathering.  I promise you will love it.

Try it out and let me know what you think!

Here are the tools I used for this recipe:

If you are looking for more delicious recipes, check these out:
Roasted Masala Chickpeas
Roasted Red Pepper Hummus
Spicy Garlic Hummus
Crispy Chickpeas and Sweet Potato Tacos

Fig and Chia Pudding Parfait

If I had to choose any other fruit besides mango, figs would definitely take second place.  The soft exterior, the honey sweet flesh, and the crunch of the seeds as you eat each one is just heaven.  Pair it with chia pudding topped with fresh baked granola and garnished with a sprig of mint, well, you just won’t want anything else for breakfast!

Continue reading “Fig and Chia Pudding Parfait”

Thandai Infused Rainbow Crème Brûlée (Vegan)

A creamy, rich, aromatic custard with a beautiful caramelized crust that is unbelievably easy to make.  This Thandai Infused Crème Brûlée is a twist on the classic French dessert by using coconut cream and coconut milk making it vegan and gluten-free.

Holi has always been one of my favorite Indian festivals.  The colors, the food, the fun.  What makes it even more special is that 8 years ago, my husband bent down on one knee in the middle of a very public festival (the organizers were in on it as were our siblings and friends) and everyone (about at least 100 people) stopped playing to watch him ask me to marry him.  I will always treasure that moment.

So for this Holi, I decided to do a fun fusion in honor of my very special husband.  His favorite dessert is crème brûlée.  What better way than to infuse a Holi special drink of Thandai and combine my two favorite events together?  Honestly, it tastes SO YUM that I had to stop myself from “tasting” the custard before it set.

WHAT DO I NEED FOR A VEGAN CREME BRULEE?

Full-fat Coconut Milk and Coconut Cream – this is important to give the custard it’s rich creamy texture.
Arrowroot Powder – this acts as a thickening agent.
Agave – for that hint of sweet
Thandai Masala – this is going to lend that brilliant aromatic and floral flavor to the custard
Saffron – for a beautiful golden color
Vanilla Extract
Almond Milk
Sugar
Rainbow Sprinkles – optional but I love how the colors brighten up the dessert
Salt

THREE IMPORTANT STEPS TO A PERFECT THANDAI INFUSED CREME BRULEE

1. Infusing the thandai masala.  This is important to get that flavor in there.  The longer you infuse, the better the end result will be.

2. Blending all of the ingredients.  This is extremely important because the arrowroot powder can clump and that would ruin the whole dessert.  When you blend it into a smooth liquid, you end up with a rich, silky dessert.

3. Once it’s blended, whisk the mixture on the stove constantly to prevent it clumping and/or burning until you get your custard consistency.

THE CHERRY SUGAR ON TOP
How can I possibly leave this part out?  This is my favorite part.  I used cane sugar to layer on top of the custard but for my Holi special, I used colored sugar and dusted the caramelized sugar to symbolize the fun of Holi.  Take a blowtorch and carefully caramelize the sugar.  If you don’t have a blowtorch – don’t worry!  I’ve included directions in the recipe card to caramelize the sugar using a broiler.  Reminder – the top won’t be as crunchy using the broiler setting but it will do the trick to caramelize your sugar.

This recipe is perfect for Holi, Diwali, Valentine’s Day, St. Patrick’s Day, or pretty much any occasion you want to celebrate.  I might even make this again for our next date night.  Feel free to add berries.  I chose not to this time because I wanted the colors to shine.

I hope you enjoy this as much as we did!  Feel free to follow and share comments on my Instagram and Facebook pages!  I would love to hear your thoughts!

From my kitchen to yours, I hope you enjoy this decadent THANDAI INFUSED RAINBOW CREME BRULEE!

Here are the tools that I used for this recipe:

**Note: The ramekins I used are passed on to me from a family member but the ones I’ve featured in the tools list are the closest in size and shape to the ones that I used.

Simple Homemade Crunchy Granola

Sweet, crunchy, nutty, and deliciously addicting!  This Crunchy Granola has it all and it is so quick and easy to make!  Add it to your yogurt, cereal or eat it for a snack.  It also makes a great gift!

I’ve got this friend Michelle.  She is one the most amazing moms I know.  She and I are workout buddies, lunch wine partners, we turn to each other when our children worry or frustrate us, and she’s who I bounce my recipes off of all the time.  Between our busy schedules, toddler/kid tantrums, and crazy lives whilst dealing with Covid, somehow we always find time to talk about food.

Whether we discuss what’s for dinner, ordering out, trying to find ways to get our kids to eat breakfast in a decent amount of time that is faster than a snail’s pace, food always makes its way into our daily conversations.

Several years ago, I had hosted an Easter Egg hunt and brunch potluck.  Michelle was kind enough to volunteer to make some granola.  Before this, I never thought to make granola at home, we always bought it.  Man it was good.

At that time, my oldest was not really fond of eating granola.  At another time, we were invited over to their place for brunch and sure enough there was granola.  Michelle’s daughter Eleanor called it crunch-crunch and of course, in toddler language, that was good enough for Sanaya to start eating granola.

This crunchy granola recipe is in honor of Michelle and Eleanor who introduced homemade granola to my family after which we have never turned back to store bought.  It is especially a nod of thank you and love to Eleanor’s love of crunch-crunch.

WHAT MAKES THIS GRANOLA SO CRUNCHY?
I’ve recently learned a secret during my experiments in the kitchen.  If I melt the maple syrup and olive oil together for a couple of minutes.  Once I’ve added this to the granola mix and it starts to cool down, the maple syrup starts to coagulate.  As this heats and cools during the baking process, it will help the granola harden into one large chunk which you can then break into pieces.

WHAT MAKES THIS SO SPECIAL?
The simplicity of this granola I think is what I love best.  It literally takes me 3 minutes to combine all the dry ingredients, another 3 minutes to heat up the syrup and oil and add it to the granola mix.  After that, basically a waiting game for the granola to cook and cool down enough so we all can eat it without burning our mouths.

I always use coconut in my granola – it’s a staple I don’t think I can live without in my granola.  As for the nuts, I chose to use almond slivers and pistachios.  I kept the pistachios whole for an added crunch and they taste SO good roasted.  You can easily give them a rough chop if you have little ones who are not able to have whole nuts just yet.

Well… what are you waiting for?  Go ahead.  Try this recipe and get hooked like we have!

From my kitchen to yours, I hope you enjoy this deliciously Simple Homemade Crunchy Granola.

Here are the tools I used for this recipe:


Springtime Lentil Salad

Spring is almost here.  I can feel it in the air and I’m so excited!  It’s one of my favorite seasons when all the flowers bloom, the grass is luscious green, and the weather is perfect!  This amazing lentil salad is a nod to that feeling and to welcome spring in my life because I cannot wait a moment longer.

Perfectly cooked, tender lentils, crisp and juicy bell peppers, fresh mint, sweet pomegranates, sharp onions, the crunchy cucumbers all drizzled with a fresh basil vinaigrette.  How can you say no to that?  While the lentils are cooking, you can chop the veggies and make the vinaigrette so all you have to do is toss the salad together when the lentils are done.  Make this on the weekend as part of your meal prep, have it for lunch, or even serve it for dinner as a side.  It’s so versatile, quick, easy, and delicious.

Not only does this wonderful lentil salad taste good and is quick to make, it is packed with protein and nutrients.  Check it out:

  • Great source of protein – 13 gm per serving
  • 23% DRI of Fiber
  • 30% DRI of Iron
  • 24% DRI of Phosphorous
  • 77% DRI of Vit. C
  • 127% DRI of Folic Acid
  • 60% DRI of Vit. K

In addition to how nutrient dense this salad is and delicious it is to gobble up, I love how versatile it is.  Add in some goat cheese for a little decadence, change out the mint to parsley if the mint is too strong for you, add in a few more veggies for more crunch or even toss in some nuts if you please.

So… try out this delicious Springtime Lentil Salad and welcome the new season with me!

Here are the tools I used to make this recipe:


Sprouted Moong Beans Sabzi Gujarati Style

Growing up, my Mom would make these sprouted moong beans for dinner often.  I remember my brother and I were not big fans and would hate eating them.  Now that I’m an adult, maybe a switch has flipped?  I don’t know but I definitely love this recipe and could easily eat this dish 2-3 times a week.  Thanks Mom!

WHAT ARE SPROUTED MOONG BEANS?
Sprouted moong beans are basically moong beans that have been soaked in water then left in a warm place to germinate.  They are very popular in Indian and Pakistani cooking though many people across the globe are starting to embrace this food more and more.
Some of the more popular ways to eat sprouted moong beans is to add them in to salads and sandwiches, however, some of the more traditional ways to make them is to make a curry, a sabzi, and even dosas out of these delicious babies.

WHY SHOULD I EAT SPROUTED MOONG BEANS?
Because they are a powerhouse of nutrients.  These legumes are one of the best sources of plant based protein providing ~14gm in 1 cup cooked.  Take a look at some of these other benefits:

  • Fiber: 15.4 grams
  • Folate (B9): 80% of the Reference Daily Intake (RDI)
  • Manganese: 30% of the RDI
  • Magnesium: 24% of the RDI
  • Vitamin B1: 22% of the RDI
  • Phosphorus: 20% of the RDI
  • Iron: 16% of the RDI
  • Copper: 16% of the RDI
  • Potassium: 15% of the RDI
  • Zinc: 11% of the RDI

WHERE CAN I GET SPROUTED MOONG BEANS?
Moong Beans are easy to sprout at home (I love this method provided by Piping Pot Curry) or you can find them at your local Indian or Asian grocery store.

So now that you know what I know about these delicious and nutritious legumes, let me tell you how to make them.  This particular recipe is my mom’s (I’ve not made a single change to it because it’s so perfect the way it is!) and I love the simplicity of it as it carries a depth of flavor too.

There are two methods of making this dish.  One is in the instant pot and the other over the stove.  I’ve given both versions in the recipe card below so feel free to try both to see which you prefer!

From my kitchen to yours, I hope you enjoy these Sprouted Moong Beans as much as we do!

Here are the tools I used to make this recipe:


Rose Pistachio Ice Cream

Who doesn’t love ice cream?  And this delicious and timeless combination is perfect to surprise your significant other or loved ones for a great Valentine’s day (or any special day) dessert.

It’s luscious, creamy, tasty, and has this gorgeous pink hue from the rose syrup that is so pretty! The best part, I didn’t have to cook it and I spent less than 10 minutes making it!  The hardest part was waiting for the ice cream to set!

Pistachios are an evergreen favorite of mine.  I add it to anything I can and pistachio ice cream is a favorite of mine.  For Valentine’s Day, I wanted to add a little symbol of love to this recipe and what beats roses for love day?  As I experimented, the addition of rose syrup was a given but I played around with rose water also because while the syrups lends a sweetness and a beautiful pink color, the rose water is where the aroma comes in.  That beautiful, sweet rose flavor makes me think of flowers in the house!

Go ahead, give this a try for your loved ones this Valentine’s Day and I promise you will not be disappointed!  The earthy and floral combination is sure to be a hit!

From my kitchen to yours, I hope you enjoy this delicious Rose Pistachio Ice Cream!


Here are the tools I used for this recipe:

If you love pistachios as much as I do, try out some of these other recipes:
Pistachio and Goat Cheese Crusted Spicy Lamb Chops
Pomegranate Pistachio Chia Pudding
Herb Roasted Acorn Squash with Pomegranates and Pistachios
Pear Halwa Cake
Fresco Carpaccio

Rosemary Caprese Skewers with a Balsamic Glaze

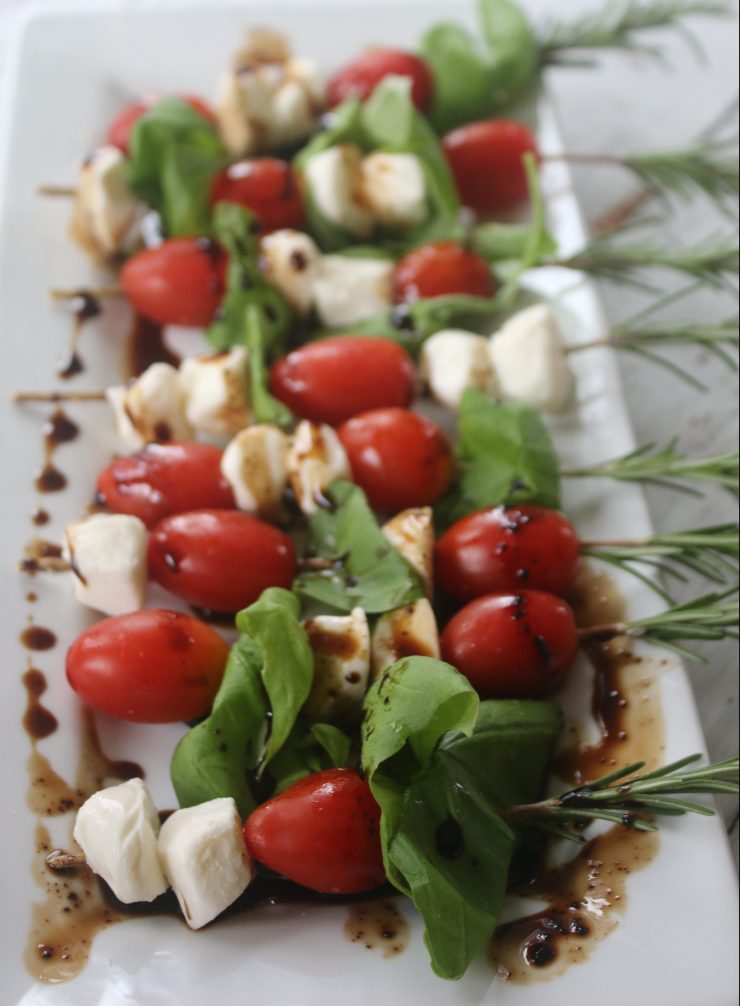
These skewers are by far one of my favorite snacks!  Often times, if I am hosting a party, they usually make an appearance.  The best part, my girls love to eat them too (minus the basil and glaze)!  Super easy to assemble, healthy, and 5 simple ingredients.  You really can’t beat that!

For the skewers, I kept the Basil in the caprese, but the addition of rosemary gives it a little boost.  Rosemary can be strong which is why just the hint from the skewers is perfect here.  Bite sized, creamy mozzarella, tangy grape tomatoes, sharp basil, the sweet balsamic glaze finished off by fresh rosemary is definitely going to be one of the best foods I eat today!

Making the balsamic glaze is pretty simple too!  I used to be nervous about making the glaze because it seemed too daunting.  Then one day, I figured, I’ll try it and see what happens.  I can’t believe I was ever so nervous!  Literally I’m boiling balsamic vinegar with a little brown sugar and that’s pretty much it!   Oh.My.God. It tastes so good, I could drizzle this glaze on pretty much anything!

So what are you waiting for?  Try out these delicious skewers and impress your guests with a fancy-ish appetizer!

From my kitchen to yours, I hope you enjoy these Rosemary Caprese Skewers with a Balsamic Glaze.

Ratatouille

The year was 2013, I had been married only a couple of months and was hosting this grand Thanksgiving for my in-laws.  My mother-in-law is vegetarian as am I and so I wanted something special for a veggie dish at the table instead of roasted veggies.

No offense to roasted veggies, I love them.  In fact I eat them all the time and therein lies the problem.  I wanted something “fancy”, something different that I don’t have on any given night.

So I scoured the internet and landed upon this gorgeous picture of Ratatouille and thought, I can make this!   And I did.  It didn’t look so pretty but hey, that’s ok, I hoped it would taste delicious though.  It was bland.  There literally was no flavor profile to it and safe to say, both my mother-in-law and I were disappointed.

She was nice enough to pretend it was good but I couldn’t even do that!

So ever since, I’ve been on a mission to create a Ratatouille that has layers and dimensions of flavor.  Safe to say, I think I found it!

Here’s the secret!

  1. Make a sauce that keeps everyone wanting to lick it off the plate
  2. Season the top of the veggies and not just with salt and pepper!  With actual herbs!
  3. Make enough sauce so that veggies are half drenched in it and the rest will cook in the steam of the boiling sauce in the oven.

I have been playing with the recipe for a while now and when I made the final version, I was satisfied aesthetically.  The question was, would my girls eat the eggplant in it?

Recently, they’ve become very finicky eaters and it can be a real struggle to feed them even their favorite foods sometimes.  But they both ate all the veggies and I couldn’t have been a prouder Mama!

Try this out for your next Holiday dinner, weeknight surprise, or Sunday dinner.  It’s easy to make ahead, stores in the fridge and freezer well and is fairly simple to make!

From my kitchen to yours, I hope you enjoy this delicious Ratatouille!

The tools that I used to make this recipe are:

Spinach Stuffed Chicken Casserole

The original idea with this recipe was to make Spinach Stuffed Chicken Breasts.  But I sent hubby to get this week’s groceries.  I’m not sure if I’ve shared this before but sending the hubby out for groceries is always picking a random card from a deck.  You never know if you will get the groceries you asked for but he will definitely come back with items you never knew about or sometimes with everything but what was on the list.

Luckily this time, I did get my chicken….. just not the breast – he came back with tenders.  So imagine my surprise when I’m in the middle of making dinner and I have chicken I cannot stuff.  Since it was almost dinner time and I would very quickly have 2 little munchkins turn into monsters if not fed, I had to do some quick thinking.  Between my hubby’s quirky shopping and my quick thinking, I’m excited about this casserole!

The kids loved it and the hubby took seconds and leftovers to work for lunch!  Talk about a win-win.  Anyways, on to the this delicious recipe!

I love this recipe because it’s fairly healthy, easy to make and not much fuss!  You can even make it ahead and keep it in the fridge, then just pop it into the oven when you are ready for it.

The stuffing is easy with spinach and cream cheese being the star.  I kept the chicken pretty simple with just a salt and pepper seasoning because I used my Veggie Pasta Sauce for the top and then layered on some cheese to give it a little melty, gooey finish.

Try it out and tag me to tell me what you think!  From my kitchen to yours, I hope you enjoy this Spinach Stuffed Chicken Casserole!

Garlic Herb Pizza Dough

Dough just before it’s smoothed and oiled to set aside so it can rise

Pizza is one food my girls are very picky about.  I know… I was surprised too!  Usually, kids love pizza but my oldest decided she didn’t like pizza after having it at 7 different birthday parties in a span of 1 month.  I get it, I totally do.  I would be tired of it too!

For me, pizza is the ultimate go to with unlimited toppings and variations.  I didn’t want Sanaya to feel an aversion for one of the most loved foods on this planet so I stepped in.  After trying so many different pizzerias, I finally decided to make it at home.

Obviously could not wait to eat this….!

This Garlic Herb Pizza Dough is so delicious and light.  When the dough is rolled out, it’s not too thick and makes for a nice flatbread.  Some days, I will roll it out into 1 large pizza and others, I’ll get the girls involved and have them decorate their own personal pizzas.  Either way, you can’t go wrong with this delicious garlic-y, herb-y pizza dough!

Try it out!  It is so delicious!
From my kitchen to yours, enjoy your pizza party!

Spinach Chickpea Stew with Garlic Couscous

I’ve recently learned that my girls like chickpeas in any form.  I used to think it was just Roasted Masala Chickpeas that they gobbled down, but I’ve been paying attention and I’m glad I have!  Watching both of them gobble down this stew was amazing.  They are one of the few girls who also love to eat spinach in any form, cooked or uncooked (I feel blessed) so I knew I was going to use it to give some green to this dish!

I’m totally adding this to my weeknight meal list as it took me only 20 minutes to pull together!  I got the couscous started on the side and takes only 15 minutes to make!

Can you tell I’m ready for the autumn season to begin?  I’ve had a fun summer enjoying the hot weather but between the smoke from all the fires and a broken AC during the multiple heat waves, I am looking forward to the end of the year.  Hot stews are just the thing to warm you up during the cold months and this recipe is a great one where you get to spend more time enjoying the food than making it!

Try it out and let me know what you think.  Tag me on Instagram @bitofspice146 and use the #bitofspice146 hashtag.   I would love to see your versions of my recipes!

From my kitchen to yours, enjoy this delicious stew!

Instant Pot Rajma (Kidney Beans)

I feel like almost every culture has their version of beans and rice.  There’s the Latin style with adobo seasoning, the African style flavored with smoked paprika and garlic, Creoles use the “holy trinity” for theirs, Jamaican red beans and rice have coconut milk and scotch bonnet peppers, the Japanese use Adzuki beans with their rice, and the Indians have Rajma Chawal.

Why are red beans and rice so common everywhere?

I don’t know.  But what I do know is they make a complete protein when eaten together so it’s really beneficial to vegetarians and vegans who don’t get their complete proteins from animal protein to feel full.

I never thought Rajma was all that special until my friend Sumit made it one day.  He makes the most amazing Rajma so I never bothered to learn because I could just call him up!  But now he’s moved to a different state and it’s not as readily available so I have tried and tried and tried to perfect my Rajma.

From my kitchen to yours, I hope you enjoy this classic dish of Rajma!

Samosa Puffs

Every Indian household is sure to have samosas for any occasion.  Whether we were visiting relatives or friends, at a wedding, holidays, celebrations of any kind…. well, you get the point!  Samosas everywhere.  When I went off to college, my mom used to make dozens and dozens and put them in large zip top bags that I would freeze and microwave them as I was in the mood for them.

My roommates and friends at college also benefited.  There were many nights sitting in our common room studying over samosas, sharing heartbreaks or girl talk or just hanging out.

These samosa puffs are a fun twist to the traditional samosas that are usually filled in a cone made of freshly  kneaded dough.  The girls had fun with the flaky pastry and loved that I kept the filling with the traditional potatoes and peas that they are used to.

From my kitchen to yours, I hope you enjoy these delicious Samosa Puffs!

Methi Thepla

Growing up in a Gujarati household, anywhere we went, you were guaranteed to have theplas packed.  Whether we were traveling by car, plane, train, pretty much any vehicle, Mom would always have a foil packet filled with theplas.  I would always get annoyed that we would be the family opening a packet of “Indian smelling food” but guess what…. I am my mother now.  Quick to make, easy to pack, not much fuss and muss associated with them, and filled with nutrition, they are the perfect snack or meal to have.

Easy to eat anywhere on the go, similar to a thin tortilla, theplas are made by adding fenugreek leaves (methi) to the dough before kneading it.  Instead of water, this dough uses yogurt as a binder making it a healthy and delicious meal or snack.

Fenugreek leaves are an under appreciated green that I have not seen outside of Indian food culture.  Some of the healthy benefits they provide are:

  • lowering blood sugar
  • reducing cholesterol levels
  • reducing inflammation
  • increasing milk production for nursing mothers
  • help with appetite control

Adding in the yogurt to knead the dough helps provide calcium and protein.  I use a multi grain flour to make these and between that, the yogurt, and the fenugreek leaves, 3 of the food groups are already incorporated into these theplas!

Added benefit, “roti” and yogurt is one of the girls’ favorite meals so it’s easy to sneak in different veggies and they’ll gobble it up.

Try out these methi theplas at home and I hope you like them as much as we do!

From my kitchen to yours, enjoy!

Chimichurri Sauce

This chimichurri sauce is a must have in your kitchen.  Traditionally served with meats, I use it on salads, meats, and vegetable dishes.  I first had this a couple of years ago when I was trying out a new recipe.  I love the simplicity of the flavors combined with the layers of all the elements you can taste. Continue reading “Chimichurri Sauce”