Minestrone Soup
A hearty and nourishing Minestrone Soup made with fresh vegetables, beans, and pasta. A comforting, nutrient-packed meal perfect for cozy fall and winter days.
Continue reading “Minestrone Soup”

A hearty and nourishing Minestrone Soup made with fresh vegetables, beans, and pasta. A comforting, nutrient-packed meal perfect for cozy fall and winter days.
Continue reading “Minestrone Soup”

Warm up with this cozy Fall Nourish Bowl — packed with roasted veggies, quinoa, and creamy hummus for the ultimate autumn comfort meal. Nutritious, hearty, and full of seasonal flavor!
Continue reading “Fall Nourish Bowl”

Discover a fresh take on hearty veggie barley soup! Packed with vibrant, nutrient-rich vegetables, this homemade version brings comfort and flavor without the heaviness. Perfect for cozy days or when you’re craving a healthy, feel-good meal.
Continue reading “Lentil Barley Soup”

This delicious Rainbow Tofu Bowl is the latest buzz in our household. Packed with nutrient-rich veggies and protein-packed tofu and quinoa, this dish is as visually stunning as it is delicious. Whip it up in no time for a nourishing and satisfying meal that celebrates the beauty of nature’s bounty.
Continue reading “Rainbow Tofu Bowl”

Indulge in the cozy comfort of a timeless favorite with this Leek, Potato, and Pea Soup. Let each spoonful transport you to a world of warmth and flavor. Embrace simplicity and nourishment in every bowl.
Continue reading “Leek, Potato and Pea Soup”


Delight your taste buds with our Crispy Purple Cabbage, Edamame, and Brown Rice Glazed Teriyaki Bowl! Experience the satisfying crunch of cabbage, the pop of edamame, and the wholesome goodness of brown rice, all dancing in the flavorful embrace of teriyaki-glazed eggplant and mushrooms. A delightful twist to add a plant-powered flair to family meals.
Continue reading “Rainbow Teriyaki Bowl”

Indulge in the exquisite symphony of flavors with our Butternut Squash and Sage Risotto. Immerse your senses in the nuanced sweetness of roasted butternut squash, complemented by the fragrant dance of fresh sage.
Continue reading “Butternut Squash and Sage Risotto”

One of the best things about the Fall season is pumpkin bread. The spices and the aroma when you are baking it compares to no other. It makes me feel so warm and cozy and ready for the winter.

I love this pumpkin bread recipe because:


The girls have been eating it in the mornings with breakfast and I love having a slice in the afternoon with my cuppa chai. It’s perfect to snack on any time of the day! And with the holidays right around the corner, make an extra batch for a relative or neighbor. What a great gift to give too!

If you like this Pumpkin Bread recipe, try out….
My Spiced Pear Loaf and Zucchini Bread.
From my kitchen to yours, I hope you enjoy this Pumpkin Bread!
The tools that I used for this recipe are:

The amazing taste of ground nuts, just a hint of sweet, and the nostalgic flavor of halwa that any Indian can recognize. This Pear Halwa Cake has become so popular in my household, I’ve actually been making it almost on a weekly basis. Continue reading “Pear Halwa Cake”

Discover the magic of Rustic Veggie Bake – where vibrant flavors, aromatic herbs, and fresh veggies collide. Prepare it ahead for intensified, mouthwatering goodness.
Continue reading “Rustic Veggie Bake”

Delight in the velvety texture of Punjabi Kadhi, a beloved yogurt-based curry, intricately infused with an aromatic blend of spices, cherished and passed down through generations, making it a soul-soothing delight for families worldwide.
Continue reading “Punjabi Kadhi”

Creamy polenta topped with seasoned veggies, black beans, pico de gallo, and all the toppings that the whole family will love.
Continue reading “Tex Mex Polenta Bowl”

These Cauliflower Steaks with Hummus Dressing are simply seasoned with a balsamic marinade and making them absolutely delicious. Tender and packed with flavor, the pomegranates add a but of crunch, the hummus adds a bit of tang. It makes the perfect vegetarian meal or side dish.
Continue reading “Cauliflower Steak with Hummus Dressing”

A simple classic, this slow Roasted Tomato Soup is rich, creamy, and comforting. Made with roasted fresh tomatoes, onions, garlic, and fresh basil, this tomato soup is full of flavor. Get your grilled cheese ready because this recipe will have you praying for a rainy day and savoring every element of the season.
Continue reading “Roasted Tomato Soup”

The year 2022 has been very eventful for us. We’ve had lots of travel, covid, a kitchen renovation, and so much more. Crafting and creating has been challenging but fun nonetheless in all of these environs. So here are my top 15 recipes that were the most popular this past year. I’m so happy you enjoyed them as much as me!
I wish all of you a healthy and Happy New Year as you read the top 15 from this year based on reader reviews and responses. I hope to continue growing and sharing my love of cooking with you in 2023. Here are the top 15 recipes of 2022.
Sprouted Moong Beans Sabzi Gujarati Style

Growing up, my Mom would make Moong Bean Sprouts Sabzi often. My brother and I weren’t the biggest fans (though a big part was that we wanted American food like the rest of our friends, not DBRS (Dar Bhaat Rotli Shaak) everyday.
Now as an adult, I see that Mom was making one of the healthiest plant proteins out there to make sure her kids got their nutrition. And now I’m doing the same. Maybe not as a child, but definitely as an adult I love this sabzi. Super simple to make, in less than 10 minutes, a depth of flavor from various spices, and packed with a powerhouse of nutrients, it’s a win win!
Pistachio Pudding Bundt Cake

A simple bundt cake that is moist, light, fluffy, and a little crunchy. Fresh ground pistachios in the cake with some more drizzled over the top of a beautiful sugar glaze, this Pistachio Pudding Bundt Cake is beautiful to look at and divine to eat.
Roasted Rainbow Veggies

Roasting vegetables is one of my favorite ways to eat any vegetable. Having several different colors and cooking them together is the best in my book! You get plenty of vitamins and minerals and the different colors are just so pretty to look at! These Roasted Rainbow Veggies are the perfect way to serve your veggies for adults and kids, making them fun, easy, and healthy.
Mango Lassi Loaf Cake

Light, moist, and elegant loaf that tastes like Mango Lassi and is made without butter and eggs.
Lemon Chickpea Orzo Skillet
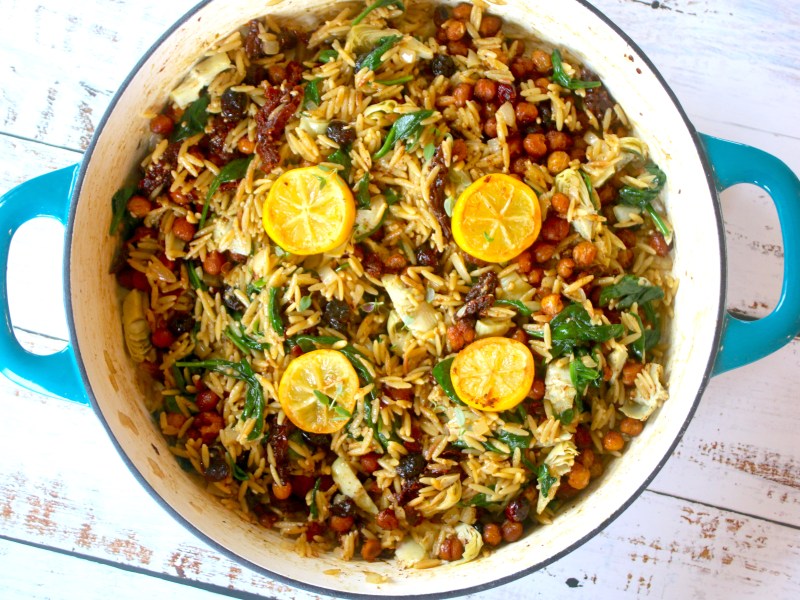
An effortless one skillet vegan recipe filled with sun-dried tomatoes, artichokes, chickpeas, spinach, grilled lemon slices, and of course orzo! Simple, healthy ingredients that come together quickly for a perfect weeknight meal, this Lemon Chickpea Orzo Skillet is a dish that everyone can enjoy!
Teriyaki Tofu Noodle Bowl

Crispy, sweet, and salty bites of tofu paired with sauteed bright broccoli on a bed of rice noodles. It can’t get any better than this. Filled with protein, this Teriyaki Tofu Noodle Bowl is perfect for a weeknight dinner or lunch prep.
Blackened Fish Tacos with a Garlic Sriracha Aioli

BBQ season is for grilling and though I love making the traditional burgers and hot dogs, I wanted to get away from the usual and do something different. These Blackened Fish Tacos are perfect with a Garlic Sriracha Aioli. A flavorful rub, crunchy carrot and cabbage slaw, the aioli to cool things down a bit and the jalapeños to add just a kick at the end of each bite is the perfect summer combination for me.
Couscous Arancini

Arancini is quite possibly one of the best things anyone could have created! Creamy, cheesy, fried balls dipped in warm marinara….yep, definitely calling my name. For a little twist, I used leftover pearl couscous instead of the traditional arborio rice risotto to make these.
Middle Eastern Vegan Protein Bowl

Simple to make and ready in just 30 minutes, this Middle Eastern Vegan Protein Bowl has everything to make your belly happy! Hint of tangy, spicy, herby, crunchy, and creamy, I love every bite I take! Filled with almost 20gm protein, 50% of your daily recommended fiber, and 40% of daily recommended iron, it is one of the most nutrient dense meals out there! Side benefit, you get 4 different colors of veggies in 1 meal!
Rainbow Farro Salad

I love eating in color and this gorgeous Rainbow Farro Salad has an abundance of it. Vivacious and crunchy purple cabbage, bright red bell pepper, pretty yellow cauliflower, tangy feta, earthy dill, and so much more. All of this drizzled with just enough olive oil and lemon juice to bring it all together so beautifully that each bite has you saying Mmmmmmmm.
Chickpea Chocolate Chip Cookies

Grain-free, gluten-free, and vegan, these chickpea chocolate chip cookies are out of this world. Pillowy soft, fluffy, sweet, melt in your mouth, chunky chocolate chip cookies.
Rose Pistachio Ice Cream

Creamy, luscious, velvety, and decadent, this delicious Rose Pistachio Ice Cream is sure to make you smile in satisfaction. Bonus, it requires no cooking and no churning! It has become my new obsession and I’m sure it will become yours too!
Rosemary Olive Artisan Bread

Rosemary Olive Artisan Bread has a beautiful crust with a chewy inside filled with olives and fresh rosemary. It is easy to make because there is no kneading required. The scent and taste of warm bread and the ease of this recipe will want you making this bread over and over again.
Creamy White Bean Soup with Spinach

What is more comforting than a hot bowl of bean soup on chilly winter days? This quick recipe will have you feeling warm in no time. It’s also great for preparing large quantities so everyone can enjoy it! Nutrient dense and full of fiber, each bowl is also filled with 15gm protein!
Almond Butter Muffins

These healthy almond butter muffins are the perfect tasty treat. They are ideal to add in the lunchbox for a snack or dessert, or even to eat for breakfast. Each muffin is so soft, fluffy, and creamy all at the same time that I have to try not to gobble them down myself!
Thank you so much for making 2022 so special for me. I have enjoyed and embraced cooking for you. Which recipes have you tried? Feel free to leave comments below, or tag me with your pictures on Facebook or Instagram.

A delicious and creamy soup that is hearty and pure comfort food during the cold winter months.
Continue reading “Roasted Fennel and Potato Soup”

Simple, easy, earthy, and sustainable, this delicious Carrot Top Pesto is a versatile dish that can be used as a sauce, dip, or a topping.
Continue reading “Carrot Top Pesto”

An effortless one skillet vegan recipe filled with sun-dried tomatoes, artichokes, chickpeas, spinach, grilled lemon slices, and of course orzo! Simple, healthy ingredients that come together quickly for a perfect weeknight meal, this Lemon Chickpea Orzo Skillet is a dish that everyone can enjoy!
Continue reading “Lemon Chickpea Orzo Skillet”

A healthy vegetarian rainbow salad filled with red cabbage, roasted veggies, herbs, feta cheese, chickpeas, and farro.
Continue reading “Rainbow Farro Salad”

**Original blog posted March 2020. Updated March 2022**
Kali dal is a very popular Punjabi dish and one of those comfort food meals that my husband has grown up with. It has also become one of Sanaya’s favorite comfort foods too so of course I had to find a way to perfect this recipe for both of them. I would say this recipe rotates in our house at least every 2 weeks.

I love it for its nutritional content, loaded with protein, fiber and low in carbs and calories. With all the rainy days we’ve had recently, this is one recipe I can’t pass up. An easy, one-pot meal, this goes great with naan or rice.

Yep, I put a ton of jalapeños as a garnish. Traditionally, it’s cilantro. But, it actually tasted good with the extra jalapeños on top!
A while back, we had a potluck and playdate with my friend Janani and her family. I don’t remember what I made, but I do remember that both my husband and I fought for the last bite of her dal. It was A-MA-ZING! It had a burst of flavor to it that we were both impressed and he actually said it was one of the best dals he has had in his life…. that’s huge coming from a Punjabi!

Most recipes of this specific dal have a basic of three spices, and I’ve found pretty simple in flavor. Works great for many but Janani’s recipe just had this burst of flavor, you didn’t want to stop eating it.

I begged her for her recipe, tried making it and failed. I tried a few more times to the point my hubby was actually sick of seeing dal…….oops. So I went to Janani’s house, had her tell me exactly what to do while I made it with her watching over me. I’ve been using her recipe ever since, however, I did make a few changes to it. I know, I know, why? I changed a little of the technique on which ingredients she cooks in what order, and changed the ratio on some of the basic spices but they are all there. The changed version is what I have listed below but if you’re interested in her original version, message me and I will send it to you.

When I talked to Janani about her recipe, that’s when I figured out it’s the spices and the amount of tomatoes that she uses which give the dal its integrity in flavor. You really need to try out this recipe. It’s so delicious!
If you don’t have an instant pot, follow the same instructions for a slow cooker and set slow cooker time for 8 hours.
Here are the tools I used for this recipe:

This easy, one pan meal is a hearty and healthy vegetarian meal the whole family can enjoy. Ready in just 30 minutes, it’s nutrient dense, packed with protein and fiber. Made with simple ingredients, this Sweet Potato, Black Bean, and Brown Rice Skillet is colorful, tasty, and satisfying.
Continue reading “Sweet Potato, Black Bean, and Brown Rice Skillet”

Soft and tender on the inside with a crispy exterior, these Air Fryer Buffalo Cauliflower Wings are the perfect spicy snack for any occasion.
Continue reading “Air Fryer Buffalo Cauliflower Wings”

These tandoori cauliflower tacos are marinated in a vibrant tandoori yogurt sauce and burst with flavor in each bite. Perfect for lunch or dinner, these meatless tacos are easy to make and filling. Continue reading “Tandoori Cauliflower Tacos”

This Dragon fruit Smoothie Bowl is a beautiful, quick, and easy tropical breakfast recipe! Dragon fruit, also known as pitaya, is nutrient dense food packed with antioxidants, low calories making it a great option for vegan and paleo diets. Made with just 3 ingredients, dragon fruit, mango, and coconut water, add your favorite toppings and enjoy!
Continue reading “Dragon Fruit Smoothie Bowl”

This Creamy Vegan White Bean Soup is a healthy one-pot soup that will fill you up, give you energy, and is full of flavor!
Continue reading “Creamy White Bean Soup with Spinach”

Growing up in an Indian household meant turning to natural and food remedies for minor ailments. If you had a tummy ache, Mom made us eat carom seeds or even cumin seeds. If we had a cold sore in the mouth, she would make us keep a clove on the sore for a few hours. There are so many more remedies that my mom and grandmother used but the one I remember and is most popular these days is turmeric.

As soon the cold weather set in or the first cough or sneeze of the season was heard, my mother would add turmeric to everything we ate. She would also make us drink Haldi Doodh or turmeric milk before bed each night. As a child, I hated this. As an adult and a mom, it is now my go to. Over the years, I’ve changed it from the basic turmeric and milk to adding a few new ingredients. Take a look!

Basically, every spice added to this recipe has anti-inflammatory or antioxidant properties or both. I normally use cow’s milk when I make this for the kids but I have made it with almond milk and it has turned out just as good. I do recommend not to use sweetened milk if you are using a plant based milk as it changes the taste of the final product.

Here’s to wishing a healthy winter and a Happy New Year with my first recipe this year!
Here are the tools I used for this recipe:


This Pesto Risotto with Roasted Tomatoes and Chickpeas is creamy and cozy, bursting with flavor! Topped with roasted tomatoes and chickpeas,it becomes a luscious main course.
Continue reading “Pesto Risotto with Roasted Tomatoes and Chickpeas”

A perfect combination of fall flavors, this salad is perfect for lunch or as a side for dinner. Roasted beets and butternut squash are served over peppery arugula, tangy feta cheese, earthy walnuts, sweet pomegranate arils. Tossed in a maple dressing that is easy to make and shake, this beautiful salad is gluten free and nutrient dense!
Continue reading “Beet and Butternut Squash Salad”

This Cranberry Apple Quinoa Salad is filled with bursts of sweetness, texture, and nutrients. The quinoa soaks up a delicious Maple Dressing and the arugula gives just a hint of a peppery note. What’s best is it’s great to eat for lunch, or have as a side dish.
Continue reading “Cranberry Apple Quinoa Salad”


